Showing posts with label Monte Cassino Campaign. Show all posts

Monday, 27 February 2012

Follow the Flames: Round 2 - 800 pts

INTRO

My USSR troops were in action again (again mascarading as Greeks).  Unlike last time, both these games were tactically much more challenging and a good learning experience.


GAME 1 - Assaulting Hill 593

The battle was set in the mountains during the second battle of Monte Cassino, and the taking of Hill 593.  The rules were challenging, as neither side had the option to 'dig in' due to the rocky ground, but would automatically gain bulletproof cover if they went to ground (didn't move or fire).

As the 'assaulting' force, this left me with a significant tactical disadvantage.  The Germans would have fortifications, machine gun nests and mortars.  If I 'walked in' on this firepower, I'd be annihilated.  The Allies teams had taken considerable casulaties at this point.  How could I turn the tide?

For this game, I was fighting Kurt.  An excellent opponent, but Kurt scratched his list together with minutes to spare, would unfamiliarity breed mistakes - I hoped so.


GAME 2 - Fighting Encirclement in the Swamp

For this game I was going to be playing one of the most experienced players in the local area.  Coops has played flames for years and years and amassed a huge number of armies including an epic tonne of Russians, Germans and American Vietnam Vets.  He's played in national and regional flames tournaments.  I was pretty certain I had a fight on my hands.  Coops gripped my arm before the game, and whispered in an undertone.  "PLEASE give me a tough game!" ... he'd wiped the board with everyone so far, could I beat him?

For the first time, I was defending!  In this battle I had the option of splitting my forces over the bottom left and top right quadrants of the board.  Coops then deployed in the bottom right, with his reserves coming in top left, and the objectives he had to take doing likewise.

ARMY LIST

USSR - Rifles Battalion (800pts)
  • Command Team (Commander, 2iC, Commissar) - 30pts
  • 45mm Antitank guns (2 bases of guns as a Command Attachment) - 45pts
  • Strelkovy Company (8 bases, rifle and machineguns) - 130pts
  • Strelkovy Company (16 bases, 7 Submachineguns, 8 R/MG and a Maksim HMG) - 265pts
  • Scout Platoon (2 bases) - 100pts
  • Heavy Mortar Platoon (8 bases including 6 mortars and a spotter team) - 145pts
  • 45mm Antitank guns (5 bases including 4 antitank guns) - 85pts
My main strengths are the awesome Heavy mortars, these guys can pin and produce casualties of even dug in opponents.  My enlarged Strelkovy Batalon with 16 bases was also party to the "Quantity is quality" rule, meaning that they'd need double the number of hits (10 instead of 5) to get pinned, importantly, this meant that if they got in assault range, these boys were unstoppable.  Finally, my 45mm were my 'funny' ace in the hole.  I'd brought them along after my experience in round one of machinegun nests and they are VERY effective.  However, they'd also become increasingly useful for shooting up enemy infantry in cover, and despite the comments of my peers - I was enjoying having them aboard.

GAME 1 AXIS - Grenadier Company (800pts)
  • Command Team
  • Grenadier Platoon (7 bases)
  • Grenadier Platoon (7 bases)
  • 105mm Howitser Platoon (4 guns, spotter, command and staff)
  • Heavy Mortar Platoon (7 bases including 6 mortars)
  • 2 HMG nests
  • 3 sets of fortification trench lines
THE BOARD - HILL 593

Hilly terrain dotted the board.  This was my core advantage.  The downside was that due to the 'rocky terrain', I couldn't dig in and anything that moved was going to get a pounding.  Kurt had learnt from his earlier games and had both a four gun artillery unit AND a six mortar platoon.  These could shelter behind a double platoon of grenadiers, trenches and two HMG nests.  While grenadiers are only Trained and Confident, ALL my troops are identical.  These represent the low water mark of the german reich.  Let's hope I can give them hell!


German Defensive Line
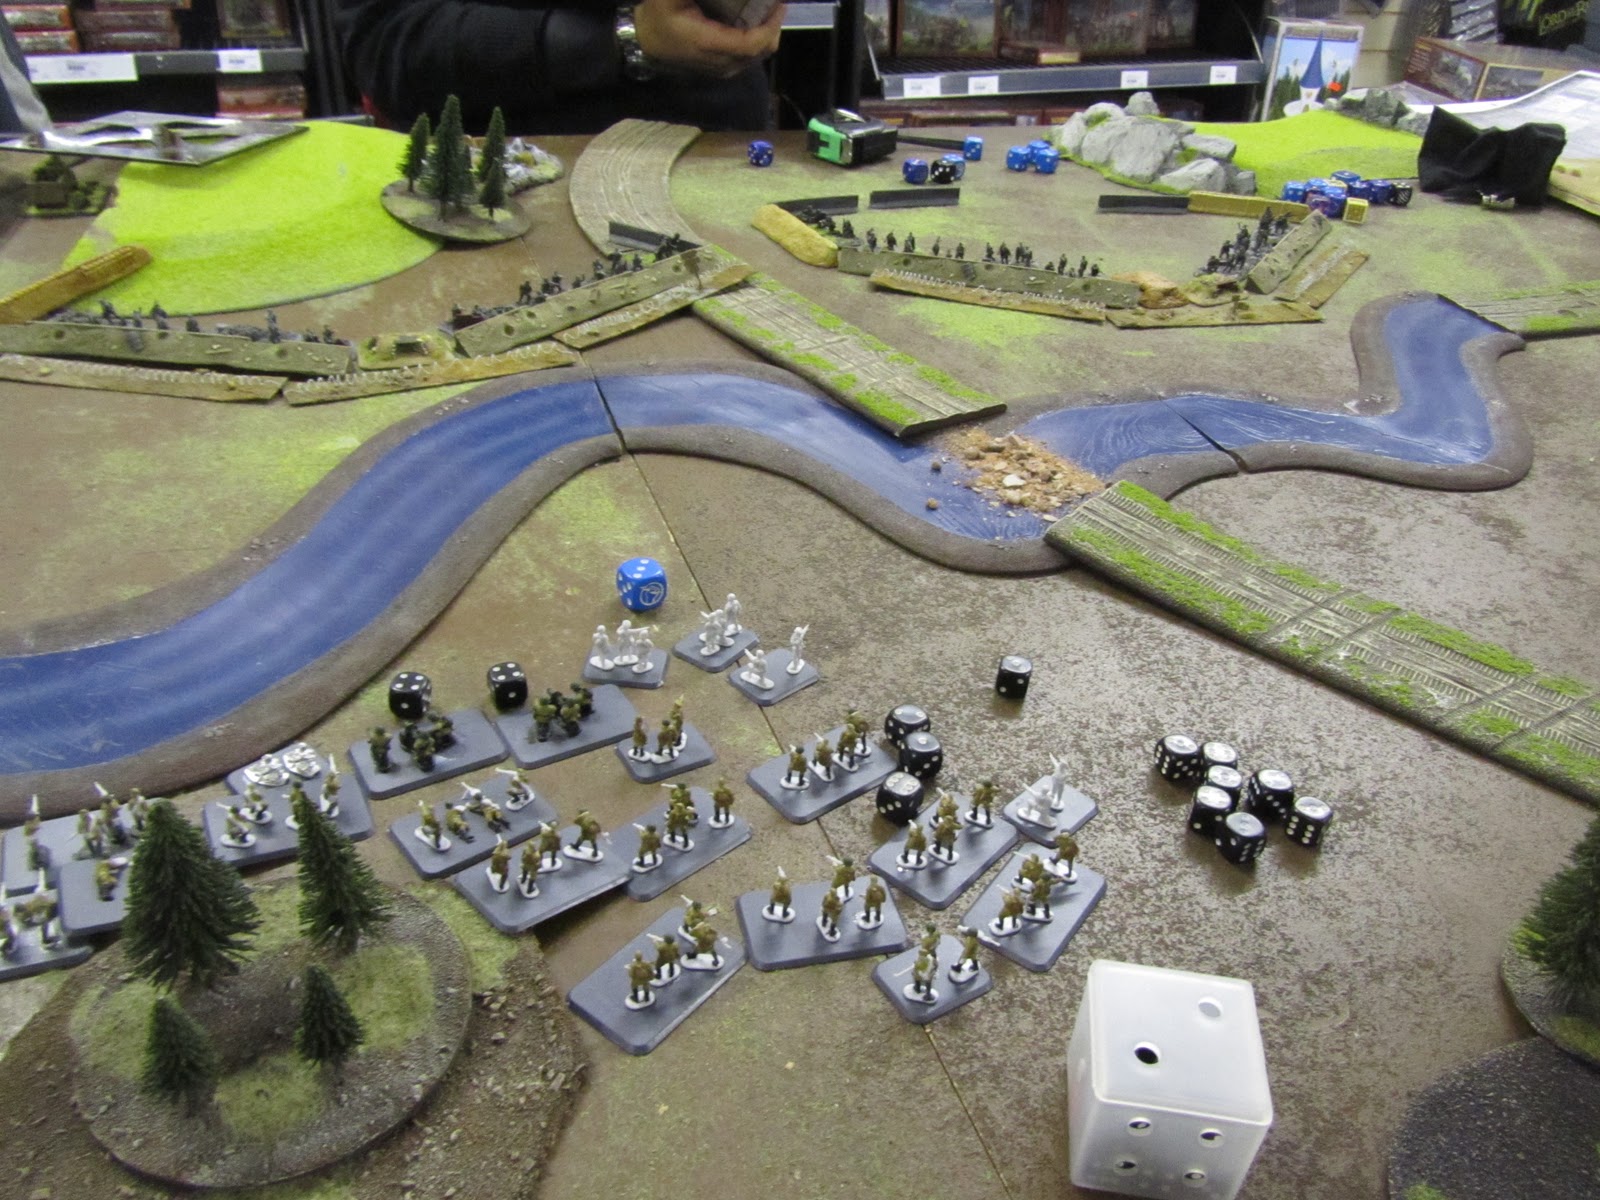
My forces (in blue) all started on the table, The heavy mortar platoon started in the top left hand corner - completely hidden behind a hill.  This meant that they could fire without being fired upon - very useful indeed.  The small platoon and Antitank guns started in the middle.  The larger platoon started at the top of the board.  Before starting the game I initiated an 'infiltration' move, using my 100pts of scouts to pull 16 bases of infantry 16" closer to the enemy.


The Germans didn't largely move all game.

Moving was risky in this game, so I went all out.  By running, I could get 100% of the huge platoon behind a large hill on the top.  This stopped them being spotted (for arty) or being shot at direct (direct fire rolls double dice against 'running' troops - ouch!)  The smaller platoon in the middle did the same trick, hugging terrain.


Russian flood from behind the hill up the left flank
Now the smart thing for Kurt to do would is to readjust his lines to ensure dominating defensive fire faced my incoming infantry.  He didn't however.  His BIG mistake.  I think he did this mainly because he was still working in "28mm mode" and thought that his infantry could see over the hill.  At only 5mm in height - they couldn't!  Realising that the only units with line of site were one shot artillery pieces and a couple of infantry, I ran like blazes at them.  Hooking behind the front line of the HMG nests - I avoided them completely.

Antitank guns move up behind their bulletproof shields to kill the HMG nests
 Now Kurt rushed to fill the gap, moving infantry across, reserves arrived that he rushed to the front lines ... but my mortars spotted them and blew them to pieces, wounding every one of them and Kurt failing 5/7 3+ cover saves!  But Rifles and Machine Guns are Rate of Fire 1 if they move.  My SMG units and most R/MG units rushed up under covering fire from my HMG and some rifle units.  The Russian firepower was devastating, destroying the Artillery with Machinegun fire alone and killing multiple infantry units.  The 'Mortered' reserve unit simply fled, many other units were pinned or engaged.  The Germans attempted a counter attack, but the defensive fire was too intense and they all died on the way in.  In one turn of assault I destroyed an HMG nest, 9 bases of infantry and a whole platoon of Artillery.  The next turn, we mopped up the remaining infantry and the AT guns wiped out the last HMG nest.

4-2 win to the Russians.

GAME 2 - Encirclement in the swamp.

Rolling for the next game (and promising experienced player Coops a tough game), I opted for a defensive position.  This would be my first defensive game and a beauty to start with.  Against such an old hand, I'd need every advantage I could get.  Coops list looked something like this:

Grenadier Company (Confident-Veteran)
  • Command HQ and 2iC
  • Veteran Rifles with 2 HMG
  • Veteran Rifles with 2 HMG
  • HMG Platoon (4 HMG and Command)
  • Mortar Platoon
In Coops opinion, Confident Veteran was the perfect mix.  Fearless is uneccessary, and costs too much.  Being Veteran means that over 16", you are almost impossible to hit.  Only certain weapons, and at certain ranges, can have much of any chance against you.

That said, as a numerically inferior force - charging out of pre-prepared positions at my lines would be suicide.  Even if they make it ... I would simply drown them in double the numbers.

The mass of heavy machine guns, while awesome in defense against an attacking army, would be handicapped by my dug in positions and bullet proof cover.

THE BOARD - SWAMP

A Complete lack of terrain combined with the fact that I was automatically 'dug in' as the defender meant that I was in a good position.  The large hill on the top right formed the base of my defence.  The Heavy mortars hid behind the hill as they could range in anything on the board and could then avoid being spotted themselves.

In front of them came the two AT guns and and both the infantry batalons.  My original plan had be to 'infiltrate' the big infantry company over towards the objectives on the bridge, in order to muck up his plans, but without this, I dug in to weather the artillery.

My defensive position with the heavy mortars positioned behind the hill
And artillery Coops definitely had.  On top of the mortars, Coops commander character had two levels of artillery to pull on.  This meant that 'off the board' mortars and artillery would be raining down on my men.  Nice!  I also had taken this 'upgrade path', so I reciprocated as best I could (but lacked the two tiers he had).

On the other flank, 4 AT guns lined up.  As long as they didn't move, they have bulletproof cover, the scouts in front of them gave them a stalling line.  I was hoping that they (and the HMG nest adjacent) would be enough of a disincentive to approach in that direction.

The Germans attempt to dig in in the face of Soviet firepower
The game opened up with some blistering firepower.  Coops failed to dig in his veteran HMG's and mortars the first turn, although they opened fire with everything they had.  They killed a couple of bases and started to worry at the large platoons - but nothing to worry about too greatly.  In return my HMG and heavy mortars targetted the HMG's in the open and pounded their lines, killing 3 out of 4 HMG's and effectively taking them out of the game.

Over the following 2 turns, the mortar teams exchanged fire, with his mortars forced to target my infantry whilst my mortars rained hell and brimstone down on his mortar teams.  By turn 4 only 1 mortar remained, this is mainly because normal mortars are firepower 6, meaning that even if you hit and they fail their saving throw, you still need a 6 to kill!  Heavy mortars are firepower 3+.  Between the rerolls to hit (see below), the 5+ cover save for the mortar teams (unlike infantries 3+) and the 3+ to overcome their bulletproof cover ... they dropped like flies.

Artillery works in a unique way in that a 'hit' hits everything under a 4" square template.  You then roll a skill check (4+ for me, 3+ for Coops vets) to hit them.  Six or more arty pieces gets you a reroll to hit.  3-4 and it's straight, 1-2 and you have to reroll every hit.  This meant the enemy mortars were completely useless.

The reserves arrive
The enemy flankers arrived on turn 3, and I turned all hell on them.  The 'god of war' mortar barrage killed 1 and the Antitank guns got in range at 16".  At sixteen inches and dug in, I needed a 5+ to hit.  But the 'volley fire' rule meant I could pour on the firepower and hits.  Giving me rerolls to hit.  The 4+ firepower made a mockery of his cover save and then the Heavy mortar plowed in.

Killing half the team, his embedded and dug in unit pass their pinning test but fail their morale check (4+) and routed.  Sometimes fearless is just what it takes.

Conclusion

The first battle was won through some intelligent movement and a mistake by my opponent.  The second battle was an uphill struggle (for my opponent).  If he'd moved, I'd have killed him.  My heavy mortars came into their own and ate his for breakfast.  Personally, I can't see how he could have won unless I'd made a serious mistake.  I didn't, I gave him a tough game ... and with 2 more turns to turn on the pressure on those Grenadiers contesting - it couldn't really have gone any other way.

Friday, 10 February 2012

Sometimes Winning sucks - brief batrep


Flames of War campaign week 2 this Wednesday gone...

Only got one game in because only half the crowd turned up.  After reviewing the campaign mission here's the setup.

He deploys a platoon and his fortifications, inlcude two mahcine gun nests around the monestary at the top of the hill.  I deploy randomly on board edges.  I roll a 3, and deploy my 45mm A/T guns with 2nd in command facing his machine gun nests.  I then roll a 5 for my rifle/machinegun platoon (with attached commissar) and deploy them in the enemy left flank.

All attackers have cautious movement.  This means that if I move normally and don't shoot/assault, I'm +2 to hit (ie a 5+ rather than 3+).  I advance on him, my AT guns move up.  He fires and misses everything.  I use volley fire @ 16" and destroy his machine gun nest.  My troops move to point blank range and then assault without shooting.

They storm into the base and start handing out death.  The A/T guns shoot up the german infantry gun.  End of round three, opponent hands in the towel.

The problem with campaign games.

Real life is rarely fair, I had Russian Infantry.  They were confident and trained, but nothing to write home about.  I was facing German elite SS Totenkopf troops with MG teams.  A single platoon for me is 8 bases (9 with Kommissar).  My opponent didn't even have that at the top of the hill.  His elites were nullified by the 5+ to hit that cautious movement gave me.  My A/T gun didn't help either.

Outnumbered and outmanuevered, it was a tough fight, but could he have won?

Options.

Totenkopf have options.  For example, by moving all his machinegun teams to the left flank of his hill, he could have delivered devastating firepower, making an assault highly difficult.  His choice of the infantry gun also had limited usage.  It's low powered and lacking range, useful on the assault, but useless in defence.  The machine gun nests ARE good, but only really against rifle/MG troops. With the machine gun nests better placed he could have challenged my location.  Bringing the infantry gun to bear on my A/T would also have helped.  MG teams are good, but some Heavy machine guns with RoF 6 would have been better AND harder to kill.

I think he could have held me off and forced me off the hill with his machinegun teams.  All he had to do was get 5 hits and any charge would fail.  Shooting would get me nothing as it's harder to hit vets than trained troops.  Using 'stormtrooper' move would have allowed him to get into position to meet the charge and still fired every turn at the full rate of fire.

On the game, I rused a total of 5 points, and my opponent just the 1, but he could have made me bleed for it.  And it didn't really feel like a win.

In a nutshell, apart from my A/T guns, I had little advantage.  Which gets me thinking on the options for round 2 and 3.  Is dropping the antitank guns really the best idea.  Or it more a better one?

Thoughts on a postcard please...

Thursday, 2 February 2012

Follow the Flames - Cassino Campaign First Round Batrep

“...behind every hill there’s another river, and behind every river, there’s another hill."

British Commandoes attempt to storm a Monastery at Monte Cassino

I know, I know - a batrep from Suneokun.  Sit your ass down and prepare to be amazed!

The Cassino Campaign kicked off last night at my local gaming store (Tabletop Tyrants, otherwise known as GiftsforGeeks).  The boards looked amazing and have done plenty to encourage me to finish off my core force for round two the week after next!

The Cassino Campaign in WW2 was one of the bloodiest and meanest battles going, and something more akin to a WW1 trench warfare.  The allies, fresh from defeating Rommel in North Africa, and hoodwinking the Germans with Operation Mincemeat and seizing Sicily, were aiming for the 'Soft underbelly of Europe'.  The problem was that the Italian Facists had gone got themselves a German personal trainer, and that underbelly had more abs than Jodie Marsh.

Jodie Marsh
For indicative purposes only ... "The Soft Underbelly" - Perception versus Reality

The Germans had picked their battlefield well.  Cassino was an extremely rocky and inaccesible environment with massive natural features and difficult terrain.  As such this environment was an anathema to vehicles, it made transport and supply lines difficult, troops could only move slowly and this greatly advantaged the defenders.  There would be no easy breakthrough, exploitation and encirclement.

To further compliment these already demonstrable advantages, the Germans went about building the Gustav line (and behind it the Hitler line and the Caesar line), these enormous fortifications spanned between the frequent hills and mountains across the whole 'leg' of Italy.  They were to prove one of the western allies greatest challenges.  Arguably far harder than the D-Day landings against 'Fortress Europe' with little vehicle support, hitting the Facists at the height of their capabilities and readiness, with the battlefield, fortifications and killspots all in their favour.

Approximately 55,000 casulaties at Cassino, compared to around 12,000 on D Day and 226,386 for Operation Overlord.  This was a very serious and bloody business, but completely overshadowed by the D-Day landings (which occured as the Cassino Victory came in).

Politically the allies were under pressure from the Russians to open up a second front, hence the punch at the 'soft' bit.  It was to prove a impossible task and arguably Cassino never fell, but was retreated from when encirclement finally seems inevitable.  The allies could never bring their numerical advantages to the fore thanks to terrain and early stage errors and bad planning.  The defence by the Germans was remarkable.


The Gaming Campaign

"Our four days and nights were absolute hell; mortar bombs continued to rain down; we had a nebelwerfer rocket through our roof; and the never-ending smoke shells meant that we were living in a world where there was no day. Our nerves were stretched to breaking point, hands shaking so much that cigarettes were hard to light. Hot meals were impossible, as was washing and shaving. My diary notes, ‘it takes all our nerves to move from our position to Company Headquarters 25 yards away’. "
 New Zealand platoon commander on fighting in the town. Ref

Flames are a very well researched and intelligent organisation.  Writing campaigns that are balanced, fun and also fulfill the history buffs is a demanding challenge (certainly more demanding than making up shite about shite, calling it difficult, taking forever AND then getting it soooo wrong, eh GW?).  As such I would recommend looking at the Flames of War Cassino Campaign Overview .

The Campaign is broken down into 'rounds' of skirmishes representing the 4 battles of the Cassino Campaign.  The Different battles represent different routes taken by the allies in and around Monte Cassino.

For this campaign, it really is a trial by fire.  The majority of the Allied gamers are new to the game, with only a handful of battles under their belts.  The German commanders have years of experience in flames at local and tournament level.  A tough ask indeed.

My first round force of 500pts, were put together from the Strelkovy Batalon (Rifle Battalion) in the Red Bear book, for the requirements of the game, I am fielding them as Free Polish Infantry, or Greek - I'm not decided yet.  They are made up of competent (Confident and Trained) troops, based around the performance in a handful of games I've fielded them so far.

Rifle Battalion - 500pts

Rifle HQ (Command, 2nd, Commissar) - 30pts
Rifle Platoon (Rifle and Machine Guns) with 2 additional Maksim HMG - 180pts
Rifle Platoon (Sub Machine Guns) with Kommissar - 145pts
120mm Heavy Mortar Platoon (6) including command and spotters - 145pts

The Battlefield.

 
The Germans are hunkered down in two entrenched positions.  They comprise 2 Grenadier units (Confident trained - same as mine), in addition to a command squad and the trench lines, they have 3 machine gun nests (which are unbelievably evil).  To make matters worse, I have to ford or swim the river, which is dangerous, difficult and makes me immensely vulnerable.  In my advantage ... well I'm attempting this at night.  Which gives the enemy a fair chance of not seeing me... I hope.

Attempt 1 - Mucking about

I'll go through this one quickly, because it's a massacre and a learning experience.  Rather than fording immediately, I get testing with the mortars and my entrenched Rifle and machine gun and Maksim machine gun teams.  3 turns of pounding later and I've caused more casualties than any of my predecessors (Dustin was wiped out without killing a stand and Jack killed one stand), but the fording is left too late.  I move up to the river turn 4, get in the river turn 5, get out the river turn 6, and don't have a chance to entrench (my objective being to 'dig in' as a beachhead on their side of the river by turn six!) ... epic fail.  I get 2 command points for turning up AND having my commander survive (at the back).  As the assault infantry resurface, dawn breaks  - game over man, game over!

Attempt 2 - no mucking about

On the second attempt I line up the SMG's, with the command team attached (in for a penny), on the river bank.  I then surge into the river turn one, while the spotters target the enemy rifle team opposite.  Not firing with either unit means that Dustin has to struggle to spot my teams,  he manages to down a few of the teams on the river, but 4 (of 6) make it across.

On the second turn I move the 4 teams onto the bank and move the other units (including the command team) into the river.  With the unit split between the river and the bank, I have no option to dig in next turn ... but must weather the fire.  The spotters rain down fire on the enemy troops, and the mortars pin the grenadiers! Yeah!  The rifles and machine guns open up, but fail to kill any.  The mortars have so far killed an enemy base.  In a brilliant turn of events, the 'view' rolls of Dustins forces suffer an epic fail and all the in range units fail to spot my shivering troops. - Wow!

Turn three sees me throwing everything against the Nazi's, the sun doesn't rise, giving me darkness as cover.  The HMG's throw everything at the closest Machine gun nest and destroy it!  (12 shots, requiring a 4+, a 6 and then another 6!).  All I need now is a good turn of space marine armour saves and I'll dig in.  The attritional firepower is immense, of the 7 teams on the bank, only 2 survive and they only just hold it together.

Turn four, it's do or die now.  The Mortars hit again, killing another stand, but failing to pin as the grenadier commander rushes across.  I feel a real sense of urgency in the Germans.  Unfortunately, dawn breaks!  The SMG and command team attempt to dig in, but after fording a river, seeing their friend massacred and rallying.  They fluff the 4+ roll to dig in.  As such, no bulletproof cover and the raking fire wipes them off the bank, despite everything I throw at them.

By turn 6 I pummel a whole platoon into desertion, and gain a +1 of the command points.  But with the death of my command team (My polish commander, injured, was rescued after the Russians bombarded the Germans into next week!  So for all the efforts, I was a 4+ away from a +4 Russian victory... and capturing the bridgehead by the skin of my teeth.

Conclusion

So close ... really, I was a 50/50 roll away from walking away with that. The Germans were unlikely to assault my position (due to their own barbed wire and my R/MG team and Maksims covering my men) and although only 2 teams he had only a 2% chance of machinegunning them down ... it was a close run thing.

Getting in and out of the river was sheer murder, and really really nasty.  3 turns of creeping and swimming in the face of enemy fire... I was helped by an astounding piece of luck.  However it clearly ran out then, as I failed 3+ after 3+ cover save.

However, everyone agreed that the river crossing was the worse of the three battles and the result, whilst galling  - was realistic.

What would I do differently, not much really.  Soviet force lists have a big chunk missing, in that smoke mortars aren't used.  This would have made the crossing a lot more possible, as a few smoke shots could have completely silenced the machineguns of the other side (for a turn).  The biggest worry for me

The other battles include assaulting a Monastery (with delayed reserves on both sides AND loads of cover (everyone is always in bulletproof cover!), or assault a barracks through the town (even more bulletproof cover).  I look forward to these.

As for the campaign ... every single allied attack lost.  A combination of entrenchment, machine-gun and tank emplacements, barbed wire, grenadiers and mortars meant that everyone struggled.

We can at least comfort ourselves that the early campaign in Cassino were equally bloody.  And take real comfort in the fact that I can pack my little men up afterwards and go home to my wife.

And finally ... a free gift to my readers

This is a superb Ministry of Defence historical PDF on the Monte Cassino campaign, with quotations, citations and great tactical analysis - Clickety Click here.  Well worth a scan!

Friday, 27 January 2012

Flames of War Campaign

I've now played a good half dozen game of Flames and in the words of another player "I haven't had an un-fun game yet."  I does seem to lack a lot of the unit crunching aspects of other games, and it's nice to have a bunch of humans fighting eachother, rather than space aliens.

Interestingly, on the 40k front.  The local club, which has connections in GW HQ, have said that the 6th edition leak is actually real and a sounding WIP.  If so, many of the changes to the core rules could make 40k a really exciting game again.

Anyhow ... back to Flames.

The local club is running the Cassino Campaign to get everyone into the game.  I've been playing around with some lists and even got a couple of test games into the mix.  The games are strickly small scale 500-900pts affairs, with no vehicles.  Cassino and the Gustav lines was one of the hardest slogs and most WW1-like campaigns in WW2.  Casualties mounted as the allies smacked head-first into some of the toughest defensive positions of the Second World War.

As such I'm taking Russians (mascarading at Greek Partisans).  At 500pts I'm fielding the following:

Rifle Battalion - 500pts

Rifle HQ (Command, 2nd, Commissar) - 30pts
Rifle Platoon (Rifle and Machine Guns) with 2 additional Maksim HMG - 180pts
Rifle Platoon (Sub Machine Guns) with Kommissar - 145pts
120mm Heavy Mortar Platoon (6) including command and spotters - 145pts

The SMG's are my assault leaders and can defensive fire or assault fire the best.  The Heavy Mortar platoon sits at the back and punches well above its weight, bringing the pain.  The Rifle/MG's have a range of 16", with the HMG at 24".  They will strive for a strong defensive position and cover a flank and offer aggressive fire.

WIP Round 2 - 800pts

Scout Platoon - 100pts
82mm Strelkovy Mortar Platoon (incl spotter) - 110pts
Sappers Rifle Platoon - 85pts

Thinking .... the scout platoon can use the 'infiltrate' rule to pull forward the Rifle Platoon into a good aggressive position.  The SMG team will be secondary to the 'sheer firepower' of two mortar companies ladling it on. The lighter mortars can also pot-shot directfire, giving them fair bunker busting capabilities.

WIP Round 3 - 1000pts


Additional Stelkovy Platoon - 110pts
Flamethrower Platoon - 90pts

Flamethrowers and Mortars - well the germans will be dug in, so what else matters.  The additional Strelkovy Platoon on the 'assault' platoon will bring this up to 15+ models, meaning that the defensive fire will need 10 hits to pin, rather than the standard 5 (Quantity is Quality rule).  As Assault platoon of Rifles/Machine guns, SMG's, flamethrowers and a command team.

Hopefully that should help crack those Fascist Bastards!