
After a long, long period, hiding in a darkened room and inventing devious ways of bringing glory to his enormous Eldar force, Devilin has emerged. Like the Imperial Guard before them, it was only a matter of time before my fledging Tau force was challenged by the eldest of the 40k races. What entailed was an epic and highly destructive battle.
One of the reason for writing up this report was to also put some practical demonstration of the Army List Tactica details in my last post. Ironically, the concepts behind the tactica become very previlent when facing an army you've never played before.
Points: 1000
Battle Type: Capture and Control
Deployment: Pitched Battle
Eldar win the roll and opt to go second.

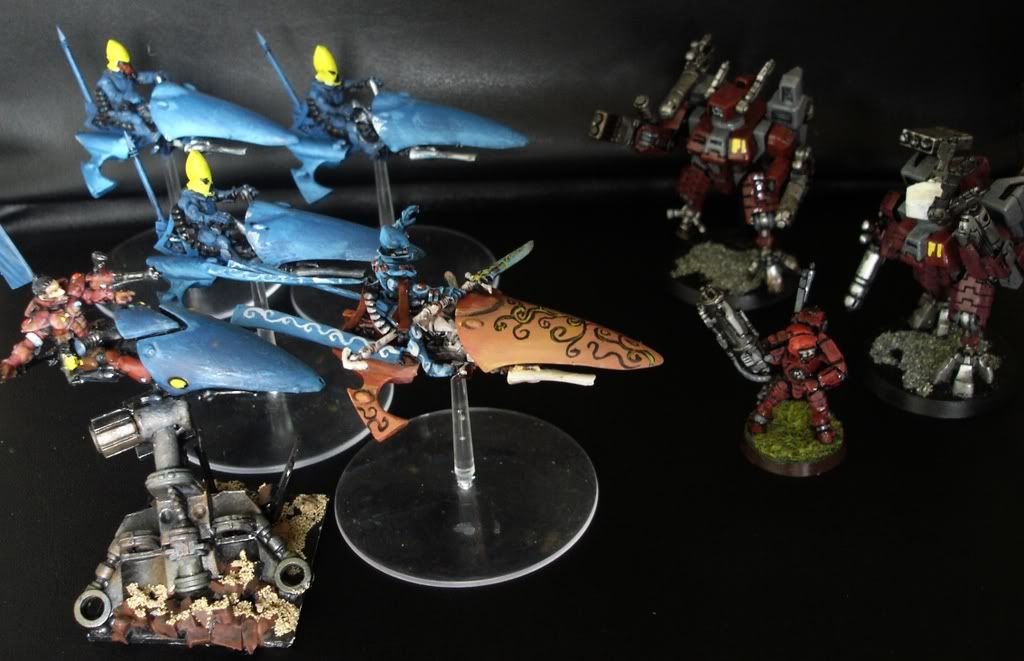
Tau Battleforce: Applying my army list tactica was straightforward as I am very familiar with the Eldar force. Applying what I knew I decided that the best approach was to go for multiple small Crisis Suit and Stealthsuit teams, bulked up by a few gundrones to frustrate the return fire. I'm a big fan on gundrones over invulnerable shields or alternative drones. This would also be my first opportunity to take some of the 'special issue' weapons available to Tau. After long thought I opted for combining both weapons on the same model - concentrating one model on 18" anti infantry firepower. A widely known, but little repeated secret is that the optimum squad size is 9. After all 8 models will need a leadership test after 2 deaths and you'll have to go to 13 models to get to 4 deaths. Therefore 9 models give you the cheapest, toughest unit.
Following the tactica, the pulse rifle teams would form a 'castle' around the pathfinders and cushion the pathfinders from flankers and deep strikers. Effectively the Troops unit would attempt to outdistanced the Eldar while offering a 'tempting target'. The Devilfish would provide close support and would place itself in harms way, helpfully attempting to engage the close combatters with its fletchette dischargers.
 Meanwhile the crisis teams and stealthsuits would attempt to ambush the fast tanks or jetbikes with devastating firepower. Too thought long and hard about taking the broadside to head off any Wraithlord (Devilin has two) - but I doscounted this as a distraction from the true purpose of the battle - killing the men.
HQ - Shas'El with Plasma Rifle, Missile Pod and Flamer, 2 Gun Drones.
HQ - Shas'El with Cyclic Ion Blaster, Air Fragmentation Launcher, 2 Gun Drones.
Elites - Crisis Suit Team [2], Team Leader with Twin Linked Plasma Rifle, Fusion Gun and Multitracker. Shas'la with Twin Linked Missile Pod and Fusion Gun.
Elites - Stealth Team [3], 2 Burst Cannons, team leader with fusion gun and target lock, two gun drones.
Elites - Stealth Team [3], 3 Burst Cannons and two gun drones.
Troops - Fire Warriors [9] Pulse Rifles.
Troops - Fire Warriors [9] Pulse Rifles.
Troops - Fire Warriors [6], Pulse Carbines.
Fast Attack - Pathfinders [6] with pulse carbines and markerlights. Devilfish with burst cannon, 2 gun drones, fletchette dischargers and multitracker.
Eldar Battleforce: The tactics behind Develin's troops was a surprise and not a surprise to me. Wraithlord, harlequins, jetbikes and warp spiders provide dangerous options on multiple fronts. The only option to me is shut down one of the prongs, and fast...
HQ - Autarch, fusion gun, laserlance, jetbikes and power weapon.
Elites - Harlequins, harlequins kisses, ShadowSeer.
Troops - Jetbikes [4] with one shuriken cannon, led by a warlock with a singing spear.
Troops - Jetbikes [3] with one shuriken cannon.
Fast Attack - Warp Spiders, with Exarch (power blades, twin death spinners).
Heavy Support - Wraithlord with BrightLance and Scatter Laser.
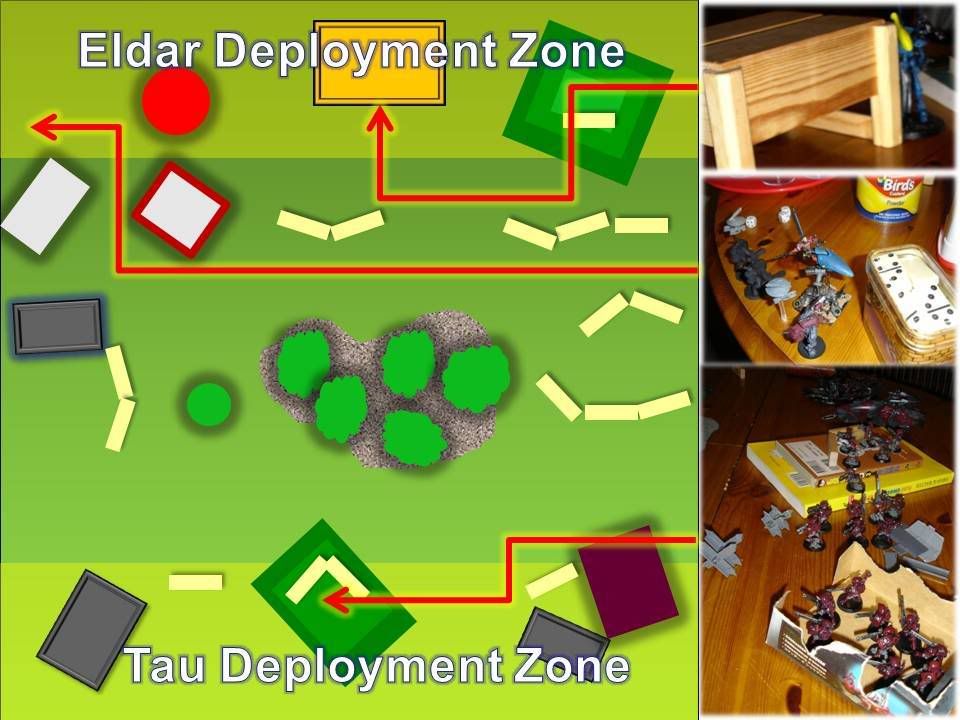 Game Board: Both Develin and I chose to place objective markers within our deployment areas, in each case the hills within eachother areas became the objective markers. With a small painted mini-genestealer positioned at the 'top' of the hill in the Tau deployment zone and Devilin opting to hide his unpainted mini-stealer objective just behind his hill.
 Deployment: In a surprise move Devilin opted to go second, and then he opted to reserve his entire army! Hence why the deployment was a partcularly lonely affair with the Tau lines setting up unopposed. Clearly, Dev's been watching a few Fritz fights and wanted to rush the objectives at the end?
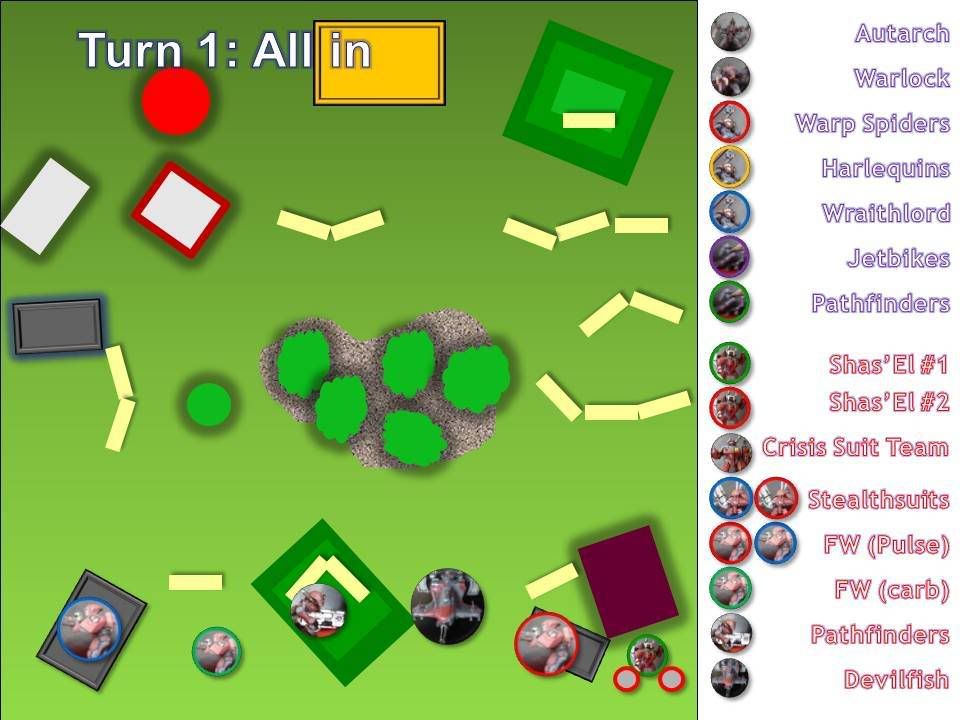 Turn 1 - With no Eldar on the team and no reserves, turn one was an unrequited turn. I opted to not move a muscle and place confidence in my gunline...
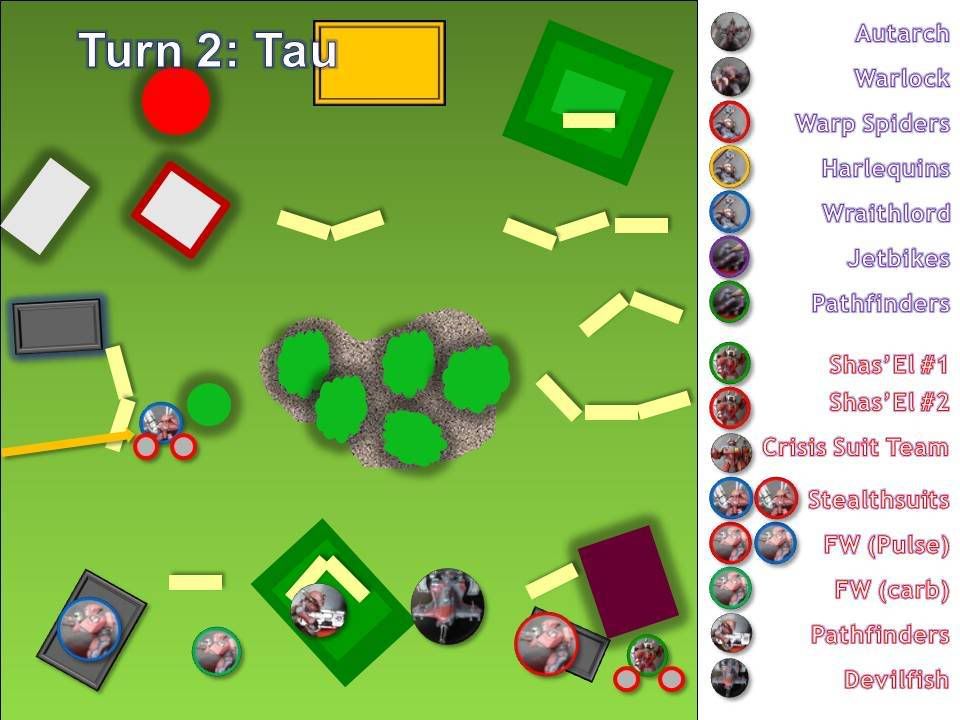 Turn 2 - Tau: After an undramatic first turn, I roll for my reserves. Luckily only my burst cannon [3] stealth team and the Shas'El come on. This means I still have 3 crisis and 3 stealthsuits in reserve. being crafty I float the stealthteam out in front of the enemy lines ... tempting tempting.
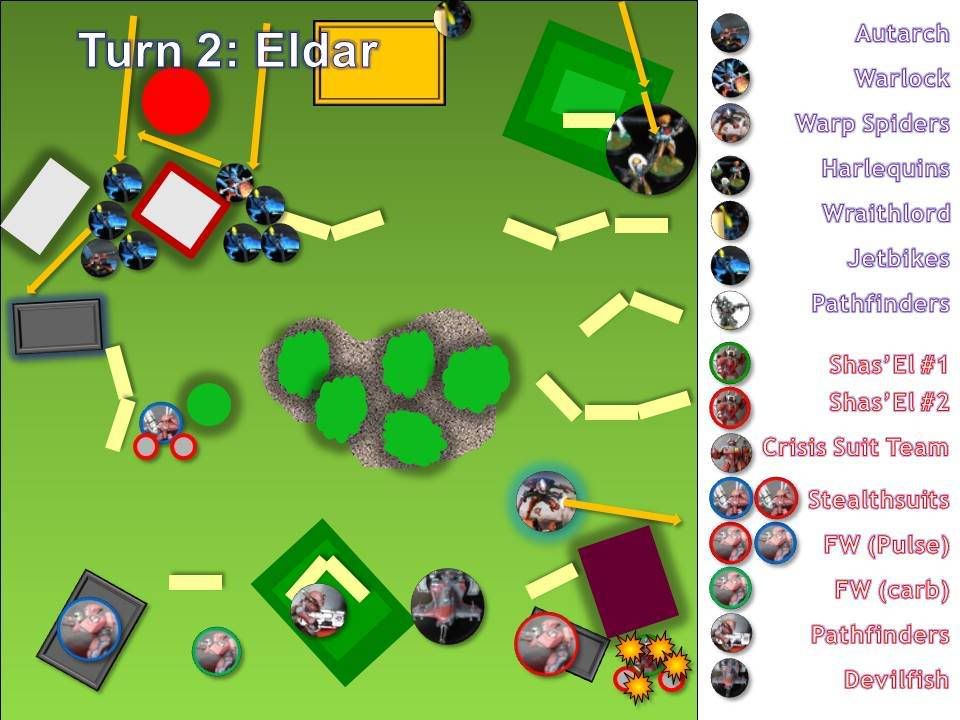 Turn 2 -Eldar: With a roar of hi-tech Elfin engines two squads of Jetbikes roared onto the board led by the resplendent (and fairly terrifying) Autarch. Surging forward 12", the Shuriken weaponry targetted the fairly surprised Stealthteam. Unluckily the two squads roll under their targeting range, only managing a paltry 10" maximum. The stealthteam breath a sigh of relief as the the jetbikes jump back into cover. Meanwhile the Harlequins surged onto the other flank, making a running move of 12". The Wraithlord (wraithsight operating on full power) stomped onto the board and immediately targetted the head of the Shas'El. More startingly, a full squad of Warp Spider deep-struck right on target and joined the Wraithlord in blasting apart the Shas'El and his gun drones.
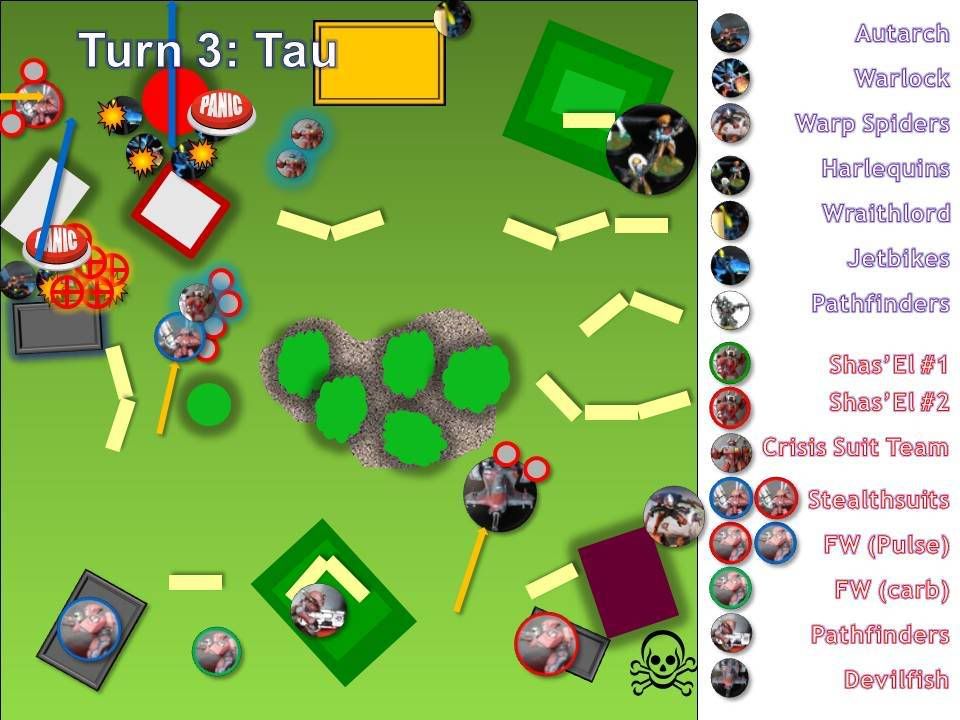 Turn 3 - Tau: Relishing my options, I nervously took the reserves roll. I needed everything on this turn to take on the threat of the jetbikes in a timely manner. The dice gods had clearly taken offence to the early demise of the Shas'El as all the reserves turned up. Placing my faith in these unruly lords I rolled for the flanking move for the other Stealthteam and arrived on the left. Taking the risk I decide to deepstrike both the other Shas'El and the crisis suit team.
  Hold your ground lads, the Eldar will be here soon ... at some point?!?
The Crisis Team deviates into open ground in front of the other team and closer to the Wraithlord. The Shas'El hits right on target and suddenly the two jetbike squads are looking down the barrel of 5 burst cannon, 5 cyclic ion blaster, 6 pulse carbine, 2 plasma rifle, 2 missile pod, 2 fusion blaster and an air fragmentation projector shot!
However, before this fire power lit up the night, the markerlights picked out the jetbike unit led by the Autarch. A total of 5 markerlights hit and I considered my options... I eventually decided to pass two bonuses to the burst cannon armed stealth team and one to the Shas'El. The remaining two I decided to use to reduce the Autarch LD10 to Ld8. Time to shoot some Elf!
First up the Shas'El targetted his AFP, but managed to scatter spectacularly off the board. The Cyclic ion Blaster was more on target at BS5 but only managed to kill 1 Jetbike with a rending shot. The associated gun drones fired, failing to kill a single model. However at BS5 the burst cannons score 8 hits resulting in 2 kills. The Autarch now faced a leadership test, usually a walk in the park, at Leadership 7 - welcome to Guard territory! His confidence buckled and he fed 3D6 towards his lines.
The other cluster of the two crisis suits and the XV25 stealthsuits opened fire on the other squad. Despite some resilient saving throws, the combined low AP1 and AP2 firepower proved too much for the other squad and without the benefit of the Autarch leadership within 12" they fled from the board.
Meanwhile, sighting the Harlequins, the Devilfish took up a defensive posture and dropped his gundrones - the devilfish, the 2 gun drones and 3 fire warriors from the left flank targetted the warp spiders on the far right but fail to kill.
 The Autarch cannot overcome the power of the targetter beam!
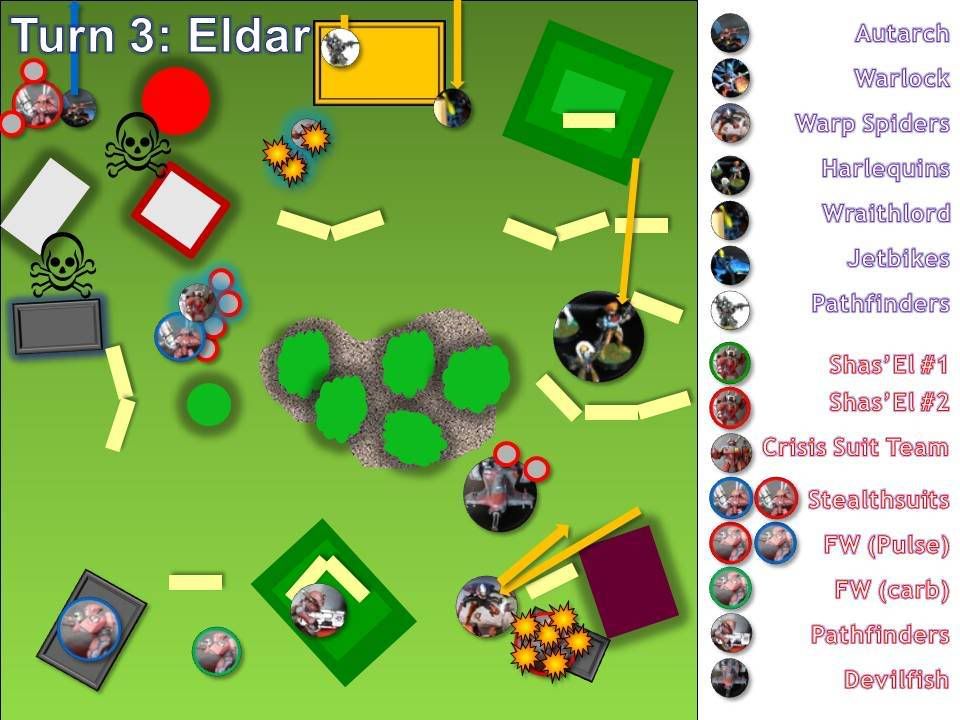 Turn 3 - Eldar: Bereft of options on the left flank, Devilin bit the bullet and brought on his troops on the right. The Autarch, within 6" of the XV25 stealthteam, fled the board.
In the centre the Eldar pathfinders took up position in the building, shooting their shuriken pistols at the crisis suits to no avail. The Wraithlord (making his wraithsight roll again!) stepped forward and emptied both the birghtlance and his scatter laser into the crisis suit team, killing the Shas'la and taking the team leader down to one wound. The Harlequins surged forward gobbling up another 10" to come within charge range of the devilfish and the gun drones for next turn. The flip-belts of the Harlequins showed their value allowing them to ignore cover that even genestealers would stumble on.
Meanwhile the warp-spiders demonstrated their power, leaping out 12" they fire a devastating volley into the right flank fire warrior squad - killing five! Rather than risking a charge into dangerous terrain, the aspect warrior opt to leap back into cover and out of range of the carbines. Impressively, the fire warriors hold their ground - demonstrating their loyalty to the greater good.
 Turn 4 - Tau: Deciding to muster my reserves, I decide to retreat from the close combat monster called the Wraithlord but not without a passing shot. The burst cannon and fusion guns fail to hit, but a lucky shot from the plasma rifle results in one wound. I wasn't going to step out in front of sniper rifles so tucked my men back into hiding. The Gun drones moved forward to face the Harlequins While the drones, devilfish and markerlights attacked the Harlequins. Only one Harlequin died though. The Warp Spiders were positioned neatly outside of LOS for the fire warriors on the left and rnage for the fire warriors on the right. My troop options could only face one at a time - so the next assault would be essential.
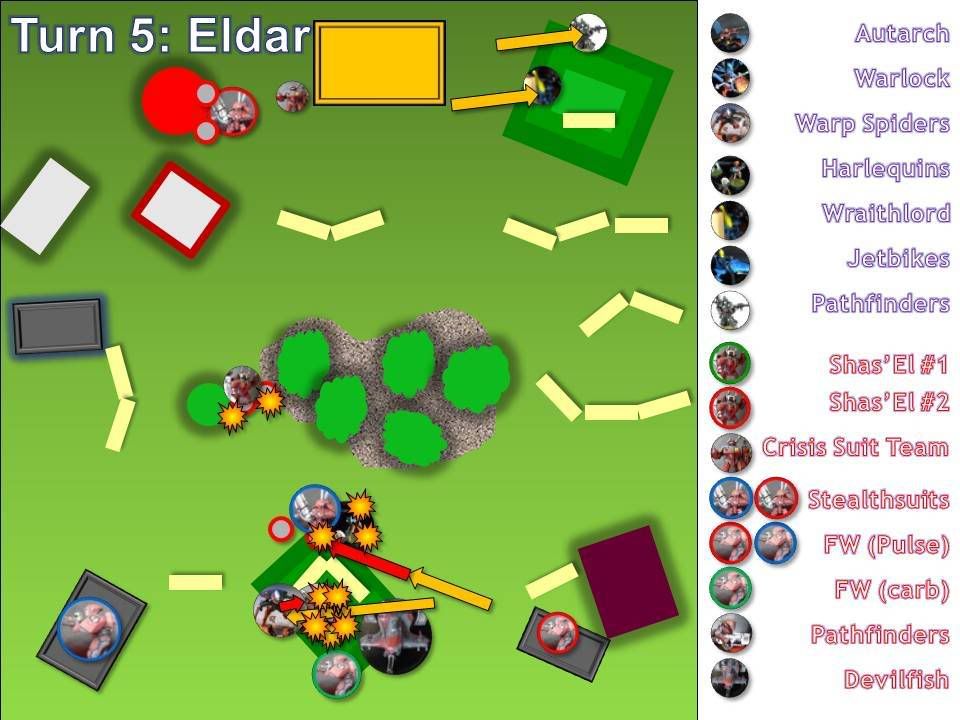
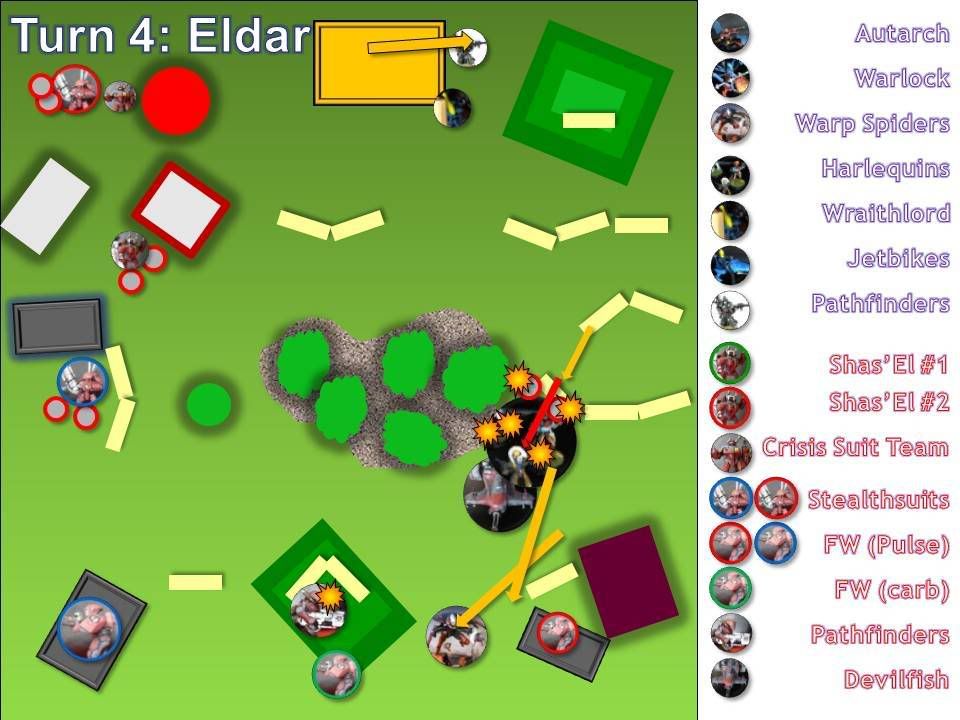 Turn 4 - Eldar: With a high pitched squeal, the Harlequins plowed forward racing in to engage both the gundrones and the devilfish in frenzied close combat. The gundrones died quickly, but the devilfish held a secret - immediately the flechette dischargers ignited shredding 3 of the poorer armoured elites. In return the Harlequins couldn't damage the devilfish. Despite losing the comabt, the ShadowSeers nerve held and he leapt 3D6 using hit and run to hide behind the warp spiders. The Warp spiders had targetted the pathfinders, but unlike their previous shots, the pathfinders only lost a single man. At the back of the board the Eldar pathfinders made a move towards the objective on the far right.
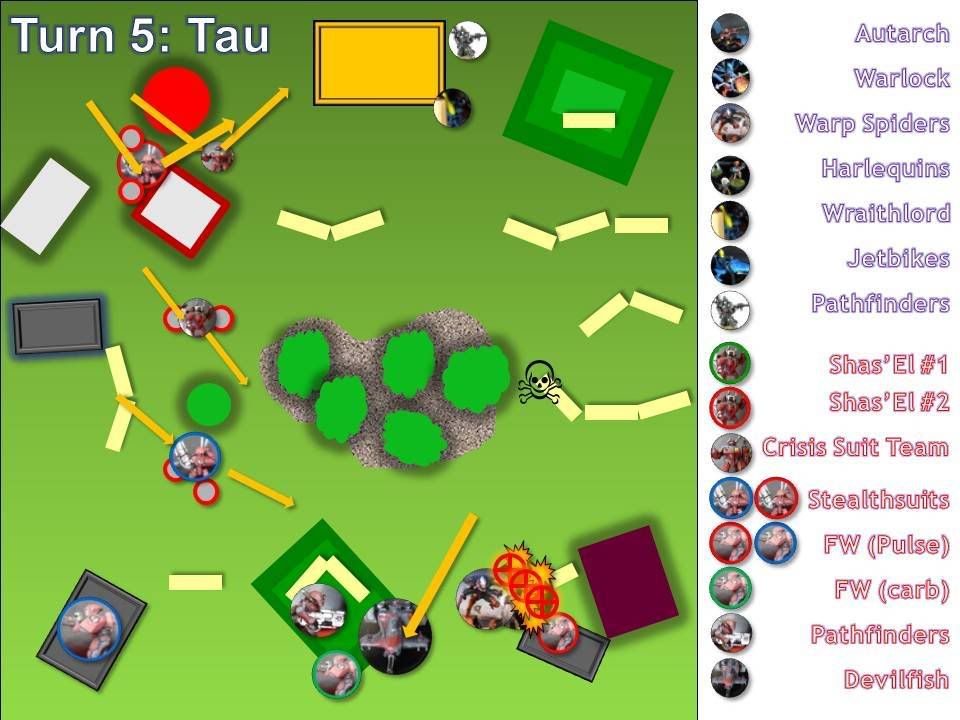 Turn 5 - Tau: With the pathfinders breaking cover, I now felt confident about taking my mobile units out against the Wraithlord. Jumping forward the XV25 team (with the fusion gun) and the remaining Tau Crisis Elite member starting 'WraithLord hunting' - popping S8,S6 and S5 shots at the Wraithlord.
Meanwhile the XV15 team and the Shas'El starting moving towards the encroaching Harlequins and the Warp Spiders. In the center, I raced back my Devilfish, playing 'barrier' again. The markerlights managed 4 hits against the harlequins.
The highly damaged fire warrior squad stepped out of cover and shot 3 harlequins dead at point blank range! Using the markerlight shots to ignore the 'shoot through warpspiders' saving throw, the carbine armed fire warriors managed to kill another two harlequins. Unfortunately, the shadow seer consistently passed both the pinning test and the leadership test - damn these pesky clowns!
 Turn 5 - Eldar: In an ingenius move the Warp Spider leap right over the Devilfish and the pathfinders, their spinners blew a brutal hole in the pathfinders and then charged into close combat. The impact of so many hits and powerblades slaughtered the brutalised pathfinders and they rolled over. Meanwhile the remaining 3 Harlequins plowed into the Stealthteam carefully defending the hill.
 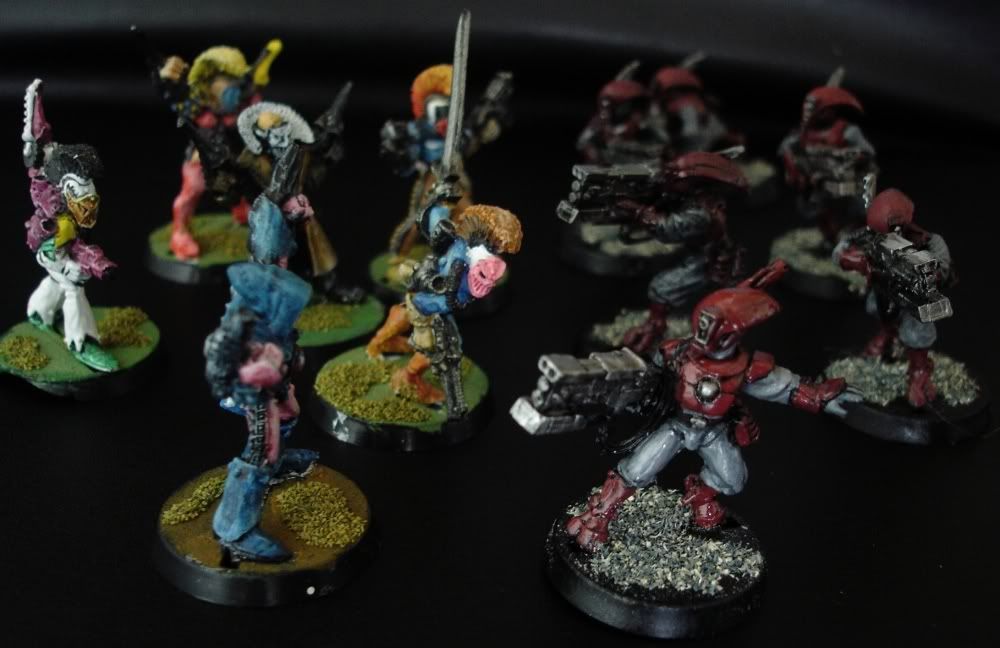 Despite 12 attacks on the charge, the Harlequins only managed one rending hit and a gun drone died. With the majority of the team with 3+ save, 6 other hits were cancelled. The Tau team struggled to hit back, getting two strikes - luckily with S4 and the harlequins only having a 5+ save, only the ShadowSeer survived.
The dice roll another turn.
 Turn 6 - Tau: Moving all the fire warriors out of cover, I lined up every pulse rifle on the warp spiders and they died very quickly. The carbine armed squad were then able to run up to the top of the hill and consolidate around the objective. Meanwhile, the Crisis suit commander, crisis suits and stealthsuits continued on their Wraithlord hunt. But failed to wound the beast. The Devilfish meanwhile went full speed up the board in an attempt to head off the pathfinders on their objective. In the close combat, the Shadowseer did a stunning job and managed to rout the stealthsuits, slaughtering them. He then retreated to the nearby woods.
 "Oh a Wraithlord hunting we will go!"
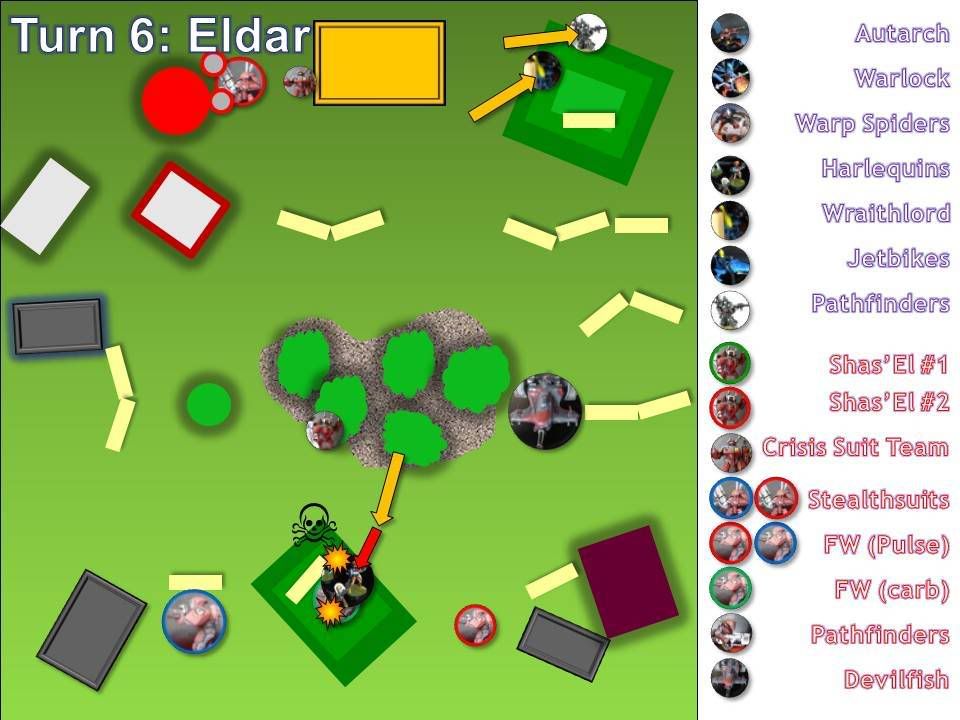 Turn 6 - Eldar: The ShadowSeer surged out of the wood and charged the fire warriors. The pathfinders snuggled down on their objective behind the hill, with their T8 bodyguard. The Wraithlord opened up on the Devilfish, but thanks to the disruption pod nothing stuck.
 Despite killing one fire warrior the Tau managed to make 2 wounds stick and the ShadowSeer died, leaving the obective securely in Tau hands.
The dice rolled again, and again we were for seven turns.
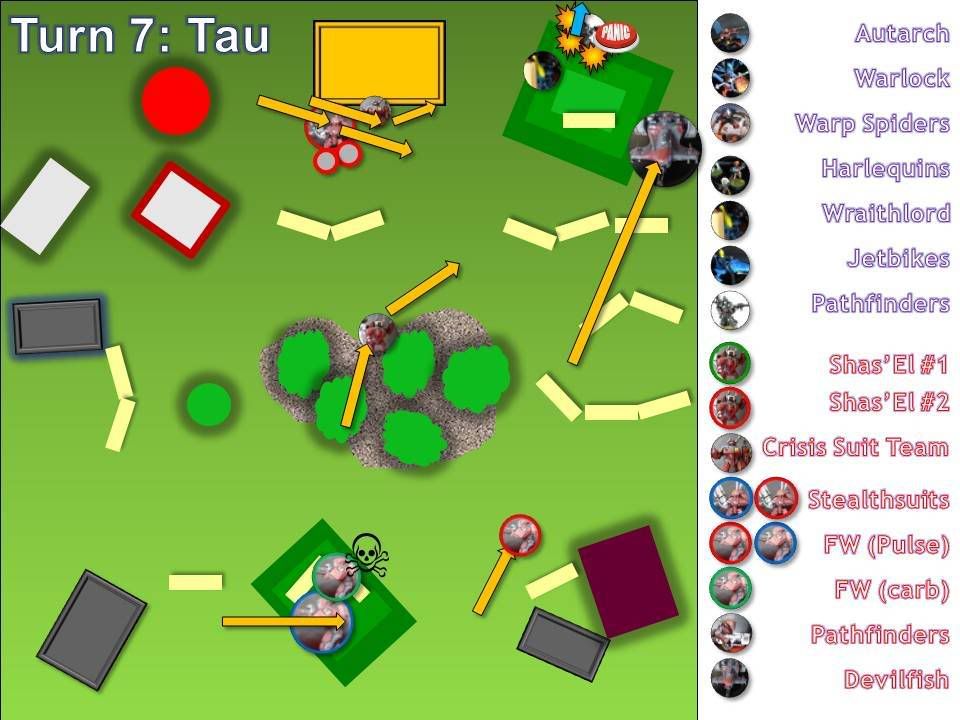 Turn 7 - Tau: It was now a desparate race to get within Line of Sight and Range to kill the pathfinders and deny the objective. The Devilfish went pell for leather, but with the WraithLord standing vigil he could tank shock the objective. The Tau lined up, with the stealth team and crisis suits having no choice but to attack the Wraithlord - everything failed. Until, with the last shot of the game the Shas'El dropped a Air Fragmentation Round on the pathfinders heads. The AFP denied them both saving throw and cover saves, killling all but one. With a shaking roll, the pathfinders failed their leadership and quit the board.
Tau Victory.
Conclusion
Tau
- AFP and ion Blaster: Unlike many other units, the crisis suit pilot thrives on combining both long range and short range fire power. Having two 18" guns on a Shas'El was a wasted opportunity as he could have harrassed far more with a missile pod. Although the AFP effectively finished the game, I've subsequently changed his outlay to a missile pod, an AFP and a flamer. Making the Commander a pest at range and bloody lethal in close quarters!
- Fire Warriors and firepower: The troops options worked very well, providing layers of firepower. I was especially pleased with how the fire warriors and stealthsuits performed in close combat killing elite troopers. The stealthsuits were well worth sacrificing, allowing me enough time to regroup and swamp the obejctive.
- Gundrones: the smattering of gundrones were brilliant. Although their firepower was neglectful, their ability to soak up fire, especially instantkill hits from Brightlances proved essential - allowing me to keep unit on the board. They also perform well in close combat, giving me more options. My only mistake with these units was to push my gun drones in front of the devilfish, I should have trusted more to the flechette discharger and not thown away these units.
- Elite Choices: Where were the flanking striking scorpions, the deep striking swooping hawks, the 48" S5 AP4 blast Dark Reapers, the war walkers at 31" or the two wraithlords. Just like my Guard force against Dustin's Tau, I feel that Devilin got focused on mash the Tau in close combat, and thereby got pull within 30". By exploiting range first, and then LOS (which both the Harlequins and the Warp Spiders fulfilled), and then survivability (with the Wraithlords), things would have proven nigh on impossible.
- Jetbikes and Autarchs: the Autarch's +1 to reserve rolls proved more a bane than anything. With the Jetbikes coming on in second turn, the stealthsuits and crisis suits were set up to ambush. The reason for missing the first turn and then putting everything in reserve was ideal for Saim Hain army, but this force struggled.
- Rangers: I still don't quite understand why the Rangers didn't come on in turn one. I do think that they are a secondary choice against Tau as the high saving throws, deep strike options and flamers are murder for rangers. However if the rangers had come on behind the hill objective they could have set up sniper rifles outside the pulse rifle range and started pinging away at the Tau. A couple of pinning hits could have held that corner and would have allowed the Wraithlord the freedom to charge the 'hunt pack' - scattering their approach.