
 By Suneokun.
With a few weeks left before the new Imperial Guard codex arrived, Dustin at 'Gifts for Geeks' emailed to say the scenery and his 6' by 4' battleboard were all ready and did I want to face another drubbing from his Tau (ok, he didn't say the last bit, but it adds drama, dunnit). As such I only felt it fair to give the Old Guard codex (which has given me soooo much pain over the years...) a final outing against the Tau forces.
Apologies for some fo the photo's in this batrep. For some reason my camera went all 'desert storm/blair witch' project during the combat... some are nice though...
Previous Experience: In our last encounter (see here), Dustin gave my 'close combat hungry' army a right pulse rifle drubbing. Despite playing a couple of practice games, I was too eager to furnish my army with my newly finished Rough riders and Orgyrns (without a moments thought for the points sink), the game wasn't finished and apart from a lucky battle cannon shot massacring 7 Kroot and 2 crisis suits, the traffic was all one way.
Revelations: Since then however, I have had a 40k epiphany relating to both army selection and army deployment. When I researched and wrote these up, I was half concerned (in the back of my head) that I was actually talking out of my posterior, and my concept wouldn't fly. However, what I've found over the following five battles is that the tacticas are actually pretty straightforward, robust and enable me to prioritise troop choices, tactics and targets neatly. Out of the previous 5 battles, 3 have been glorious victories and 2 have been draws (although to be fair one draw was against Orks, with Guard on killpoints and I killed/routed everything bar his deffkoptas - but meh?).
Tactica in a nutshell: choosing an army (in my opinion) is about understanding heat and deniance. Heat is my term for the real and/or perceived 'lethality' of any given unit. Effectively Terminators have more 'heat' than mortar teams - simple enough. But heat is subjective, a scout squad on an objective will attract more heat than a TH/SS Terminator Assault squad (who isn't about to hit your lines). Understanding strategies around heat is essential, as this feeds directly into the 'on-the-field' tactica of 'choices'.
Deniance is all about choosing your forces to best exploit your ability to avoid enemy fire altogether and still achieve your objectives. Fritz's Saim Hann army are an excellent example of how you can use speed, reserves and terrain to effectively deny your opponent an effective turn of shooting. Relying on armour saves or cover saves is a secondary and last choice. The priority is to use tactics, deployment and placing to ensure that your opponent CAN only shoot his railguns at troopers. Deniance is determined by range, movement, indirect fire, exploiting terrain and finally good armour. And options should be chosen in that priority.
Deniance however, doesn't work properly with a clear understanding of 'circles'. Circles are the imaginary sphere that surrounds every unit, dictated by their fire power and/or charge effect. Understanding these 'spheres' gives us three key advantages. We can see where the enemy is weakest and can be exploited, we can also see where our firepower is concentrated and exploit or adjust accordingly. Finally circles help us manage deniance, especially ranged deniance, turn on turn. The following battle report is a good example of this.
Understanding heat however feeds into the battlefield tactic of 'choices'. If you present only one danger to an opponent, he will target it. Now you may choose to do this (A demolisher, wraithlord, Nob warbike mob or Eldar Seer Council will often play 'fire magnet' to actively attract firepower) however understanding circles and deniance will ensure that when you move, your primary focus should be on maximising your impact while offering a maximum number of difficult choices to your opponent.
As an example, look at another set of games - snooker, pool or billiards. In these games, potting the ball is not enough, to become really competent you have to play multiple layers ahead and maximise your options (potting as many balls as possible) while making strategic choices to deny your opponent the same opportunities.
So if we can maximise these options, we can increase our chance of winning. This however does not concede the final playmanship point. This is that good behaviour is rewarded by the dice. What I mean by this is the following. In the game you are about to read, my 7 ratlings shot at 4 pathfinders. Despite scoring five hits, when it came to the 'to wound' roll, I rolled a complete run of 1's. Five 1's, no other. Now unless I have a retro-active 'natural roll', I just managed a 1 in 7776 chance. Both Dustin and I were so amazed that the 'justice' of it doesn't even come into it. IF you have a series of rolls that go against you, don't get upset - just settle happily that you have karma 'good news' coming your way...
On with the battle report.
 Dustin's Tau: from our previous battle, this was a 'stripped down' version of the 2000 pt force. Dustin had focused on 'antitank' firepower with plenty of numerous troop options to tie up objectives.
HQ
- Shas'El with two Shas'Ui bodyguards, Missile Pods and Plasma Rifles all round, 1 shield drone.
- Crisis Suit Monat with Missile pod and Fusion Gun.
- 1 squad of 12 Fire warriors with pulse rifles, a Shas'Ui.
- 1 squad of 12 Fire warriors with pulse rifles, a Shas'Ui.
- 1 squad of 12 Fire warriors with pulse rifles, a Shas'Ui.
- 1 squad of 12 Kroot with 5 kroor hounds and a shaper.
- 1 Piranha with burst cannon and 2 gun drones.
- 8 Pathfinders with Shas'Ui, devilfish with gundrones and burst cannon, disruption pod.
- 2 Broadside battlesuits with twin-linked railguns and smart missile systems.
- 1 Hammerhead gunship with railgun.
- 1 Hammerhead gunship with ion cannon.
 Suneokun's Guard: from previous experience (and playing Tau myself) I knew that the best thing was to draw up a gunline beyond 30", denying the army its pulse rifle advantage. As such I focused on 48" and 36" firepower. The objective was to target the bigger targets (Broadsides/Hammerheads) and reduce the average strength to 5. Then my chimera 'gunships' could trundle in and pour firepower into the Tau troops. During all this, I selected 5 mortars. These long range weapons would repetitively 'ping' the entrenched Tau and Kroot, hopefully scoring some good hits, pinning and forcing them to 'go to ground'.
HQ
- Command Section [5]: Junior Officer, Veteran with company standard, mortar team and guardsman. Commissar with bolt pistol.
- 3 Mortar Teams [6]
- 3 Autocannon Teams [6]
- 3 Missile Launcher Teams [6]
- Ratlings [7] Sniper Rifles, +1 saving throw, infiltrate.
- Storm Troopers [5], Sergeant with power sword, meltagun, flamer, 2 hellguns, deepstrike.
- Platoon Command [5]: Junior Officer, bolt pistol, Heavy Bolter, meltagun, in a Chimera Transport with Multilaser, heavy bolter and heavy stubber.
- Squad One [10]: Heavy Bolter.
- Squad Two [10]: Mortar.
- Remnant Squad [5]: Flamer.
- Armoured Fist: Heavy Bolter, Meltagun in a Chimera with Heavy Bolter, Multilaser and heavy stubber.
- 3 Lascannon Sentinels.
- 1 Leman Russ Battletank with battlecannon and heavy bolter.
- 1 Leman Russ Battletank with battlecannon and lascannon.
 Objective: Seize Ground (five markers)
Deployment: Spearhead
Dustin won the roll and opted to take the first turn and deploy first
Deployment: going second suited me and I aimed to deploy my troops in layers which would combine to deny
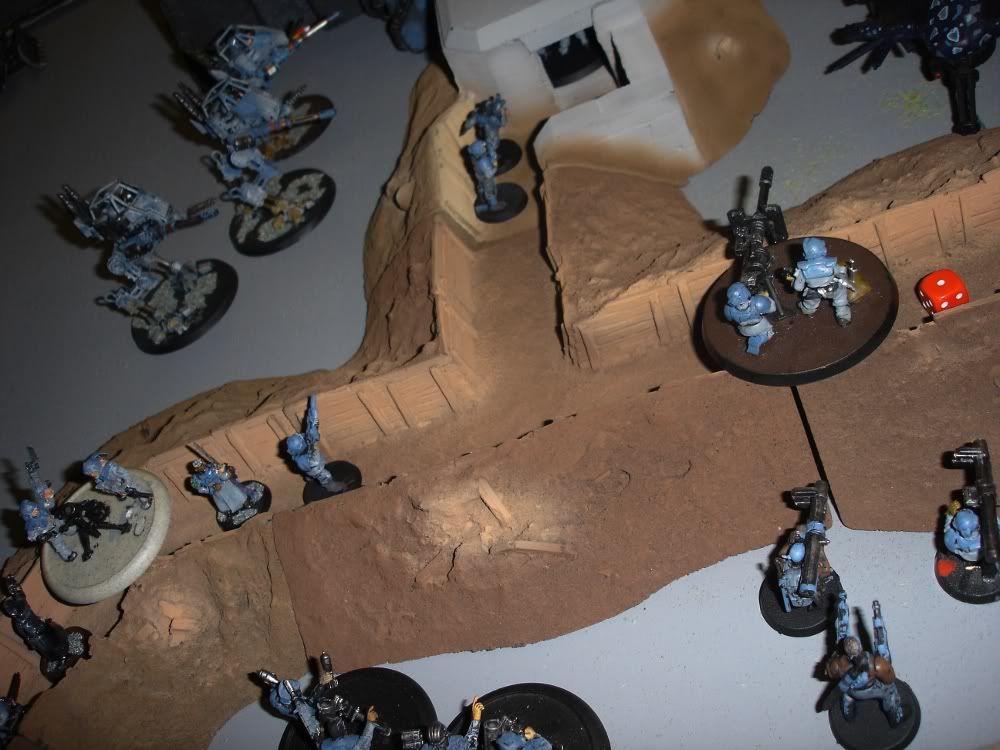
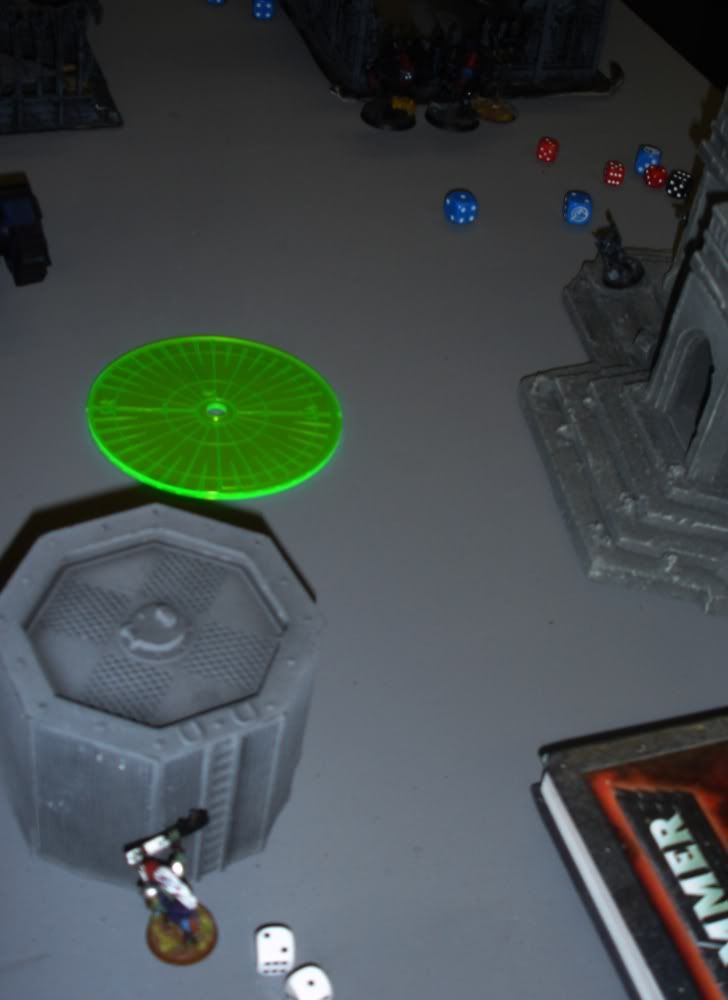
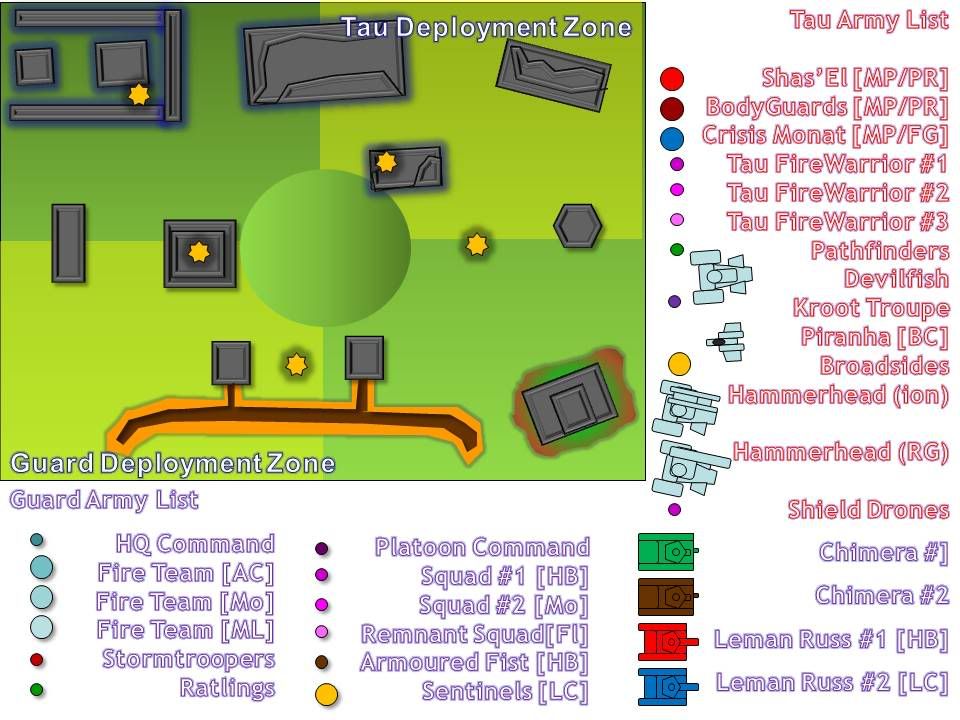 the Tau decent shots while leaving my units free to attack his. I secured my far right flank with my ratling infiltrators. While they would be outside the leadership assistance of the command HQ, and therefore vulnerable to routing. They could stop the Kroot from deploying on my flank and flanking my heavy weapon teams.
The mortar teams, missile launcher teams and autocannons all arrayed at the back of the board, well outside 30" and within range of the whole Tau quadrant. The HQ command sat centrally, ready to dole out Ld9 rerollable
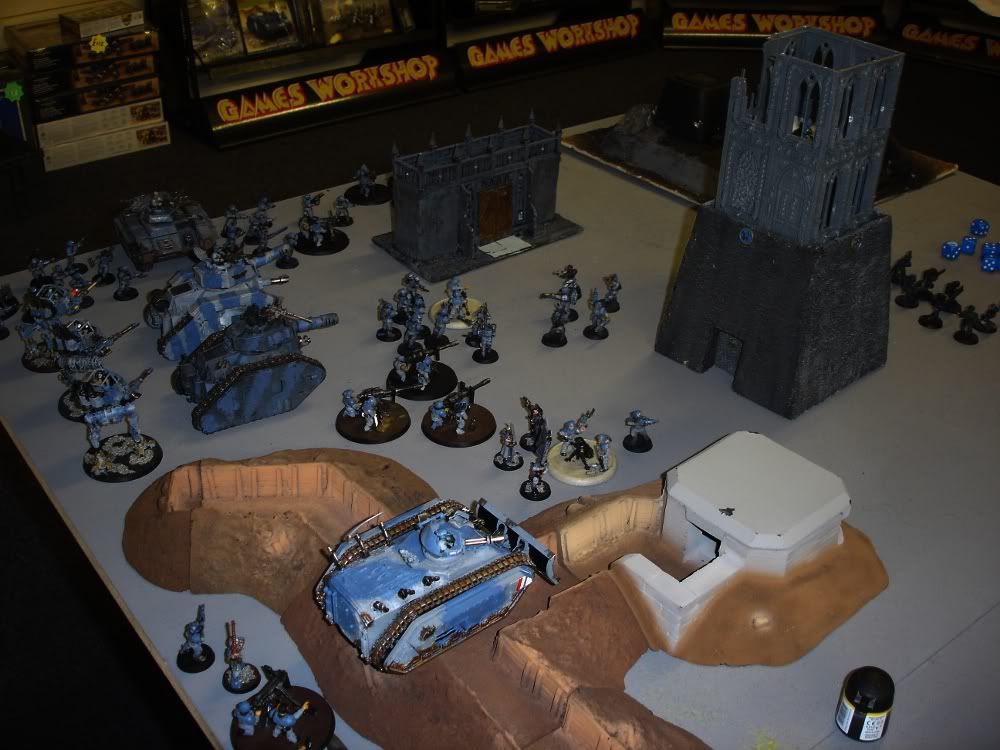
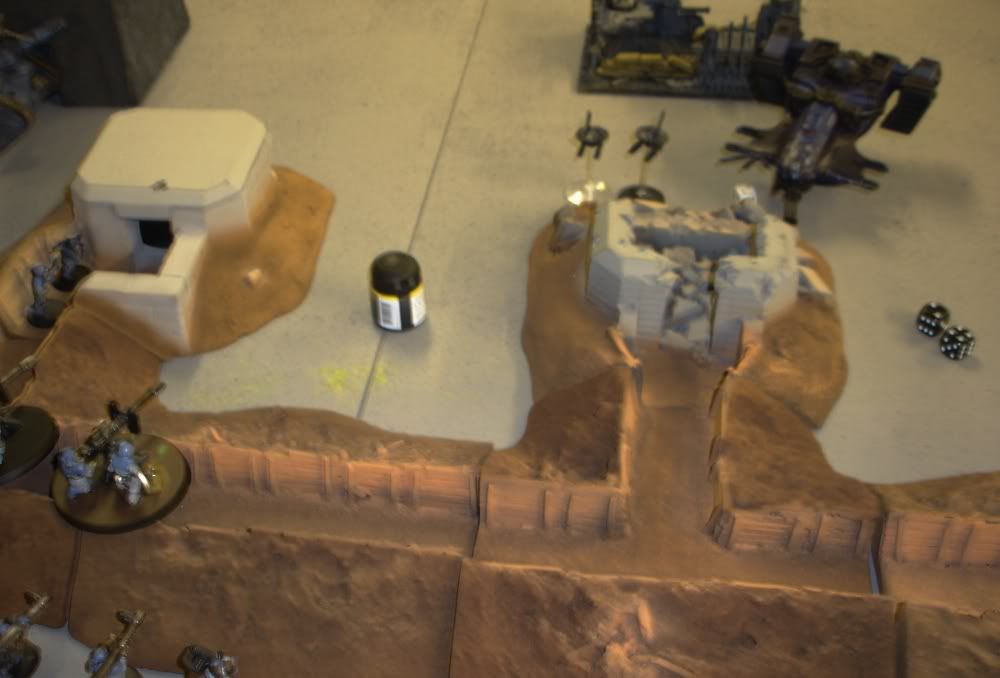
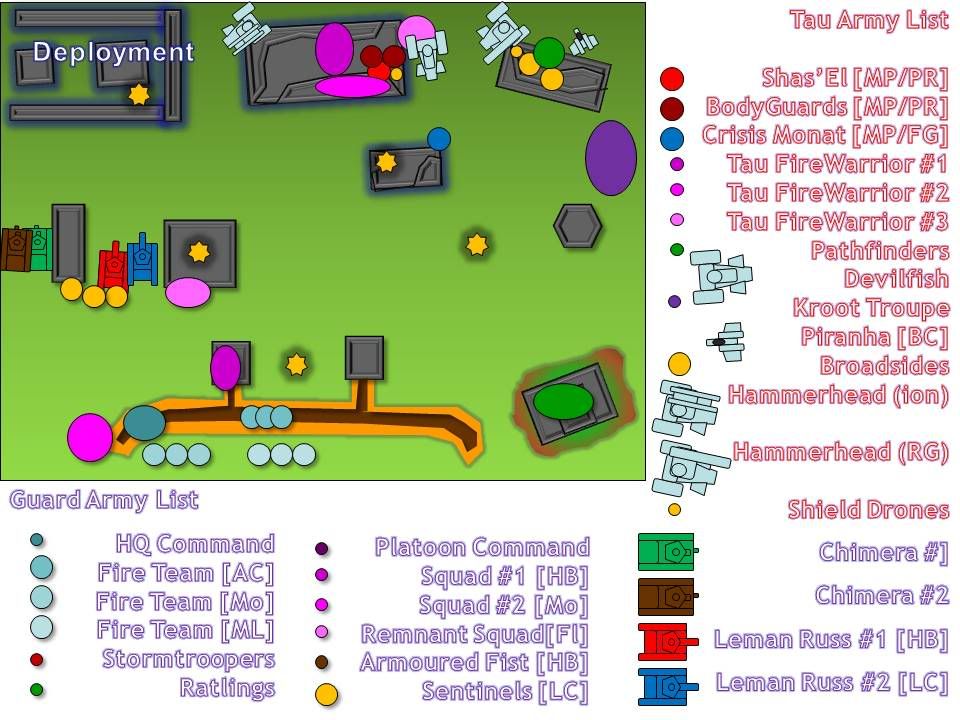 leadership test with a commissar's headshot as backup. The heavy bolter squad setup at the front, they were inside 30" but a combination of a 3+ save in the bunker, 10 men and the commissar standing behind them should keep them in place. The Leman Russ's deployed just beyond the tower, out of line of sight for the Broadsides. The Sentinels deployed behind them and the Chimeras took up a position to deter Dustin from bringing his Kroot into the top left flank and contesting that objective.
Dustin deployed his men in cover, and as going first had little control over placing them in range or not. His Kroot and piranha would attempt to suppress the Ratlings and threaten that flank. His ion cannon would play chicken with the Leman Russ's and attempt to slow the chimera's...
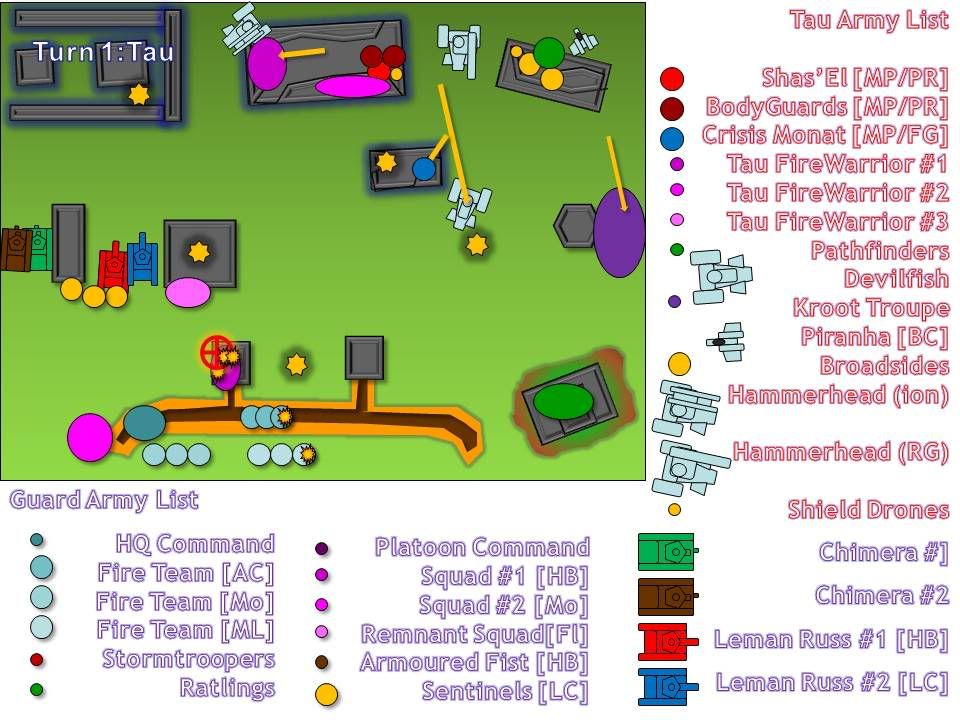 Turn 1: Tau - With the Broadside have good lines of sight from the top of the building. The problem is that they cannot move and fire. Thank to my crafty deployment I have 3 sentinels and 2 battletanks within 48" and the broadside cannot target any of them. The broadside have to settle with killing some autocannon team. One of the fire warrior squad embarks at the start of the turn and the devilfish races forward to challenge the objectives in the centre. The Kroot move and run forward to attack the Ratlings looking very exposed on
  the right flank. The pathfinders target the heavy bolter team (the only target in range apart from the ratling). The markerlights add plus one to the BS and reduce the saving throw to 4+. Refusing to duck, five guardsmen are shot down by missile pod and pulse rifle fire. The Ion Cannon takes a potshot at the furthest Chimera on the far left, but his the building. The other Hammerhead's railgun shoot, hitting both the Missile Launcher team and a single autocannon team member. Despite five hits, it only causes a single wound to the missile launchers.
 Turn 1: Guard - By maneurvering by Leman Russ' I could target the Kroot on the far right flank with the battle cannon. In addition I moved up the Sentinels with lascannons and the lascannon armed leman russ. The four lascannon managed two pentrating hits and despite the 4+ saving throw clearing one shot, they wrecked the hammerhead. Good start. The chimeras had inched forwards, but couldn't target the fire warriors. The mortar teams open up, bombarding the fire warrior teams in the centre ground, the 5 mortars combined for a total of 13 hits, this resulted in 8 wounds and 5 casulaties.
  This bombardment pinned the right most Tau team. The heavy bolter team in the bunker and a couple of laguns opened up on the approaching Tau Monat. Combining their fire with the autocannons proved too much and the Crisis suit died, his heavy armour failing under too much supression fire. The Missile Launchers and the rearmost Leman Russ targetted the Far kroot. While the Leman Russ' shot deviated, the missile launchers managed 6 kills (with no saves) this resulted in the Kroot routing back the way they'd come. The Ratlings knew they had a deadly purpose and lines up the Broadside Battlesuits. Despite succeeding with 5 hits out of 7, I proceeded to roll 5 1's. That's a 1 in 7776 chance! So the broadsides survived.
 Turn 2: Tau - With the majority of the armour still out of line of sight of the broadsides, the Tau had few valuable targets. Dustin concentrated firepower again on the Autocannon and Missile Launcher causing a couple of further loader to die. In addition, the Tau Piranha swarmed forward to give covering fire and attack the ratlings - who were now looking awfully beleaguered. The Devilfish rushed up to the damaged bunker and deposited its gundrones.
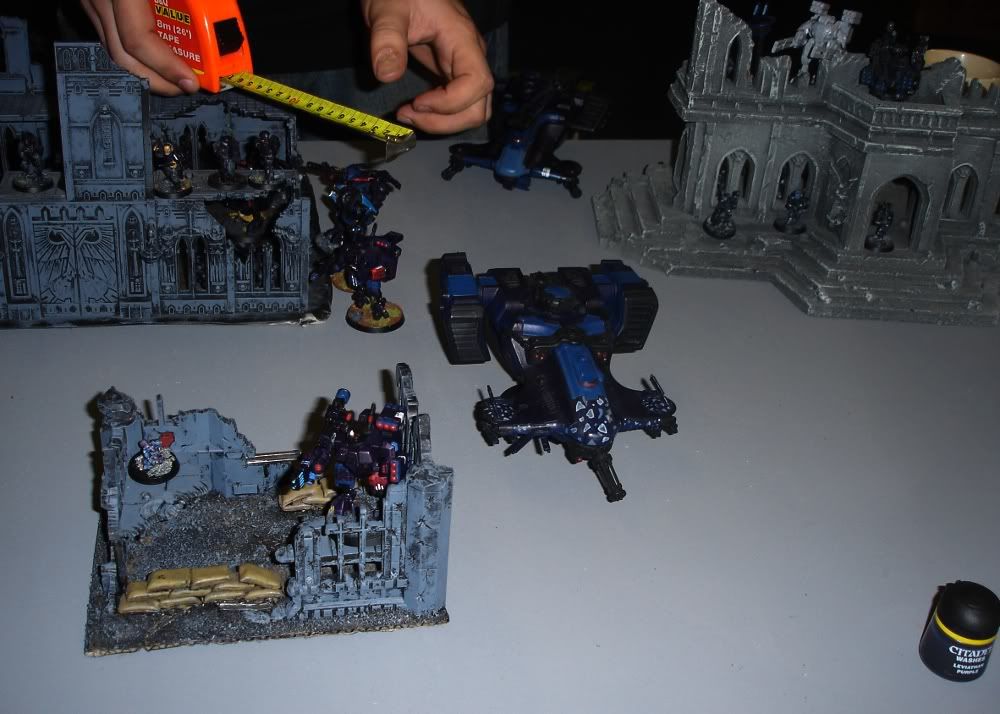
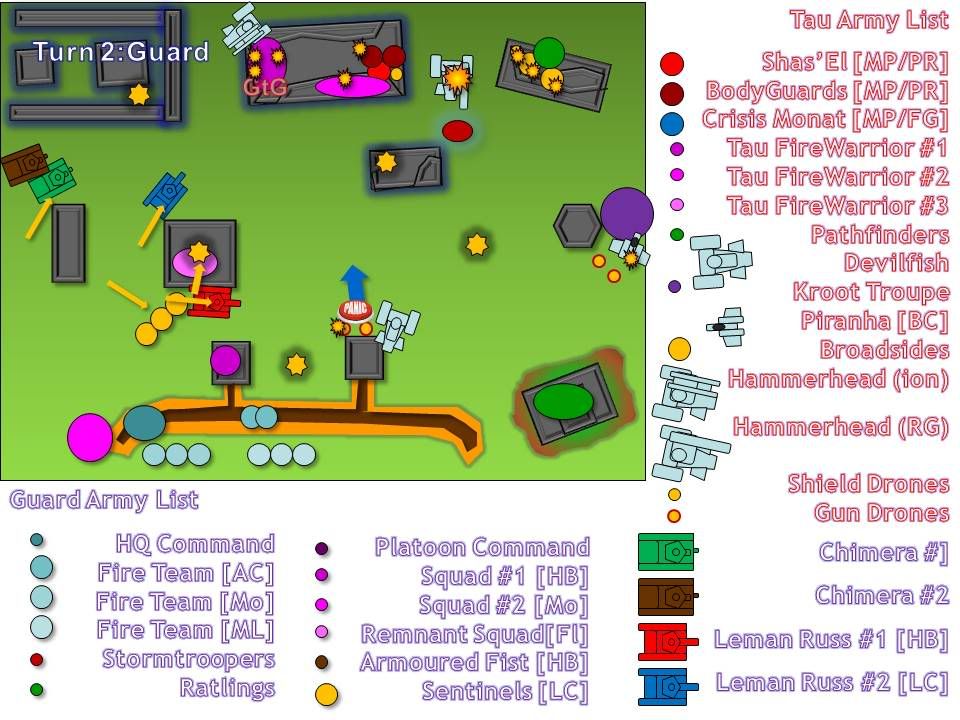 Turn 2: Guard - With the encroachment of the Piranha and the lascannon vehicles in position to strike I gambled that I could kill his tank killers before my boys died. The two leman russ' came out from behind the building. The heavy bolter Leman Russ shot its battlecannon into far pathfinders, meanwhile the lascannon russ joined the 3 sentinels in targetting their lascannons at the Broadsides. The leman russ managed to destroy the Broadside's shield-drone. Despite only 2 shots getting through the broadsides failed both their cover saves - the Broadsides were no more!
 Taking the bull by the horns, I deepstruck with my small stormtroopers squad right in front of the Tau Hammerhead. One melta shot later and a weapon destroyed roll left the Tau battletank stripped to a mere double burst cannon. In one turn I had managed to reduce the Tau armada's firepower to maximum S7 and ranged 36". Effectively the Tau's anti-tank options were gone.
With such effective tank shooting, the rest of the army went to work. The other Leman Russ targetted the Pathfinders with his battlecannon, killing three. Despite this, they passed they pinning and leadership tests, thanks to the Shas'Ui. The Missile Launchers went after the devilfish at point blank range, but the devilfish gained a 3+ save from an intervening gundrone squad and the shots went wild. The autocannons lacked much to shoot at at all, so the loaders and gunners aimed at the floating gundrones - killing one, the drones lost their leadership and subsequently left.
On the right flank the situation for the ratlings was more desparate. They now faced a piranha and the kroot - neither of which the ratlings had much chance against. Trusting to luck the ratling attempted to rend the Piranha and succeeded with a single hit. The piranha suffered a 'crew stunned' result, trapping the Kroot behind it.
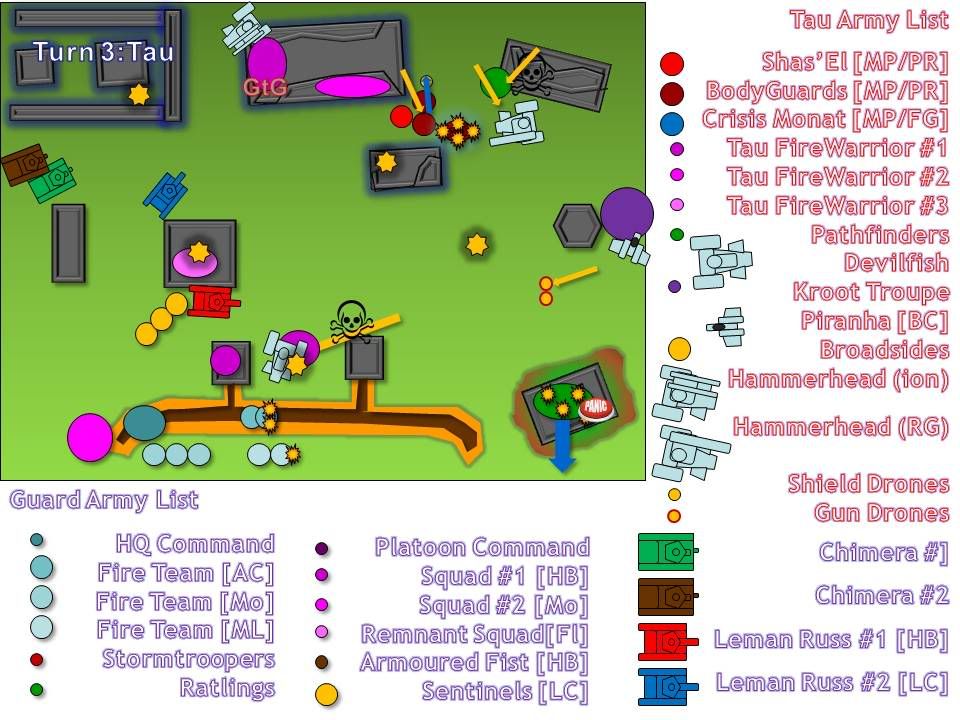 Turn 3: Tau - The tau returned fire with full force. The command squad, pathfinders, Hammerhead and a fire warrior squad scored massive damage on the small stormtrooper squad. Despite the firepower, the sergeant survived and kept his head on the leadership roll. The devilfish in the centre leapt over its fleeing gundrones and deposited 12 fire warriors on the target. They immediately opened up on the Autocannon team in front of them but despite losing a further two men (bringing it down to just 1 man) the squad held, thanks to the
  commander and his commissar. The Piranha gundrones dispatched and started drifting towards the guard lines. Meanwhile the crowing calls of the ratlings was cut short as the kroot aimed their longrifles. Cracking shots pinged out and they mananged to kill 4 out of 7 ratlings despite the ratlings' 3+ save. The ratling (with only Ld6) legged it in no uncertain terms.
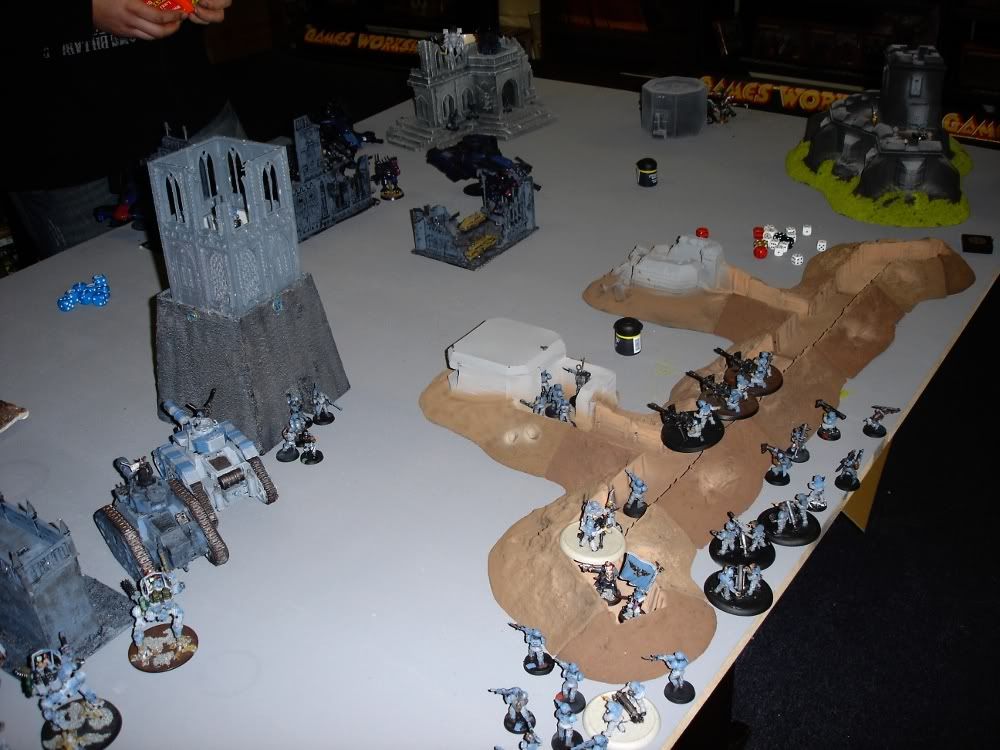
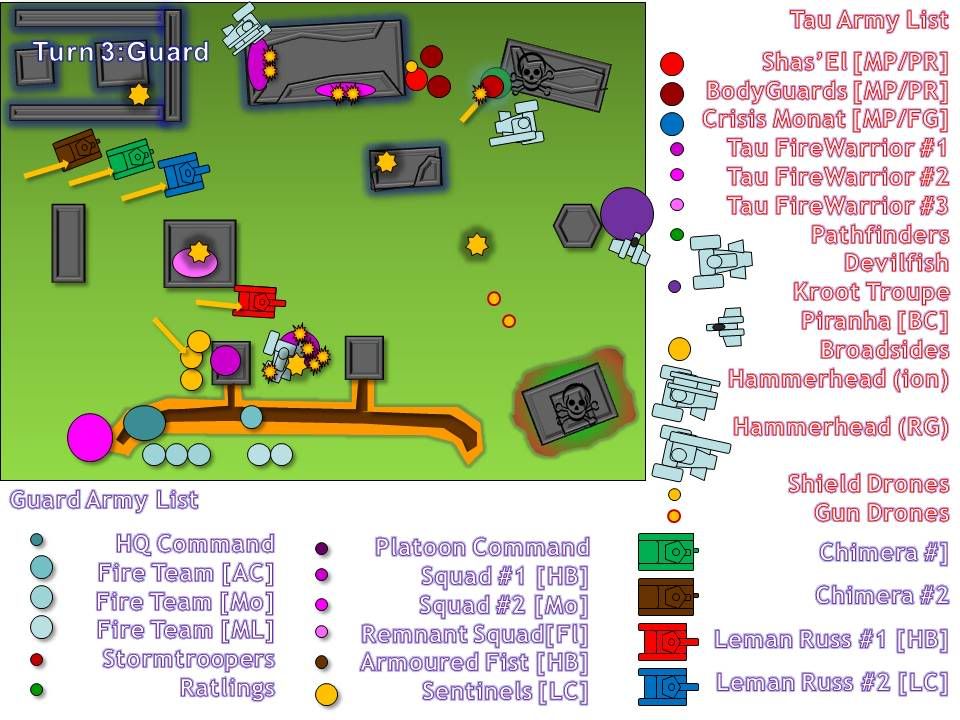 Turn 3 - Guard: WIth the confidence in my armoured column, the Leman Russ and chimera 'gunships' moved forwards. Now that the 'real' danger was gone, both troops units in the Chimera's popped the tops and loaded their heavy bolters. The combination of 2 heavy bolters, a multilaser and heavy stubber across two tanks started to ring out of these mobile pillboxes. The effect was immediate. The sheer volume of fire forced one squad of Tau to go to ground. The other squad lost a further 2 men but held firm. The Leman Russ fired into the building but scattered.
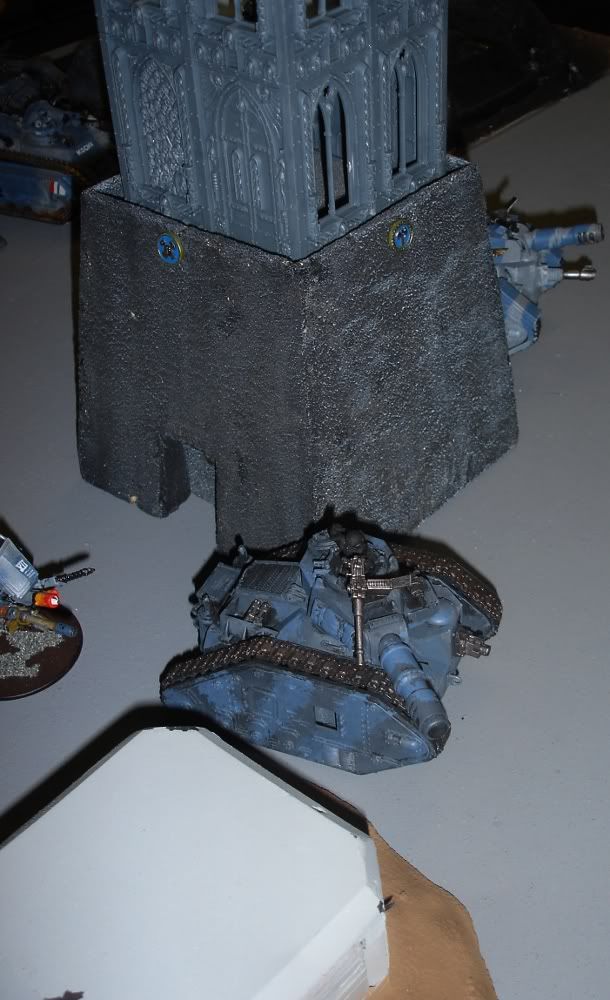 The other leman russ targetted the devilfish and his tau firewarriors guarding that objective. Unfortunately the battlecannon shot scattered into no mans land. The Sentinels had lined up on the Devilfish too. However despite being within 12" to deny the 4+ dsiruption pod save, the devilfish was obscured by the bunker and gained a 3+ save! The devilfish didn't get as much luck from the missile launcher team who managed a weapon destroyed result. With the chimera's pinning down the fire warriors the mortar teams could concetrate fire on the firewarrior bunched up under the transport. They managed a total of 12 hits, resulting in 8 casulaties. This reduced the full squad to a meager 4.
While this was going on, the stormtrooped sergeant went on the offensive and charged the pathfinders. The pathfinders used their proton grenades and gained the upper hand in close combat thanks to half the unit being in cover. I unfortunately forgot about the frag grenades the sergeant is armed with and he went down spectacularly under a tatoo of markerlight carbine butts before he could get to work with his power sword.
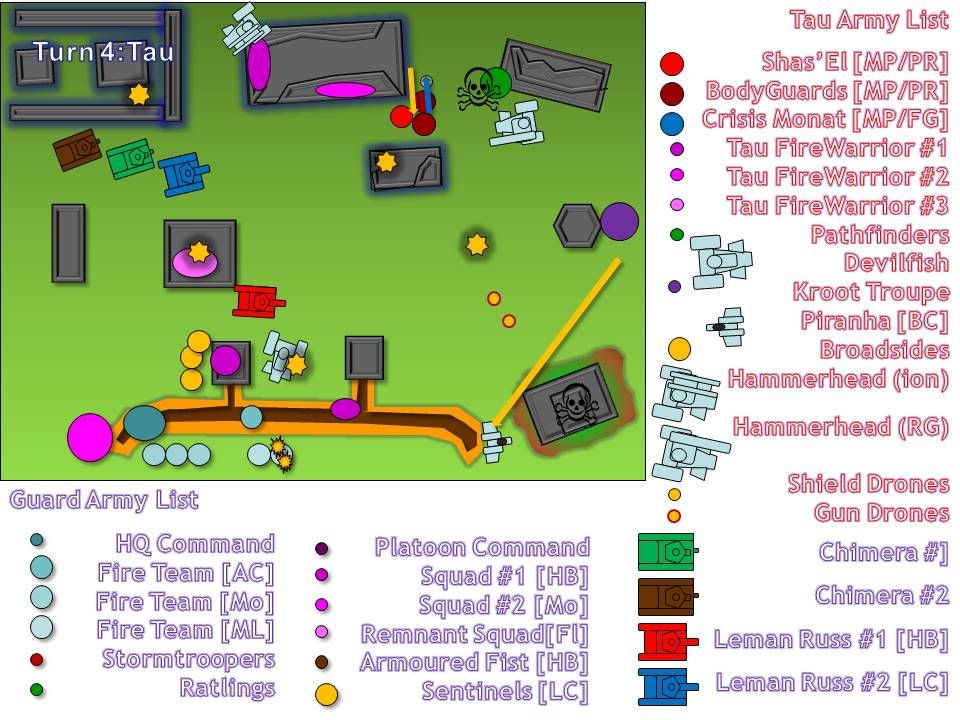 Turn 4 - Tau: With the ratlings routed the Piranha was now free to race towards the Guard lines. The disarmed devilfish hovered impotently as the 4 fire warriors managed a 6 for difficult terrain and leapt into the guard trenches. They proceeded to shoot up the missile launcher team, bringing that unit down to two - again the commander/commissar/company banner saved the day. The kroot eyed the objective in the open on the far side of their silo and hunkered down out of line of sight.
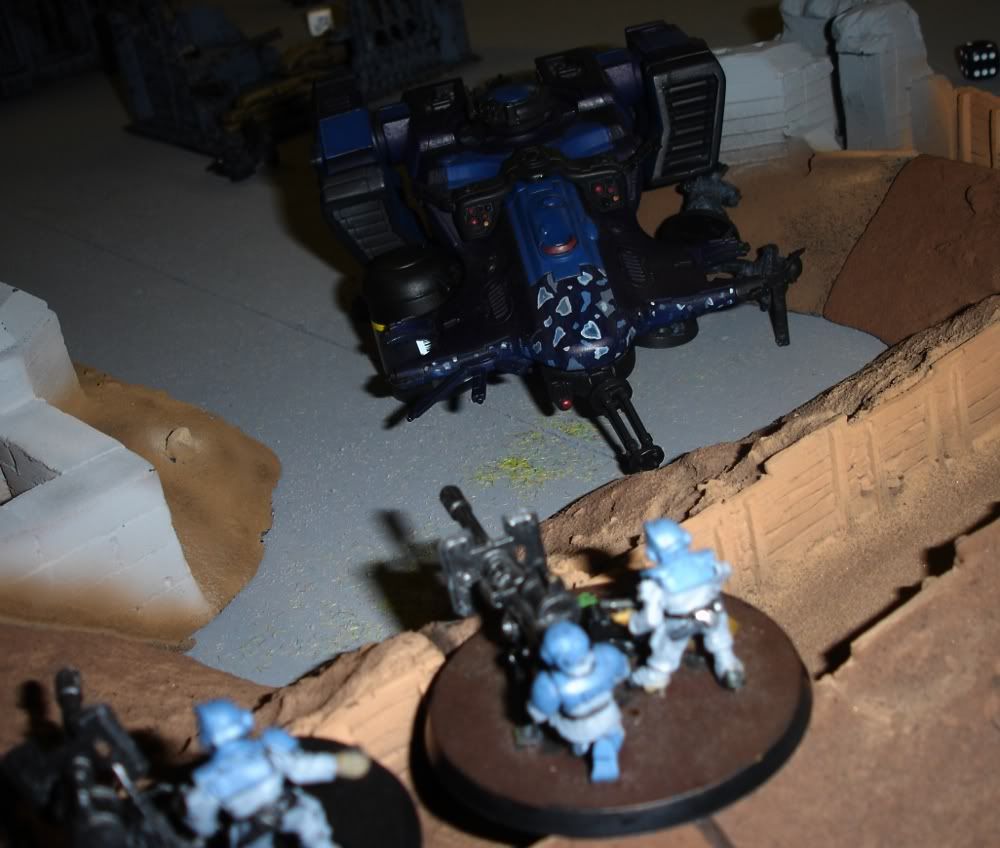 The Shas'El and bodyguards popped out of their building to target one of the chimera. Despite achieving two hits, they failed to penetrate the armour with their S7 weapons. They then retreated back behind the building. The two fire warrior squads in the building and the pathfinders were ineffectual in shooting as their numbers were now so low.
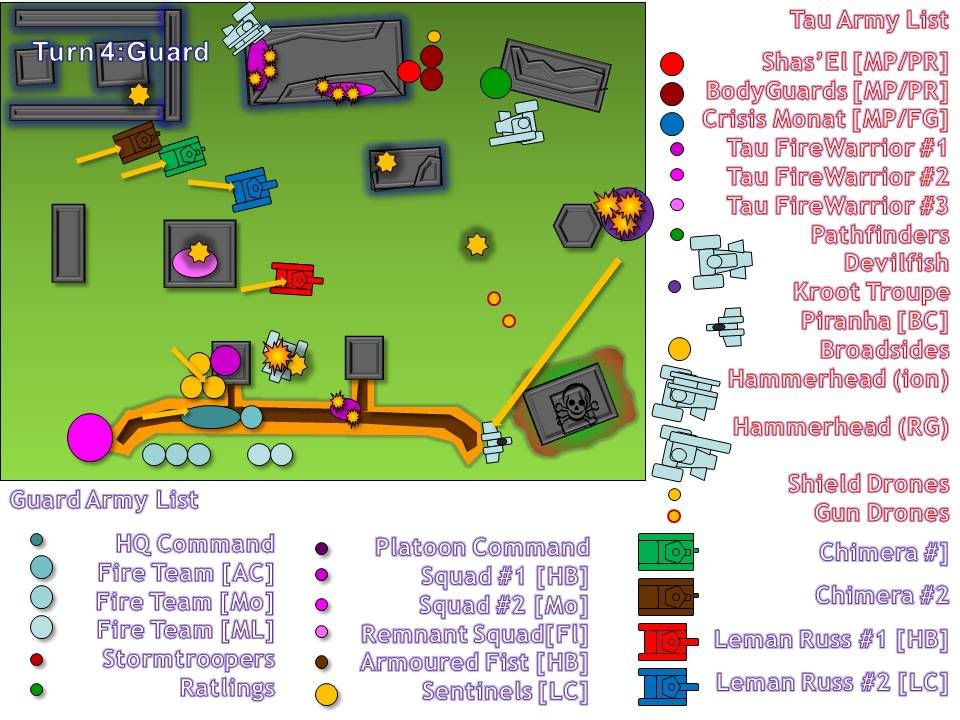 Turn 4:Guard - The Chimeras continued their approach scoring multiple hits and securing the top left objective. Next turn I would deploy the armoured fist into position. The firepower from both tanks withered the fire warriors down to a a four and five man squad. The leman russes had a different target, by moving their full 6", both ordinance templates were brought to bear on the Command Squad. With a shuffle of consternation, Dustin realised this was instantkill no saving throw ordinance template territory! Luckily for his, both templates scattered dramatically and the leman russ 'fluffed' the opportunity with dignified aplomb.
 Elsewhere Dustin wasn't so lucky. The sentinel cleared the bunker and skewered the devilfish with their lascannons. The missile launcher team and autocannons targetted the Piranha, but its 3+ turbo boost save proved too much. The command team charged down the trench and opened fire - downing two more fire warriors. The mortars were a difficult choice, after all so few targets were bog enough, after long thought and careful guestimating of distance I targetted all the mortars at the Kroot at 48". The hit was millimeters short, but the blast got six kroot. What followed was the karma of the scattering battlecannon shots as two mortars hit and the third scattered in a further 5 kroot. 17 hits resulted in 10 wounds - no save. The kroot were reduced down to one shaper.
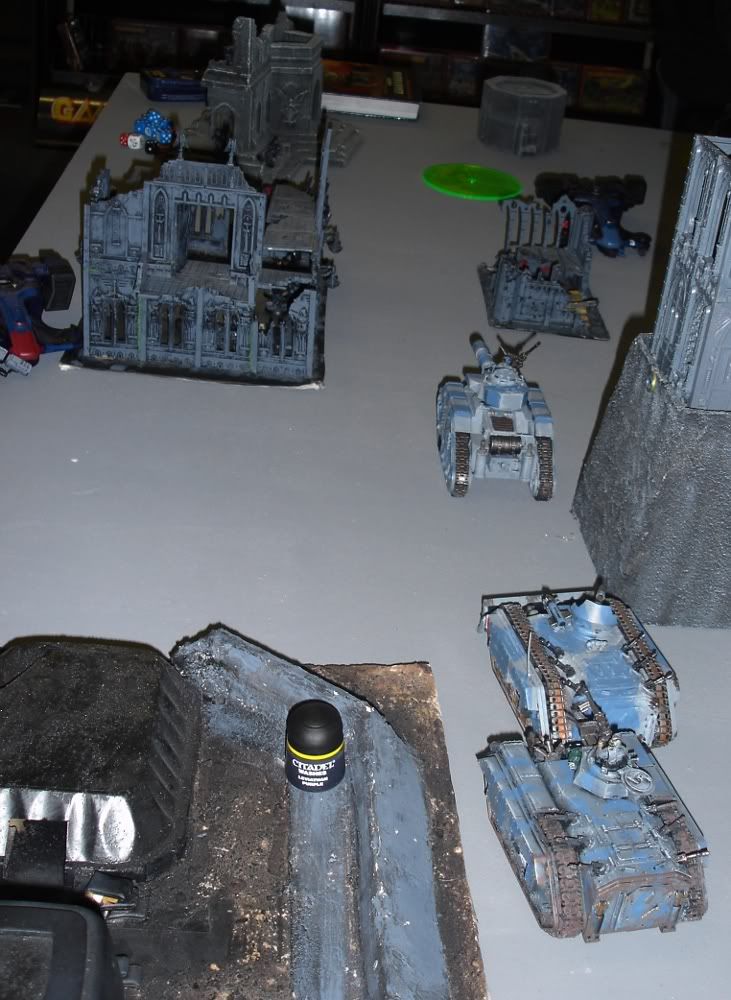 At the end of that turn, the Tau had a total of 9 fire warriors across three squads and 1 shaper all taking leadership tests. They all passed, but it was clear that the Guard now held two objectives uncontestable. One within easy reach (outside my bunker) and the Tau could attempt for two objectives with few enough men that my return fire would be devastating and I could contest anyway.
Dustin conceded the game.
Conclusion
The Guard: Well that went to plan, sort of... personally I wasn't expecting the consistantly damaging firepower to be that effective. The deniance tactic worked brilliantly, with the majority of my army being outside pulse rifle range. I 'discovered' the effectiveness of the 'Chimera gunship' through the guards list in the "battle of six armies" tournament, and once the anti-tank options were clear these behemoths could trundle forward unleasing a torrent of firepower. With the drastically reduced price of Chimera rumoured in the new codex, plus their rumour of being upgraded to fast - these boys in numbers will be devastating.
 The Leman Russ' proved excellent, giving me effectively a bullet proof vehicle screen to approach his lines. I quite like the combination of the Heavy bolter Leman Russ and the Lascannon option. Giving one tank a choice while the other targets troops only.
After this battle I am definitely modifying my Sentinels to Lascannons - they were awesome! The low 'heat' a sentinel generates when there are so many other juicier targets on the board meant they survived the whole game. This combined with being able to deploy 3 lascannon shots meant I could effectively get the jump on all the armour in the game. The lascannon is also the weapon of choice against Broadsides as it combines great range with AP2 instantkill. S9 is essential for challenging A13 vehicles (especially where disruption pods are included!).
 Finally, I was really excited about how well the mortars worked. They consistently haranged the Tau lines, indiscriminately pinning or routing units. In return they received no casualties. They were untouchable. The missile launchers, heavy bolter squad and autocannon received all the attritional fire, and thanks to the commander/commissar/company banner combination - held their ground.
The Tau: After the game, Dustin admitted that he hasn't lost a game with his 'gunline' Tau except against Guard. Of the three games he's lost, two were outshot and one was close combat (probably with something like 'light infantry doctrine'). He was a brilliant opponent and took the hits on the chin, was 'generous' about numbers of hits, saving throws etc and actually inspired me to play the same - we had a couple of 'rulebook wobbles' but that was mainly over neither of us being able to find the rule in the rulebook! He was a pleasure to play against, and inspired me to 'raised my game' beyond being petty about little things...
... However, Dustin doesn't like drop troops or flanking and it cost him the game. Afterwards he felt he should get another Hammerhead and perhaps convert the Ion cannon hammerhead back to a railgun for maximum templates. I think that would help, but I think it would be a mistake beyond a key option - flanking and deepstrike.
 Under the new rules, pathfinders (and their devilfish), kroot and stealth teams can flank. While this is fairly pointless for the pathfinders, Kroot and stealthteams, combined with some deep striking Crisis Suits could have completely carved up my left flank. The stealth teams could have securely flanked (either attacking the ratlings or the Armour) and shot up the rear armour of the leman russes, chimera or lascannon sentinels. This would have crippled my ability to attack his Broadside and effectively neutered my antitank options. A stealth team could then hide behind a wrecked vehicle or hid in the open trusting to a 3+ save and the stealth fields. With a couple of drones in squad, they would have been unstoppable. In addition a crisis suit team could have demolished the leman russes with fusion/missile pod fire. The kroot flanking could have attacked the ratlings immediately, or been on hand to kill the armoured fist and command squad when they surged out.
Stealth suits and Crisis suits aren't great in close combat, but against anything without power weapons, they would have thrived. Crisis Suits a T4, with a 3+ save, which gives them a better than fair chance against guardsmen if they charge. The guardsmen hit first, but 10 hits only result in 0.74 wounds - I like those odds.
Finally, despite watching leadership after leadership test passed with ease, Dustin didn't go after my command squad. Six would later and he would have had a good chance of routing my Ld7 troops (who were all lined up on the board edge). The combination of a flanking/deepstrike phobia and shooting at my 'preffered targets' meant Dustins firepower was wasted. Something tells me next time I won't be so lucky!
 Dustin's Dog Witnessed the Whole Thing - poor thing!