
Further to the ToSsA tournament (which is still ongoing) I was asked by a group of new players to organise a game. This meant I had to organise a battle for a total of six players. Now, I'm very keen on encouraging New Players into W40k and get a real kick out of it when they enjoy it. After a lot of experience I have adopted the following strategy:
- Play to win, but don't exploit your 'knowledge'.
- Explain the options and tactics available to every player - objectively (quite hard sometimes).
- Be honest
- Most important - be fair.
This means you have a lot of responsibility to get it right, and be very honest (because you can effectively make it up, if you were a cheaty little wotsit!) Luckily for my opponents, I'm not.
The battle lasted 3 turns (which in a three way, explaining all the rules and explaining all the tactical choices - is FOREVER!) but was brilliant fun! Highlights included the Harikari Lictor, the objective in a tree and the 'ducking Shas'El'. All the teams were 500pts and the rules for a three way battle "Called Broken Alliance" can be found on pg.272-273 of the 'big' W40k rulebook.

Setup: Each team placed an HQ unit within 6" of the 'ammo dump' in the centre of the board. The rest of the armies were deployed within 12" of their 'base-camps', built around objective markers. The base camps were base in both corners of the one long board edge and the centre of the opposite board edge.
Objective: Capture/Contest objectives
Special rules: First up there's turn sequence. Unlike normal 40k it isn't linear! This makes for an incredibly lethal and tactically varied game. The idea is that whoever goes first one turn, automatically goes last next turn! The two remaining players dice-off to see who goes first. This means that armies frequently get two goes - which is lethal! Secondly, the rules for shooting into close combat go out the window. You can happily pepper a close combat fraccas, as long as your boys aren't in there. Any shots into combat are rolled on a D6 with 1-3 hitting your unintended (but equally satisfying) opponent.
Before we get started I have to say that this was one of the funniest battles ever - playing three way is a lot of fun (luckily the wife was involved!)
Just to add pressure, I was up against the entire in-laws. This included my partner (Bim), the mother in law (MiL), Father-in-Law ('Klaus'), Brother-in-Law (Cosser) and his partner (Danish).
*****
Army Lists: Guard and Tau are discussing terms of surrender (they both think the other is surrendering) in no mans land when Hive splinter Urobus attacks. Every senient for themselves!
Tyranids (Suneokun and MiL): On random dice rolls this is the second time the MiL and I have fought together against a common foe. The first time was with a significantly reduced force, on the Tyranids first outing (see here) and we died quite spectucularly!
HQ: Broodlord (Feeder Tendrils) and 5 genestealers.
Elite: 3 Tyranid Warriors, one with rending claws and death spitter, one with rending claws and spinefists, one with scything talons and devourer.
Elite: Lictor
Troops: 10 Termagaunts with Scuttlers
Troops: 8 Hormagaunts
3 Ripper Swarms with adrenal glands
Tau (Cosser and Danish): Complete Noobs to playing, they were given a versatile and tricky force to get right and did a stellar job.
HQ: Shas'El with Flamer, Air Fragmentation projector, Missile Pod, Hard wired target lock, hard wired multi tracker and 2 gundrones.
Elites: Crisis monat team leader, Twin-linked Missile Pods, Fusion Blaster and Hard wired Multi-tracker.
Elites: Stealth Team [3], 2 burst cannons, team leader with fusion blaster and hard wired target lock, 2 gun drones.
Troops: Fire Warriors [9] with Shas'Ui.
Troops: Fire Warriors [9] with Shas'Ui.
Imperial Guard (Bim and Klaus): Bim's had some experience playing Guard and Tau - so she was going to do something clever. Klaus would bow to her better knowledge.
HQ: Junior Officer Command Squad [5] with 2 grenade launchers
Elites: Ratling snipers [4]
Troops: Platoon HQ [5] with 2 Grenade Launchers
Troops: Squad #1: Plasma Gun
Troops: Squad #2: Plasma Gun
Troops: Remnant Squad [5] with flamer
Troops: Armoured Fist with Heavy Bolter and a Chimera with Multilaser, Heavy Flamer and Heavy Stubber.
Deployment: We decided to agree turn sequence after deployment (otherwise it would have taken forever. Everything deployed bar the deepstrikers and flankers (the lictor, monat and stealth team).
 The three HQ elements looked very uncomfortably exposed in the centre of the board, with the Broodlord and his 5 genestealer retinue looking particularly mean! The Tau Shas'El and Guard HQ looked exposed.
The imperial guard troops embedded in the cover with the command squads and remnant out front. The ratlings took their right flank while a plasma squad embedded in the building on their left flank.
The Tau bunched up around their objective, their two fire warrior squads looking very outnumbered when compared to the Tyranids or the Guard, but with strong fire lines on both adversaries.
The Tyranids deployed as far forward as possible.
Turn 1
The Tyranids Surge
The Tyranids Surge
 We rolled for the first turn and the result couldn't have been better for the two gun lines. In a tangle of confused limbs, the Broodlord sucked his thumb. Guard would go first, then Tau, then Tyranids!
Imperial Guard (Turn 1-1st): Bim and Klaus wasted no time in targetting what they saw as the most lethal units in the Tyranid armada. The Broodlord came under withering fire from the remnant sqaud and ratlings and despite a cover save from most, 3 of the 5 genestealers bought it. The Heavy bolter and Tank targetted the Hormagaunts as Bim had long since learnt of their lethal charge. Meanwhile the flamer team was moved forwards and the Command squad retreated. One command squad targeted the Broodlord, whilst the other failed to kill the gundrone. Unluckily for Cosser and Danish, the Plasma team were within 24" and managed to secure the gundrones demise with a plasma gun shot. Some heavy bolter fire targetted the Tyranid Warriors, but whether it was the hive mind interference, not a wound was made.
Tau (Turn 1 -2nd): the Tau lacked the sheer firepower of the guard with so many units in reserve. The Shas'El targetted the tank side armour with his missile pod and AFP, despite getting a penetrating and glancing hit, he but only succeeded in a shaken result, the Chimera was shooting noone. The FireWarriors instead targetted the hormagaunts, reducing them to just two models. Satisfied that this enemy of the greater good was subjugated, they targetted the other squad at a Imperial Guard command squad and managed a single wound.
Tyranids (Turn 1 - 3rd): I hadn't moved a model, but had already seen my best assault units decimated... but not destroyed. However I knew something good. Coming last meant that I had a guaranteed 2 turns against the Guard and a 50/50 chance of having two turns on the Tau. Trusting the the tyranids speed (two turns worth) I sent the Hormagaunts (all 2) left with the Broodlord. The Termagaunts broke right, fleeting towards the Fire Warriors protecting their objective. They were followed by the Tyranid Warriors. Despite the combined fire of a devourer and deathspitter, not a single fire warrior died in the sqaud in the open. Meanwhile the Termagaunts charged the Tau Firewarriors in cover. To my surprise they were equal in attacks and the Tau held firm. The Remnant squad weren't so lucky and the 2 hormagaunts managed to secure 4 wounds to the guardsmen 1. I was down to a single hormagaunt - but not out - I had another turn! The Broodlord and retinue killed the command squad dead without comeback and consolidated towards the heavy weapon/armoured fist unit at the back. The rippers ran out into the open in front of the snipers - confident of their additional turn.
Turn 2
Tyranid Consolidation
Tyranid Consolidation
 With the Guard guaranteed coming last this turn, Cosser and Danish rolled off against the MiL and myself. The Tryanids won. Good news for this turn - but actually less helpful, as we would have to go last next turn!
Tyranids (Turn2 -1st): The Ratlings peeked up from their sniper sights just in time to get marauded by swarming rippers intent on their blood! The Ratling fought tooth and nail and despite everything being on the rippers side (tougher, stronger, x3 the attacks) the Ratling pulled out a draw at one wound each?! The Armoured Fist squad were equally lucky, while losing 7 men to the devastating broodlord and retinue, they managed to kill the remaining two genestealers. Despite this they routed and were pulled apart by a lonesome broodlord. Meanwhile the lone Hormagaunt happily leapt into combat against the command squad. Despite best efforts, neither side managed to wound! So with the close combat elements struggling, it was up to the basic troops to show the way. The termagaunts managed five wounds on the fire warriors and only lost one in the exchange. This was too much for the Tau and they broke and were pulled down by the ravaging lizards. The remaining 7 gaunts consolidated into the undergrowth capturing the enemies base! Meanwhile the three warriors moved into cover behind the hill and tried to wound the Tau firewarriors in the open. Despite some solid shooting the armour prove enough and only one fire warrior fell.
Tau (Turn 2 -2nd): The arrival of the Stealth team made up for the loss of their fire warriors. They flank attacked and arrived adjacent to the Chimera and the Broodlord. The elites attempted to use their 'target lock' ability to mix fire between the tank (with the fusion blaster) and some guardsmen (Cosser and Danish were well aware that the Tyranids weren't going anywhere). The stealth teams leader failed to hit with the fusion blaster, so Cosser committed the whole force to shooting the tank in the rear. One glancing and one penetrating hit later resulted in a destroyed heavy flamer and a shaken crew. The stealth team and their drones consolidated in their assault phase moved and leapt on top of the building housed by guardsmen - safety tucked away from Tyranids! The Tau Shas'El and the remaining 8 fire warriors concentrated fire on the Termagaunts holding their objective - forcing them to go to ground. The Monat failed to arrive from deep strike.
Guard (Turn 2 - 3rd): With a whole half of her army destroy in a single turn, Bim needed to take drastic action. Spurring her shaken tank into action, the Chimera shot forward 12". It might not be able to shoot, and may have lost it's most potent weapon - but the 10 troopers inside would be enough. They piled out and thanks to some clever placement, everyone but the sergeant was able to shoot. Their target - the Broodlord (or BroomLord, as Klaus insisted on calling him!). Denuded of his protective genestealer bodyguard, the 16 lasgun shots and 2 plasma shots added up fast and the Broodlord found himself with a single wound left. Meanwhile the other platoon squad had taken umbridge to their heavy flamer being destroy (Bim really likes flamers, especially heavy ones), and took it out on the Tau on their roof. Unfortunately for the plasmagunner, his weapon decided to vent all over him and he failed to hit. The other las shots were more successful and both the Tau Stealth-suits gundrones were killed - the stealth Shas'Ui held they're nerve though. In the final part, the Command team killed their recalcitrant Hormagaunt and consolidated 6" to the edge of the hill.
Turn 3 "Revenge of the Humans"
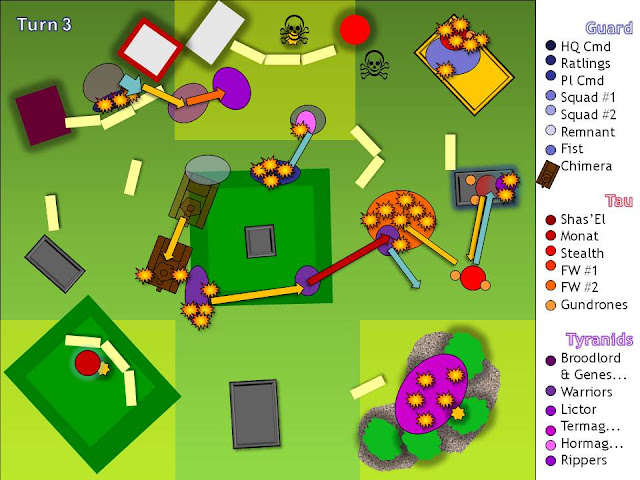 After taking advantage of my 'double move' I now faced a total of four turns between my last turn and the next... this was going to hurt! Bim faced off against her brother Cosser and the Guard won, the Tau would again take turn 2 - talk about consistent.
Guard (Turn 3 - 1st): Now the tables were turned on both the Tau and the Tyranids as the Imperial Guard demonstrated their awesome firepower. The command platoon, fresh from their 'Hormagaunt chopping' experience targetted the broodlord and easily dispatched his final wound with a couple of krak grenades and lasgun fire. Seeing this, the sergeant with the Chimera ordered his men back in the tank. Now unshaken and very much working the tank trundled forwards 6". The squad inside manned the starboard lasguns and the plasma gunner popped up through the whole. Added to this was both the multilaser and the heavy stubber. Cruising slowly behind the Tyranid Warriors and let rip. From the three surviving Tyranid Warriors, only a single warrior on a single wound survived. Meanwhile, back at their building, the platoon squad decided they REALLY didn't like the stealth suits on their roof. 17 las shots later, three pincushioned armoured forms crashed against the roof buttresses.
Tau (3rd Turn - 2nd): In a bizarre mirroring of the stealthsuits arrival, the Crisis monat arrived and deepstruck in front of the Chimera. He scattered back 5 inches, but still within 12". Both Missile Pod shots hit and the Fusion Gun. 2 penetrating shots! The tank STILL survived with another broken weapon and a shaken result... it could still drive! The Shas'El ordered his fire warriors to make for the Imperial Guard lines and engaged the Imperial command squad on the hill. The Fire Warriors complied and smoked the command squad with 8 hits, 4 penetrating their hill despite the team going to ground. Meanwhile the Shas'El moved into flamer range. Killing 3 termagaunts with the flamer, he also killed a further 1 with a scattering AFP shot. After consulting the tyranid codex, I established that the Termagaunts had 'lurked' and therefore were immune to leadership tests (although they also couldn't contest or hold the objective they stood on - maybe next turn...
Tyranids (3rd Turn - 3rd): Right, about time! I've got no-one left - how depressing... still. The tyranid warrior surged forward and despite only having one wound plunged into combat. His devourer managed to kill a single Tau on the way in, he then charged and killed four more. The remaining 3 Tau were unable to wound the Warrior in return and subsequently routed, being cut down by the desparate Xenos. The tyranid warrior consolidated within 12" of the gaunts in the wood. Meanwhile the fearless (and pretty pointless) ripper swarms rushed forward to attempt to reach ANYONE before the game ended. Finally, after several 1's on the previous turns, the Lictor arrived - a beautiful model and I'm really pleased how he turned out. He deep struck brilliantly next to the Crisis Suit Commander and leapt into close combat. Striking 4 times (reroll to hit - good...), he score 3 wounds (nice), none rending (boo), that were promptly saved (bah). In return, the Shas'El secured a single wound. Unfortunately, because of the new fearless rules he suffered another wound (and failed his save). Unfortunately, because of the new fearless rules he suffered another wound (and failed his save). My 80 pt Lictor had just commited Seppuku!
At this point we all agreed that midnight was a good point to stop - everybody thoroughly enjoyed the battle (although Klaus resented not being able to surrender in the first turn!) and we all got home to bed.
The tactic agreement on the night was that the guard were winning, but the Tau could maybe pull it back. My bruised and battered Tyranid force just didn't have anything left...

Conclusion
It actually reminded me of the tactical approach of games such as Advanced Space Crusade or SpaceHulk - where things are predicated around ambush and recovery - a sort of quick-quick-slow that gives a more latino beat to the normal GW 40k 4-4 heavy metal gameturn beat!
Guardsmen: Never has the strength of the new close combat rules been demonstrated so well as when nids fail to kill all the guardsmen! Despite having the worst guns and the worst armour, the guardsmen tallied through. Merit has to go to the two standard squads who accomplished the killing of a broodlord, the death of an entire stealthsuit team and performing a gangster driveby 'Chug-Style' with their Chimera! Special mention must go to the ratlings, who faced down a ripper swarm despite being the only thing on the board smaller than them - talk about against the odds.
Tau: the Tau performed strongly. Using their firepower well. Luckily for me, the Termagaunts were slightly better (in luck if nothing else) and the Termagaunt 'problem' took the Tau almost the entire game to resolve. Looking back - I should have charged the Tyranid warriors in as fast as possible - one warrior killed an eight man FW team - what could three have done. I was worried about the Shas'El however. Despite this, at the end of turn 3 - only the Tau had the anti-tank and the speed to challenge the Guard.
Tyranids: I love the broodlord! He's sweet (in an awesomely ugly sort of way). The performance of the Rippers was great, dropping well below the radar (literally) they snuck up on the ratlings. I'm seriously considering giving them leaping in future (at least against Tau) as templates worry me. The termagaunts worked hard and died hard - killing and securing the objective, they tied up the Tau all game. The hormagaunts were brilliant - managing to kill a squad with only two men. The biggest dissapointment of the battle - the Lictor. 80pts of nothing. That's 5 genestealers, or 8 Hormagaunts, or 16 spinegaunts! He sucks ... sooo badly. Why did I buy him, why did I take him? Can someone please explain to me what the Lictor is good for - cause he's dying a lot lately. Did I mention lately - he was sooo late.
Waste of a elite slot - period.
Anyhow - nobody secured an objective. Killpoints are a challenge as many times a unit was killed after being mauled by the third protagonist ... but here goes. Winner is worked out on kill point difference:
Guard
Kills: Broodlord, genestealers, hormagaunts, 3 Stealthsuit and 2 gundrones - 4 killpoints.
Losses: HQ Command Squad, Platoon Command Squad, Ratling Snipers, Armoured Fist, Remnant Squad: 7 killpoints.
Tau
Kills: Lictor, HQ Command Squad: 3 killpoints.
Losses: Stealth Team, Fire Warrior Squad #1, Fire Warrior Squad #2 - 3 killpoints.
Tyranids
Kills: Platoon Command Squad, Remnant Squad, Ratling Squad, Armoured Fist, Fire Warrior Squad #1, Fire Warrior Squad #2 - 7 killpoints.
Losses: Broodlord and Genestealers, Hormagaunts, Lictor - 4 killpoints.
Which means the mother in law and I grab a moral victory over all the newbies!
So yeah, err carnage. Try it, its lots of fun!