Tuesday 30 March 2010

BATREP: 1850 Nid v Guard - Battle Mission

In the face of the neverending devourer ... the guard employ Orks...

Further to my previous pasting by my friend and colleague, Mark 'Ironside' - we rescheduled another game. I was to get the chance to rethink my horde to get to grips with Mech armour ... while Mark would put together a more fluffy/mixed guard force.

After last minute chats, we agreed that the Guard wouldn't go all infantry and that a mixed force would offer me the best challenge. This is my fifth outing with the new nids ... and I'm still getting to grips with the play-style (being more used to Guard and Tau gunlines) and the special characters I roll with.

TYRANID ARMY LIST - Hive Splinter Orubus
  • Tyranid Prime: Lash Whip and BoneSword, Devourer, adrenal glands
  • Parasite of Mortrex
  • 2 x 1 Hive Guard
  • Doom of Malantai in a basic Spore
  • 20 basic Hormagaunts
  • 4 Warriors with rending claws, toxin sacs and deathspitters in a spore
  • 10 Termagaunts
  • 5 genestealers
  • 5 genestealers
  • Tervigon with Regen, Catalyst, toxin sacs
  • 20 Gargoyles with toxin sacs
  • Trygon with regen
  • Trygon with regen
GUARD ARMY LIST - Mark's Defence Force
  • Primaris Psyker
  • Infantry Command Squad - Autocannon, meltagun
  • Squad #1
  • Squad #2
  • Squad #3
  • Squad #4
  • Squad #5
  • Veterans with 2 plasma and a meltagun
  • Lascannon HWT
  • Missile Launcher #1 HWT
  • Missile Launcher #2 HWT
  • Mortar Team #1
  • Mortar Team #2
  • Hellhound with heavy flamer
  • Hellhound with heavy flamer
  • Vendetta
  • Punisher with Pask and 3 Heavy Bolters
  • Leman Russ with heavy flamer
  • Leman Russ with heavy flamer
Marks getting really into his duel hellhound list (impressed on him by your truly) and apart from dropping the vendetta and taking yet more mortars ... this is probably what i'd take (but with more flamers ... grrr)

To keep things interesting I suggested we play a battle mission rather than a standard conflict. This would give us a chance to showcase Jervis' big new idea ... and the Nid one's seemed particularly tasty! As I jumped this on MArk that evening, I gave Mark the choice of the Nid mission he'd defend.

He opted for 'Wave Assault' (Pg:84)

WAVE ASSAULT DESCRIPTION

For those that haven't bought battle missions yet, wave assault requires the 'non-nid' player to deploy anywhere more than 12" away from 3 board edges. The Tyranid player then divides their army in to three equalish sets of units. These 'sets' then arrive in a random order in turns one, two and three. The objectives are based in the centre of the board and 18" away from the centre line of the 'nid-edges'.

DEPLOYMENT

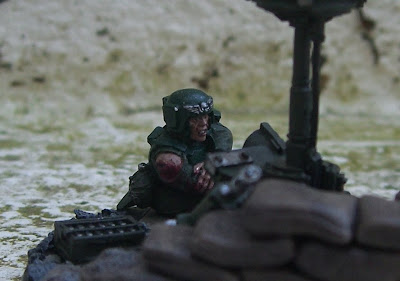
Our lictor viewed the smelly objectives, surrounded by tasty tasty treats (otherwsie known as guardsmen)

Mark deployed everything except the 'fast attack' options (with his vets inside the vendetta). The standard guard squads formed up around the Leman Russ battle tanks, with the Punisher sitting pretty in the middle. The Heavy weapon teams sat well back in a handily placed central bunker complex (oh, how did that get there? LOL) and hunkered down for the battle. Mark strategy was going to be to blast me away from the centra of the board with some serious firepower.

DIVIDING THE WAVES ...

Never having done this before, I sort of worked it at random ... and made some blinding mistakes!

Wave 1
  • Tyranid Prime and four warriors in a Spore
  • Doom of Malantai in a Spore
  • Tervigon
  • 5 Genestealers
Wave 2
  • Parasite of Mortrex with 20 gargoyles
  • 1 Hive Guard
  • 10 Termagaunts
  • Trygon
Wave 3
  • Hive Guard
  • 20 Hormagaunts
  • 5 genestealers
  • Trygon with regen
Anyone else notice the blinding mistake. No Synapse in Wave 3 ... guess which wave turned up first!

TURN 1: It's just a jump to the left!

The Hive Guard, Hormagaunts and Genestealers arrive on the left hand flank, while the Trygon deep strikes in the middle to cause maximum problems. Hive guard immediately fails his leadership and hides ... hormagaunts keep their nerve and keep to some cover for this turn. The Guard turn their ire on the Trygon, with Commander Pask with BS4 20 shot reroll to wound punisher cannon leading the way ... he goes down in a hail of rapid fire death and nastiness. Oh dear. The battle cannons open up ... killing half the Hormagaunts and 3 genestealers. Wierdly both units pass their leadership tests!

And in normal vision ... Mark sets up three layers of dakka to meet my horde!

TURN 2: And a step to the rigggghhhht!

Wave 1 arrive. And the Tervigon turns up and spouts 10 termagaunts onto the board. Forget to Catalyst the stealers though ... doh! The Spore land brilliantly and the Doom kills several heavy weapons teams and forces a standard squad to run off the board due to casulaties. The Tyranid Warrior and Prime also hail fire on the enemy ... but the lack of a rear armour shot thwarts them. They do drop into area terrain. The Hive Guard flips again (and I mistakenly keep him in 'cover' not 'area terrain' ... this is a mistake. The hormagaunts flip out and run, skip and jump a guardsman squad ... causing a not inconsiderable massacre. The Hive Guard pop shots at a unit and 2 genestealers move up behind the spore/warriors on the left flank.

The Prime leads a desparate charge down the middle ...
hang on we're nids ... munch munchy, crunchy crunchy!


Guardsmen respond. The lasgun fire drops a genestealer, while a missile launcher barrage kills the Doom (when won't I roll a 1 or 2). The combined fire of lascannons etc is weathered by the warriors in cover (while the prime take some strategic lascannon hits and battle cannon hits) ... on the other flank a peppering of lasgun shots is followed up by a hellhound, who kills 4 termagaunts and all but two genestealers... hmmm. Meanwhile Pask proves wholely useless against the Warriors.

TURN 3: ...bugger that, right down the middle boys!

The Hormagaunts go on to massacre the command squad (left hanging by a vagrant Primaris Psyker avoiding 'shadow') The last wave arrive and the gargoyle flood on to the board ... nicely spread out. Both hive guards pass their leadership this turn and subsequently do nothing against the leman russ in range.

The remaining 2 Warriors and Prime charge the leman russes in front and score multiple hits.. immobilising both of them and removing the battle cannon from one. The Tervigon spouts another 8 termagaunts and they flood the board as the genestealer (catalysed this turn) make a run at the hellhound. The termagaunts open fire on the guardsmen in the open and start demonstrating their grit ... downing several.

The lone genestealer on the right flank charges a squad of seven and kills 3 ... but gets taken down in return... more hormagaunts, check?!? The two genestealers manage to hit the Hellhound, but fail to penetrate it ... another 6 anyone?

The Trygon attempts to repeat the genius of its forebear ... deepstriking in the middle will work this time 'surely'.

The Guard get the other hellhound and vendetta. The vendetta arrives on the left flank and immediately turns my 'out of place' hiveguard to pate! Lurk in AREA TERRAIN next time please! The other hellhound comes on in support and adds its attack to the hurt raining on my warrior squad... but now at toughness 5 ... they weather it well, but fall at the last shot!

The Trygon finds that the bad plan first time was a bad plan second time round ... and goes down to flashlights ... yes flashlights - damn you guardsmen! The Termagaunts take a creaming from the hellhound and the genestealers get wiped out with krak missile. FNP, hah! The Doom attracts some serious firepower. The Primaris moves up to engage and forgets about synapse/shadow and subsequently does himself an injury! The Gargoyles attract serious mortar and punisher fire, but only lose about half ... not bad.

The Myetic Spores get pummelled to goo too. So at the end of this turn I have the Doom and his gargoyles ... a single hiveguard. 24 Termagaunts, a Tervigon. Not good.

TURN 4: Fight fight fight!

I'm seriously stretched for synapse now ... The Parasite charges another Leman Russ and kills its cannon too, damn you dice. Meanwhile the Tervigon moves up to take an objective. It spouts out more termagaunts, which shoot up more heavy weapons and guardsmen ... some more run away! The hiveguard lays a shaken result on the right flank hellhound, but fails to kill it (another poor penetrating hit!) Termagaunts move up and claim one objective ... shooting off the guardsmen.

Termagaunts Horde and Tervigon secure an objective ... while the Parasite plays
pattycake with the guardsmen ... producing 8 swarms!


The remaining 3 Hormagaunts show their pace as they race across and kill the Primaris Psyker ... but fail to make it back to cover...

Guard shooting is the worst of the game. A number of gargoyles, termagaunts and other die ... but nothing in the numbers I expected. Importantly, the hiveguard survives. The Vendetta flies up to grab the centre most objective, while the hellhound moves up at full speed to contest another.

TURN 5: Breeding a new army.

Tervigon finally sparks out this turn, with another 10 Termagaunts. She Catalysts up and sits on the objective. In addition, the Parasite leaps a terrain piece and dives into combat with the final troop choice in range. The ensuing comabt in drawn (thanks to three great 5+ saves by the guard) and the remaining gargoyles are dead ... but 4 new rippers burst to life and swarm over the central objective.

Pask comes a cropper on some uneven ground (better get out and push you bugger)

In the enemy turn, the punisher moves up to contest the centre but Pask proves a better commander than driver ... resulting in an immobilised tank! The hellhound weathers the hive guard fire (only now do I realise I rolled the hiveguard at BS3 all battle (doh!)) to contest. The other hellhound moves up and (ignoring the Tervigon) drops a S6 murder template over my swarm ... killing all. The veterans then disembark to capture both central objectives.

We roll a 1.

Final Score ... a close 2:1 to the guardsmen!

CONCLUSIONS

Is this battle mission supposed to put me at an advantage??? Ok, there wasn't one. It was actually a really well balanced game and very very fluffy - which is what I like. In addition, the performance of the Prime and the Parasite were superb. The Tervigon soldiered through, pooping out termagaunts (much to Marks dislike)... but the main thing was what I learnt about deployment.

What made a refreshing change was that my 'anti armour' options really worked this game. Mark had nearly as many tanks as our last battle, but the anti-mech options worked this time. The Hive guard are a solid option... while limited against leman russ, they excel against hellhounds and vendettas (especially if you remember they're BS4!) ... The Prime and Warriors are currently a little wasted in antitank duties ... and hopefully a bit of FNP from the tervigon would offer them all out into the open and assaulting the flanks!

Tervigons. I'm a little afraid of getting Tervigons into the mix ... but they are actually far more durable than I give them credit. Hiding the Tervigon behind my Warrior unit would have given her a 4+ cover save, and them a 4+ cover (assuming random hormagaunts in the way) and 4+ FNP!

Add into that the ability to drop a FNP on a deepstriking Trygon and I'm laughing. It's clear from this battle that I need to work on my unit synergy far more.

With this in mind, I should have grouped the Spore mines and Trygons in a single cluster ... offering me a chance of delivering some serious pain. The Hive Guard were great ... but they don't need to be separate. Hiding them behind the Tervigon would offer me better options.

As a third group, the Parasite is the ultimate horde leader. Dropping Hormagaunts and Gargoyles and Termagaunts under his wing would have made more sense. As such, if I played again ... I'd take the following:

Group 1 (4 units): Prime and Warriors (walking), Tervigon, 2 x HiveGuard

Group 2 (4 units): Parasite and Gargoyles, Hormagaunts, Termagaunts, 8 genestealers

Group 3 (5 units): 2 x Trygon, 2 (separate) Zoanthropes in Myetic Spores

These units are also useful to remember for the main game as well as they offer useful synergies in speed.

Monday 29 March 2010

Tyranids Adaptive Style...

Further to a recent poll ... I'm pleased to say that the classic Zoanthrope won! With the Tyrannofex and Hiveguard bringing up second and third. Thanks to everyone that voted...

In light of the many suggestions and my 13-2 pasting at the hands of mech guard ... I've been mulling over the Nid choices that I could take.

This is the current list I'm running, it's still based around the core of the parasite and the Prime ... both of which are performing well for their points!

So here goes:
  • Tyranid Prime: Lash Whip and BoneSword, Devourer, adrenal glands
  • Parasite of Mortrex
  • 2 x 1 Hive Guard
  • Doom of Malantai in a basic Spore
  • 20 basic Hormagaunts
  • 4 Warriors with rending claws, toxin sacs and deathspitters in a spore
  • 10 Termagaunts
  • 5 genestealers
  • 5 genestealers
  • Tervigon with Regen, Catalyst, toxin sacs
  • 20 Gargoyles with toxin sacs
  • Trygon with regen
  • Trygon with regen
Tactical shifts...

The Hormagaunts play fast bullet screen while the termagaunts and tervigon (plus offspring) hold objectives. The Gargoyles run with the Parasite (and do not deepstrike!) and pick their fight to provoke lots of spawn. The parasite can then join the spawn when his Gargoyles are used up! The genestealers attempt to infiltrate at point blank or flank ... depending on whether we have first turn. The hiveguard set up shop with the tervigon and wait for the Hellhounds to close... generating lots of immobilised and other effects.

The Doom, Tyranid Warriors and Prime and the two trygons deepstrike ... but I'm learning with deepstrike to go slightly 'out of range' on one flank. This limits the fire power shooting at you and can also 'chase' some enemies into the arms of the parasite!

That said the Doom and the two Trygons are generally dying on the turn they arrive. The 'up front' effect of the Doom putting him at point blank range to a lot of return fire power. opponents are leery of letting any of these into close combat and therefore the doom and trygons are yet to raise a claw in attack!

I'm actually still unconvinced by the doom's effectiveness. Especially given it's 'heat'... 30 more points for 2 anti-tank shots seems good odds. Perhaps Zoanies are the way forward... but the doom is a lot of fun. It's just too easy to roll a 1 or 2 versus a missile launcher or lascannon hit...

That said, a couple of Zoanies would offer a dependable shot at Pask in his Punisher ... which is an awesome anti-nid build ... those 29 BS4 reroll to wound S5 shots against MC's really add up!

The genestealers are yet to succeed at all. They've singularly failed to jump the enemy OR kill any of the mech they've gone after. 6's to hit, followed by 6's to penetrate is a big ask. I'm half tempted to cash in those boys for another Zoanie and maybe a lictor.

With this in mind, here's the list I'm currently thinking on for facing mixed guard:
  • Tyranid Prime: Lash Whip and BoneSword, Devourer, adrenal glands
  • Parasite of Mortrex
  • 2 x Hive Guard
  • 2 x Zoanthropes in a basic Spore
  • Deathleaper
  • 20 basic Hormagaunts
  • 4 Warriors with rending claws, toxin sacs and deathspitters in a spore
  • 10 Termagaunts
  • Tervigon with Regen, Catalyst, toxin sacs
  • 20 Gargoyles with toxin sacs
  • Trygon with regen
  • Trygon with regen
The addition of Deathleaper gives you a great anti-psyker/leadership boost. Plus he's nice and durable when dropped into that area terrain with the heavy weapon teams. I really lacked a close-in elite choice to throw at the heavy weapon teams in the last game. If I decide I want to take stealers again ... I can downgrade him to a normal lictor (who'd do nearly as good a job!).

What do you think?

Tuesday 23 March 2010

Rules Check 1...2...1...2...

An excellent HULKSMASH by MAURICIO HERRERA. Check out Mauricio's work at DeviantArt. Reproduced without permission, will be removed on request.

Have you ever had a game where you've got the rules right all the way through ... where you just missed things, or your sub-conscious did a special on you, and you realised that you spent most of the game moving and firing everything at the enemy ... I have, many many many times.

I wouldn't call it out and out cheating (although I know some movement fudgers who practice the above as art forms...) but somehow our little brains get 'set'. We end up fighting against the dying of the light over the most obvious and bizarre interpretation of a clearly written rule...

... Weird innit?

Now my approach ... it should be said, is to be fairly pedantic about the rules. I'm a bit of a stickler for sticking to them. I want to win on the merits of my tactics and armylist and its exploitation ... as well as some lucky dice rolls. I generally let the grey areas slide for the ease of play ... and importantly I'm more about having fun than winning... but is that's true, why do I commit the above sins? Perhaps its the inner HULK ... creating a better playing environment through the subversion of my subconsciousness. A case of 'HULK CHEEEEAT!'. Maybe?

Here's a selection of some of those 'rules' arguments or hypocrisies that beggar belief:

Firing Ordnance Weapons

In an effort to improve my '5th Edition' gameworthyness (and because I've read all my codeci 10 times over now), I've started rethumbing through the main rule book. In a moment of shock I realised that I'd been cheating in the last 'n' games (where n is the number of games that I'd been cheating in)... when a vehicle fires an ordnance weapon it can fire NO OTHER WEAPON THAT TURN (NB: Even defensive weapons are unable to fire ... Pg 58)! The exception is the Leman Russ ... that can fire its main weapon AND one other weapon. I'd been dakka dakka-ing away quite happily with everything I had!

This makes a huge difference to the way I play and the options I usually roll with. As an Imperial Guard Player it also gave me a huge advantage to shoot everything (dah?). I think what had happened was my 'cheat-HULK' had got the movement rules confused with the ordnance rules (easy to happen if you are green and a bit thick) ... and assumed the 'not firing all weapons' was down to the movement and not the huge massive great Demolisher Cannon firing...

Clearly, my reanalysis of the rules makes for some interesting thoughts, and makes tanks like the annihilator and punisher leman russ (let alone the no-cover-save variant) much more tempting....

Infantry Cover Saves

This one is weird. I ended up on the wrong side of half the club over this one. And even when the rule was read objectively and digested, I had a number of 'unconnected' gamers arguing against the very rule.

The rulebook clearly states "When any part of the target model's body (as defined on page 16) is obscured from the point of view of the firer, the target model is in cover." So if the toe of my rough riders is hidden behind a piece of hill - they get a 4+ cover save. This caused absolute uproar ... but I'm right (I know I am ... CHEAT-HULK says I am!)

The rulebook then goes on to say ... "This is intentionally generous, and it represents the fact that the warrior, unlike the model, will be actively trying to take cover..."

This is different from the 50% of the unit in cover ... or Monstrous Creatures and tanks gaining cover saves (50% or more of the unit hidden by the way ... I checked it ... I know, I'm too kind!) but somehow people couldn't disconnect the actual 'true line of sight' from the metaphoric 'model'.

50% of a unit in cover

This one also throws up weird 'HULK CHEAT!' moments. I have 75% of a unit obscured behind a wall (don't panic HULKERS, it a solid and relatively high wall!) then that unit has a 4+ cover save. Yes? Yes! If 51% of the unit is in cover ... then they all get a normal cover save!

If you can't decide (ie its exactly 50/50, or you can't count to 10) then you may 'choose' to forgo your proper cover save for one with -1. IE 5+ instead of 4+. My fellow club members had apparently adopted this as THE RULE (HULK) ... rather than taking it as guidelines for adoption based upon mutual consent. Even the rulebook is fairly fluffy, indicating that this option is .... 'faster (albeit less precise)' ... so a good option?

Weird...

Barrage Weapons

This one I get big time. Barrage weapons fire indirect, so the cover save is dictated from the centre of the template, NOT the firing position (ie through the trees on the way in). If you can see the target AND are firing indirect, you gain BOTH the templatie explodie benefit AND the minus BS to hit reduction.

I love mortars. I use them a lot and my explanation of this rule is well versed. That said, I found myself on the receiving end of a barrage recently and was half into a 'hang on a minute...' moment when I realised what I was saying.

It doesn't feel fair. At all.

Charging into cover

Can't wait for the arguments over this one. Check out the brilliant breakdown at Maunderings of a 40k player ... this ruleset has become more important since flesh-hooks (frag grenades) were dropped in the Nid army. Now players facing nids can expect to 'hit first' when defending from cover. This gives them a significant chance of chumping the genestealers or hormagaunts before nastiness ensues. As such ... it can become a contentious area.

Simply put (as Dverning confirms) ... if you have any models sticking out of that cover, the attacker can opt to charge that model without resorting to a difficult terrain test (DTT). No DTT, no Initiative 1 - you are all kinds of red red gravy!

At this point, many players 'HULKs' will be writhing. How can this be true. Surely you must charge into and onto me in cover and therefore I should batter you down. Check out the breakdown from maunderings ... its convincing.

The Rough Rider Effect

Sometimes a rarely used unit comes along and attracts a little attention. In one game, my opponent was running Assault Marines at me. I charged in my 'one-shot' rough riders. He'd been playing alongside me in a doubles tournament and seen these guys kill termies, smurf bikers and Tau Crisis suits ... he should have known better.

PENFOLD: "Assault Marines, Initiative 4"
Suneokun: "Roughriders, Initiative 5"
PENFOLD: "But strength 3..."
Suneokun: "Strength 5"
PENFOLD: "But power armour..."
Suneokun: "Power weapons"
PENFOLD: "...in cover?"
Suneokun: "Frag grenades"
PENFOLD: "HUUUUULLLLKKK CHEEEEAAATTT!"

My two squads of 55pt roughriders charged 22 inches and killed 6 assault marines. The assault marines beat the rough riders, but they held them up for one more turn before being killed off. At which point my Leman Russ had zero'd them. Kaboom?

Allocating Rerolls by accident

I'll put this down (mostly) to the new tyranid codex. The codex has a lot of random rerolls and autowounds bouncing around. The rending rules are complimented by blinding venom (auto-wound on a 6 to hit), one scything talon (reroll 1's), two scything talons (reroll all misses), preferred enemy (reroll misses, but not against vehicles), special rending (deathleaper rending on a 5 or 6), impregnation (parasite cause D6 ripper bases on a failed toughness test) and so on and so on.

As Space Wolf players will attest, it's difficult to remember which dice you have to reroll and which you don't... tricky.

In one game I attributed scything talons to the parasite (who has rending claws) and forgot to autowound from all the 6's from the gargoyle charge on Pedro Kantor (they died!) ... it's awfully confusing.

Great player arguing that the tail of a Vendetta was not part of its 'hull'

This particular fraccar occured during a brilliant tournament game where my aforementioned PENFOLD and I hammered a dirty Space Marine and Guard list with our brilliant Space Marine and Guard list. Effectively it was our mortars and terminators versus their Vendettas and Smurf Bikers (filthy cheating min-max army list ... pah!).

During the game an ordnance battle cannon shot scattered off the centre of one vendetta and hit a perfect strike on the tail of its accompanying skimmer. At this point my opponent declare this a 'miss' as it hadn't hit the 'hull' of the vendetta and 'wings and tail don't count' ... hang on a minute...

HUUUULLLLLKKKK CHEEEAAAATTT!

The conversation that followed was bizarre and entertaining. And pulled adjacent players off their own tournament games ... it was intense. I found myself in the minority again (IT IS probably just me ... people do enjoy arguing with me ... probably cause its great intellectual fun (and not because I'm an arse ... honest!)) with my fellow gamers arguing the difference between a hull and a wing and a tail. I pointed out that there is actually no 'hull' on an aircraft. There is a fuselage, wings and a tail ... the hull refers to the whole vehicle. The rulebook bears no interest in whether you are running a tank or a plane ... they both have hulls!

This stumped everyone, but in true hulky fashion, they would not give way to the logic of Bruce Banner. We rolled a 4+, and he saved the penetrating/wrecked roll. We played on. I'd like to think that the 'Gods of fairness and equilibrium' looked kindly on my plight ... cause we hammered them to death with small arms fire and won 12/4.

Conclusion

We all have a little of a mini-hulk inside us ... and wargames is the perfect place to go green (better than over your job, girlfriend, car, house or children anyhow!) ... I hope the above examples have amused you and help you know.

For you are not alone. HULK.

Monday 22 March 2010

Mycetic Spore #2: Ravening Horde...


Further to my first Mycetic Spore: Xzandrate made the following comment

xzandrate 6 days ago
I like that alot.

My only complaint, as it is with alot of sports, is there isn't enough representation of impact, or demonstration of how it slowed descent(yes I'm waiting for the big dandelion seed spore).

I'm thinking that the trygon bases may work best, with the spore on one end, and a small impact trail on the rest.

This is exactly what I love about blogging and the feedback it generates. When I read this, something in brain went 'ping'. His comments were exactly right. I'm not too bothered about making the 'impact' too realistic ... but a Trygon base ... pure genius. That would allow a little 'crash and drag' to add to the drama!

From this, my latest Mycetic Spore was born. To confirm ... This was built from bits, a 50p tennis ball sized polystyrene ball and some plastic-card (£1.05 for A4) ... so total cost (about £2! for a S6 monstrous creature drop pod!) - joy!

Carnifex and Genestealer Mycetic spores ... (like they will ever have a carni or stealers in them?!?)

Design Concept...

With my first spore I wanted to give the impression that it had impacted almost vertically and that the Carnifex was 'shakily' slicing his way out... I was very limited by the size of the base ... and therefore could do little to 'implant' the spore into its surroundings. Thus the spore actually looks more like it managed a drop pod landing ... which is highly unconvincing!

Unlike the first Spore I wanted this one to have more dynamism to it's impact. The Trygon base is definitely the way to go here and immediately makes the model more appealing. Gaming wise I can see the 'big base' as being more of a problem, as it will collect more firepower ... but so what?

Front view of the 'exploding' stealers. Note that I sacrificed and old and new stealer to the cause ... nothing like a retrospective!

The first thing I did was to slice of the bottom of the ball to bury it in it's trench. I then used the leftover polystyrene to build up the displaced materials behind it. To further to idea of 'momentum' I kept to a single 'crack' and modelled a series of genestealers bursting from the hole.

Why genestealers ... well they capture the attention don't they? In addition, the new codex funnels these guys towards a more small unit or commando role. This means that large horde of stealers are a thing of the past ... and the chance to actually field my 28 stealers outside APOC games was minimal. Perfect sacrifices!


Rear shot showing the trench ... built of polystyrene and cork 'rocks'.

I decided against the 'fronds' of the first spore as I wanted a more 'immediate' effect ... like this spore was still sliding to a halt as the stealers emerged. The 'scoring' was all done by experimenting with polystyrene cement (plastic glue), superglue and PVA (for the 'hardened' bits) ... see the post for my First Spore for more detail on how to get this look!

What do you think? Comments welcome (as usual!)

Friday 19 March 2010

Banner making for friends


Just a quick post ... after my recent blog on painting/making banners, I felt I better put my money where my mouth is...

Both Anton and Drax commented about doing banner and as good friends of them both I decided that I'd undertake to build them a banner each ... I little forward? Yes! However it perfectly demonstrates the examples I was trying to make...

In both cases I trawled their blogs for suitable source material, luckily both Drax and Ant paint splendid models so it wasn't long before I found this on Drax's site:


Then it was just a case of letting my imagination (and some serious photo editing software) rip on them both...

Here's the results:

CLICK FOR A LARGER IMAGE


CLICK FOR A LARGER IMAGE

Wednesday 17 March 2010

Tyranid Anti-Mech: Neck and Neck


Time's getting short to vote on the Tyranid Anti-Mech options ... and the race is turning into a close one! After taking an early lead, the Tyrannofex has been pulled back to level pegging with the last minute added 'Zoanthropes' with the Hive Guard bringing up a strong third. Neither the Hive Tyrant or the Harpy have gained much love ... but maybe you can change that!

Click HERE to see the original post... and VOTE on the poll on the right.

Tuesday 16 March 2010

Creating a banner

My new 'In the Shadows' picture took me a couple of hours (but I'm not very good ... yet!)

Keeping your banner fresh and interesting is a good way of catching the eye of visitors as they come to your site. Since Christmas I've been playing with my new favourite toy ... a Wacom drawing pad and have subsequently been playing around with producing banners/graphics and pictures...

Here's what I've learnt so far.

#1: You don't have to be an 'artist artist' to have a damn fine banner

As the recent poll at Maunderings of a 40k gamer proved ... great banner design has little to do with great artistic skill. If you can paint mini's, you can have a great banner design.

If you've got some spectacularly well painted character models that you're really proud of then you can go for a 'showpiece' banner. Get a quality photo of your best mini and then go through a banner maker program to do all the hard 'lettering' work for you!

Great work by Warhammer 39,999 in creating a well coloured and balanced piece.

Alternatively, if you are less happy with the quality of your mini's, you can always bunch them together in a dramatic 'scenario'. Take shots from the knees up at 'eye level' with a background of tanks... muchas fun!

Scenario creation is a fun way to build yourself a banner

#2: If you want to draw your banner ... keep it simple.

I've started multiple 40k paintings and drawings only to drop them 30% in because they are too complicated. The best idea is to keep it simple and play to your strengths. Do you have a good eye for portraits ... then do that, are you more of a 'graphic design artist' then stick to cool tanks. Play to your strengths.

This design keeps everything very simple and allows the centrepiece to stand out.

#3: Remember to 'adjust levels' or curves on your photo's

This goes for mini-photography more than anything. You don't need an expensive software. Simply download GIMP2 from SourceForge for free (it's open source) ... open your jpg and crop and resize. Then choose the 'curves' option and adjust the contrast, light and colour levels to the best to suit your mini.

#4: And finally ... don't be afraid of cheating

We're not advocating plagarism here and copyright infringement is right out ... but grabbing a head shot from the interweb is a great way of 'tracing' your way to victory! Using 'layers', you can trace a sketch of the character on one layer over the source material on another. As an example, here's how I cheated my way to my most recent banner:

Step 1: Who do I want to draw?

I'll be back (stomping on the gays rights as I go....) Image curtosy of Sacramento Bee and will be removed on request.

Politicians and Sports People are great choices for photohunting in google. Actors are very recognisable and have generally got a 'photo-face' on them - not helpful. For this example I chose the world most favourite governor (and California's least) - Mr. Schwarzenegger.

Step 2: Insert, adjust and trace...

By dropping Arnie into a layer of his own and then creating a transparent layer over the top, I can quickly build up a portrait with his profile. Now, you'll noticed that the completed picture doesn't actually look that much like Arnie ... and that's the point - I don't want 'Arnie the Guardsmen' ... I want a separate image.

Arnie's adjusted for position and then traced ... to give me my 'guide'

Step 3: Colours, Contrast and levels

Colouring in Arnie is then a 'painting by numbers routine. I can even use Arnie's original as my painting 'tablet' for colour selection. Build up the image and the environment around it.

Step 4: Research...

I've found plenty of great source material and inspiration out there. I've subscribed to 'ImagineFX' magazine and through them have found great resource pages like this one, on Henning Ludvigsen's SITE. Building up resources, source material and getting practice has never been easier ... thanks to the interweb.

Conclusion

So have a look at your current banner and think about how it talks about your site, your design and your aspiration ... (goodness only knows my site needs more housekeeping) ... and I hope the ideas above prove useful!

Comments welcome.

Monday 15 March 2010

Tyranid Tactica and Conversion: Mycetic Spore

Mycetic Spore ... turn two I cry "Tennis Ball of DOOOOOM"

If you haven't voted yet, then add your contribution to the vote on the right over which anti-mech option I should consider in my horde. As an aside, I'm addressing a missing monstrous creature that needs serious attention.

Mycetic Spores...

Hang on, a 40pt monstrous creature that can land like a drop pod ... ie on target (or near enough) to cause serious damage and harm ... I like it! Let's not get carried away ... the Spore ain't no Carnifex. But 40pts for the delivery method alone is worth it. Included I get a 3W, 3A lash whipped and shooty bomb ...

The biggest thing that caught my eye was the S6 6" range 6 shot gun ripper tentacles. Is is just me, or it that actually a better option than the Lictor. The lictor might get an 'autoplace', but I'd take six shots at BS2 over his 2 at BS3 any day! In addition, I just popped the hatch and dropped another MC, 20 genestealers or Doom of Maladie in your backyard. That's a lot of thinking for my opponent going on there!

So it's a bit like getting a 2-for-one deal. I get to drop 'the doom' at point blank, while at the same time I get to drop some random shooting on something nearby. Top choice for spore inhabitees:

#1 'Dooooooom of Malantai': The only defence against Doom (inside or out of a transport) is movement or mass lascannon fire. Dropping the doom at point blank means you'll get two turns of 'munchy munchy psychic powers' before the fire power starts dropping like confetti. The Doom WILL probably die ... but he'll take a whole turn of shooting to do it. Even so, giving him a MC golfball to hide behind ain't a bad option!

#2 'Zoanies': Yes Zoanthropes at point blank range! Dropping in a combination of the Doom, Zoanies and Gaunts/Stealers can be a great way of ruining someone's breakfast. Don't let them get pick off from a distance, get up close and personal!

#3 'Oh look, Devilgaunts': You've got to buy at least 10 gaunts anyhow (for a Tervigon), so why not 10-20 devilgaunts (that's devourer armed gaunts) dropped in at point blank. 20 Gaunts will fire 60 S4 shots at 18". That's 5 'Spesh Marins' dead or 13 Guardsmen. Guess that means that the objective is secure??

#4 'Good Ole Warriors': Yes, why take Shrikes? It's a copyright infringement, 5 pts extra and they only have a 5+ saving throw? Sticking Tyranid Warriors (normally led by a Prime) in a great big Spore is a great way of delivering choppy choppy death in the back yard.

The also rans...

Carnifex: Ok so this fellas now Tervigon conversion fodder ... because a Carnifex in a spore is more than a regenerational Trygon? The Trygon has more attacks, more rerolls to hit and S6 +2D6 is as dangerous as S9 +2D6 against all but the most nasty Deamon princes. Ok, so the Carnie can fire when he steps out of the spore ... but so can a Trygon?

Hormagaunts: I prefer to play my hormagaunts 'fast and loose', these guys are the distraction that you have to pay attention to. 6pts for superfast cannonfodder is great, and if the enemy ignores them, their high attacks will ensure they pay to regret it. Against Mech armies these guys are a cheap (and quick) bullet shield ... 2pts for adrenal glands?? Don't make me laugh!

Genestealers: They may be cheaper, but the 5+ saving throw ain't great, making these guys flamer-fodder in most games (as they should be!) My problem with them deep striking? Well you are better of infiltrating if you have a plan, or flanking if you haven't. Either way is better than a 'boo and stand very still' surprise.

Building a Spore - My Approach...

I had a look around the interweb and spied a few 'Mycetic Spores' that looked more like a present than a threat! The Easter Egg spores didn't exactly fill me with enthusiasm. Therefore I went back to the drawing board. My background in water purification and my other half being a parasite doctorate ... I quickly discounted 'egg shaped' and went towards 'ball shape'. After all, even reptile eggs are round and only birds (and some mammals) produce the 'oval' shape.

Crucially for me, I wanted to build something more like an Oocyst of a Zygote Crytosporidium. This is a particularly nasty water borne parasite which grows a hardened shell in order to fend off dessication or chemical cleaning processes (like Chlorination). Take a look at the following link and you'll get a clear idea about the life cycle of this bug... LINK

Oocysted Crypto ... in deep space?

Crypto has a particularly nasty stage where it can estimate if the 'coast is clear' (ie: no chlorine) and then it splurges out the side of the cracked Oocyst in a particularly unpleasant manner.

RUDDY PERFECT!

Size: Tennis Ball sized polystyrene ball - 50p
Based: Plastic Card stencilled to shape as a 60mm MC base.
Rubble: Cork
Breakage: Knifework complemented by polystyrene cement and super-glue
Ageing: Enamel Spray black basecoat.


I think you'll agree that the 'tennis ball' size is spot on for housing a Carnifex or 20 genestealers. The size is also about right for hiding MC's behind while avoiding the overblown cover allegations of the larger 'easter eggs' designs.

I'd like to claim some 'genius' or 'brilliance' in the build, but it literarally came down to working with the effects of the different glues and paints on the Polystyrene. Simple rule ... anything that ain't acrylic paints will wither and eat your polystyrene ball!

I cut the large holes into the ball ... I wanted to give the impression of a self activated biological acid eating away the surface... which works pretty well. I scored very slight 're-entry burns' and crash scars around the base of the ball. I then glued the cork and ball to the base.


After drying (well during actually, I was impatient!) I then superglued in the Carnifex head, scything talon (that's sclicing its way out!) and the various fronds bursting from the holes in the surface. At this stage I noticed the 'burnt effect' and went back over the 'scoring reentry' with pippet strokes of superglue. The melted/burnt effect was very good. After this I added so PVA and plastic glue as 'gloop' about the Carnifex exit.


I wasn't aware that the enamel paint I used to base all my models would 'bite into' the polystyrene (I think the rule of thumb is to assume everything will!) ... but the finished effect looks brilliant!

I have to say, after painting, that this 'tennis ball of Dooom!' is the grossest thing I've created so far for the nids... even beating my rippers!

Let me know what you think!

Friday 12 March 2010

Tyranid monster anti-mech ... help me choose?


So I've hit a quandry, which I thinks actually a pretty close call and I'd like to throw it out there to everyone...

You should be pretty familiar with my list by now ... generally revolving around the Parasite and Prime and dropping 2 Trygons and a Tervigon on the enemy. I got pummelled in the recent game and lost astoudingly badly to mech guard (13-2), so what 250pts should I spend to 'upgrade' my antimech option?

Option 1: Hive Tyrant with Venom Cannon.

First downer ... this significantly changes the format of my army and would force me to drop the Prime or the Parasite. On the upside the Hive Tyrant can come with lots of fringe benefits, including psychic powers and 2+ armour save. The problem I forsee is that a Tyrant with 2+ saving throw, a heavy venom cannon and regen comes in at 255pts ... which is Tyrannofex territory. The advantage for the Hive Tyrant is that he gets Tyrant Guard AND is awesome in close combat. But you're talking about 315pts for a 6 wound unit ... which makes the next option seem cheap...

Option 2: Tyrannofex

Nice conversion opportunities here as the Tyrannofex with a Rupture cannon totals 295 points (he needs regen after all). He's got short and long range shooting goodness and comes with a 2+. He's an obvious target for deepstriking termies ... so you'll need termagaunts/genestealers in the rearguard. But otherwise he's a shoe-in. Means finding 45pts out of my current list ... but thats no great shakes. He'd also take 12 Lascannon shots or 12 railgun shots ... and that's assuming no cover. Overall I'm tempted.

Option 3: Harpy

Great conversion opportunity and a good solid suggestion. The twin linked heavy venom cannon is actually the most accurate, but flying MC's are cannon fodder as they are very hard to hide 50%. That said, I'm also alarmed by only having a 4+ save on this guy and T5 ... as a guard player this screams 'bring it down' autocannons to me! He is the discount option though, at only 185pts. But also the most vulnerable, with only (only?) 4 wounds and instantdeath to S10.

Option 4: HiveGuard

Oh, hiveguard ... what to do? With a harpy, I could afford a single hiveguard to offer machine gun support to the Tervigon and shoot up the enemy. Careful placement could also make units of these guys real area denial placers for anti-mech. I'm very tempted to play one (I have an old Zoanthrope I can convert and see how he does...? At 50pts each ... that's 5-6 on the pricing we're talking ... that's 12 T6 wounds out of LoS and pumping shots into side armour. That's really really really good.

BUT: I'm hearing on the web they are a pain to build AND they are at least £10 each... which gives me pause ... would I be better off with more Zoan's?

So please help me out ladies and gents .. which would you choose and why?

Thursday 11 March 2010

Rethinking my Tyranid list

Without resorting to 'hiveguard' yet ... yet ... yet. How do I make my nids more than just a smear on the Imperial tanks treads (as in my last 13-2 devastating defeat)
  • HQ: Parasite of Mortrex ... I still want to run with this guy. He's effectively a lictor (S6 with reroll of 1's and rending) with the ability to seed another army of rippers ... and I like that a lot. His antimech skills are good, but he definitely boost the Gargoyles.
  • HQ: Prime with BoneSword/Lash Whip and Devourer, Regen and Tox. Just great, although adrenal glands wouldn't go amiss in upping his anti-mech punch.
  • Elite: Doom of Malantai. Great against combo armies, pretty useless against mech armies actually. Maybe I should have opted for a couple of Zoanthropes instead as their Lance weaponry would have rocked.
  • Troops: 10 Termagaunts
  • Troops: Tervigon with Regen, tox, Catalyst and Cluster Spines - this is the core, although I'll never run her alone again.
  • Troops: 5 Genestealers - good idea, but a Broodlord would have weathered the flamers better ... perhaps opt for a single smaller, but upgraded squad with adrenal glands.
  • Troops: 5 Genestealers
  • Troops: 24 Hormagaunts - I'm loath to upgrade these guys with adrenal glands. Although the number of attacks they pummel will eventually result in some explodes. I'd prefer to run them as a huge bullet screen and the adrenal glands would make them hot!
  • Troops: 4 Warriors with Rending Claws, Tox and Deathspitters - Just great, I'll probably add a venom cannon variant on the end of this squad.
  • Fast Attack: 3 Spore Mines - got run over by a leman russ - 30 points wasted... I'm thinking these guys are a joke. In dawn of war they are useful to control territory, but in pitched battle and spearhead they are pretty irrelevant as there are no rules about not deploying within 18".
  • Fast Attack: 21 Gargoyles with Tox, I like the build ... I would consider giving them adrenal glands... but deep striking in too slow, too vulnerable and too tactically fixed. I'll run them behind the hormagaunts for a 4+ saving throw.
  • Heavy Support: Trygon Prime, Regenerate - Downgrade to a normal Trygon with regen.
  • Heavy Support: Mawloc, Regenerate - upgrade to a normal Trygon with regen.
New list ideas: Anti Mech Variant
  • HQ: Parasite of Mortrex (160)
  • HQ: Prime with BoneSword/Lash Whip, Adrenal Glands, Deathspitter (110)
  • Elite: 2 Zoanthropes (120)
  • Troops: 10 Termagaunts (50)
  • Troops: Tervigon with Regen, tox, Catalyst and Cluster Spines (215)
  • Troops: 5 Genestealers (70)
  • Troops: 5 Genestealers (70)
  • Troops: 24 Hormagaunts (144)
  • Troops: 4 Warriors with Rending Claws, adrenal glands and deathspitters (180)
  • Fast Attack: 20 Gargoyles with tox and adrenal glands (160)
  • Heavy Support: Trygon, Regenerate (225)
  • Heavy Support: Trygon, Regenerate (225)
Tactics: NO DEEPSTRIKING! Ok so maybe with the Trygons, but the genestealers will infiltrate and the hormagaunts, termagaunts form a screen for the Gargoyles. The Zoanthropes aim to tunnel behind the Trygons and shoot up the mech. (18" range ain't no use for the first two turns anyhow on pitched battle), with the other two options, I get everything as close as possible and pour onto them like a big steaming, rending pile of nastiness.

With the Zoanthropes offering real anti-mech and two Trygons popping up, it will be harder to focus fire and something will get through. The zoan's, warriors, parasite and trygons are all prepped for anti mech - with the gargoyles as a cheap ace in the hole. The genestealers WILL die, but should be able to get the drop on one or more key vehicles...

So what do you think ... would I be better off with a lictor of something likewise, or should I simply slump for the hiveguard and have done?

I look forward to your replies.

Wednesday 10 March 2010

Tyranid Batrep and Tactics: Back to the Drawing Board

After putting some serious thought into a nicely balanced and formidable Tyranid Army I took on Mark. Now Mark and I have had some titanic battles ... and I'm pleased to see that some of my tactical tricks with the Guardsmen have rubbed off on him...

I took the following list:
  • HQ: Parasite of Mortrex
  • HQ: Prime with BoneSword/Lash Whip and Devourer, Regen and Tox.
  • Elite: Doom of Malantai
  • Troops: 10 Termagaunts
  • Troops: Tervigon with Regen, tox, Catalyst and Cluster Spines
  • Troops: 5 Genestealers
  • Troops: 5 Genestealers
  • Troops: 24 Hormagaunts
  • Troops: 4 Warriors with Rending Claws, Tox and Deathspitters
  • Fast Attack: 3 Spore Mines
  • Fast Attack: 21 Gargoyles with Tox
  • Heavy Support: Trygon Prime, Regenerate
  • Heavy Support: Mawloc, Regenerate
Mark took some cunning tactical choice of going all out on the armour:
  • HQ: Primaris Psyker
  • Troops #1: Vets with plasma/melta
  • Troops #2: Vets with plasma/melta in Chimera
  • Troops #3: Vets with plasma/melta in Chimera
  • Fast Attack: Vendetta
  • Fast Attack: Vendetta
  • Fast Attack: Hellhound Squadron with heavy flamers
  • Heavy Support:Leman Russ Demolisher with Heavy Flamer
  • Leman Russ Battle Tank Squadron with heavy bolter each
  • Leman Russ Punisher with Pask and 3 Heavy Bolters
As a bench test for this army, Mark couldn't have chosen a tougher nut to crack. To compound the problem, I decided to reserve/deep strike with lots of my options. Mark played very well, and I'm unsure what I could have done better given his placement and position. I've played two 'reserve' games not and I don't think I'm suited particularly well. It gives you flexibility, but the impact of losing firepower and having to steal the initiative from your opponent is too much.

Turn 1: Mark stole the initiative ... so my 'ambushing' genestealers got flamered to death! The Tervigon survived ... just. The MAwloc ran away (tunneled)

Turn 2: Mark killed the Tervigon, my genestealers started running and the Doom, Mawloc, Trygon and Termagaunts (standard) arrived. Doom kills 3 guardsmen and kills a Vendetta. My Mawloc scatters (nearly off the board) and my Trygon fails to get an angle on rear armour.

Turn 3: Mark kills my Trygon, nearly kills my Mawloc and runs away from Doom. 24 Hormagaunts arrive via the DS hole and run about aimlessly (without adrenal glands they cannot hurt anything!) The doom is only S5 blast and without targets (being all tanks with minimum armour AV12 facing) Mawloc assaults the Punisher and manages to stun and immobilise it ... rubbish. Parasite deepstrikes onto board with his horde.

Turn 4: Mawloc dies in lascannon hole. Hellhounds and blast demolish the Gargoyles and a missile launcher does for the parasite. Prime and retinue arrive and shoot russes, managing a penetrate and two glancing ... but only manage to stop them shooting! Genestealers catch and charge the Vendetta and only manage to stop it shooting - despite two penetrations!

Turn 4: Genestealers get toasted. Vendetta deploy vets and they shoot up the termagaunts. Doom of Malantai is killed by 3 twin-linked lascannon (NB: MArk hadn't bothered focusing on this unit up til now as he assumed it would get eternal warrior... Warriors and Prime weather a mountain of fire (mainly thanks to intervening hormagaunts) and they smack down on Demolisher - wrecking it! Hormagaunts run around doing little.

Turn 5: Mark does house keeping, reducing gaunts, toasting all the hormagaunts and destroying the last Warrior bodyguards. The Prime goes down to plasma fire and I'm left with 1 squad of gaunts on the board, who pass their leadership and shoot the vets ... killing four but failing to rout them. My 5 termagaunts face a short future.

Final score: 13 to 2 killpoints.

Conclusion

Not to lament the dice ... but the combination of piecemeal tactics and some horrendous vehicle damage rolls meant that I was really on the back foot all game. Mark could sit inside his AV10 bunkers and shoot the priority targets as leisure. The genestealers 'could' have given me an edge, but stealing turn 1 from me. I lost the genestealers and had to suffer two turns of shooting on the Tervigon before help arrived. My penetration and damage rolls on the tanks were simply appaling and compounded an big problem ... I was trying to make love to a tin of beans... no dice!

Pask (with his reroll to wound) firing 29 dice (even at S5) at BS4 was absolutely devastating. The punisher really showed it's credentials in this game.

The Mawloc is really the Trygon's little brother. While I can see the merit of a S6 AP2 blast ... I'd rather have a close combat monster. He missed and then had no shooting to complement his deep strike. The Trygon's needed better backup... and the synapse upgrade just isn't worth it!

Deepstriking isn't really necessary for the Parasite, as his whole unit would be much better not getting 'clustered up' and using the cover more effectively.

Overall, very very disappointing ... but an instructive and interesting game (albeit an important lesson) nonetheless. Mark continues to be one of the most playable gamers in the club. He takes a 'complete cakewalk' with the same good cheer as he's taken a drubbing from me in the past.

We've agreed a rematch in two weeks ... similar nid army versus mark's standard guard (with more troops).

Good fun all round!

Tuesday 9 March 2010

Sholto's Malifaux Reviews


I've got to give a big shout out to Sholto at Incunabulog (nice Ravenor drop sir!) for some amazing work answering all my persistent questions about Malifaux, how it works, what the rulebooks like and the models...

Clearly, Sholto's sold on the whole thing, and I have to admit a temptation myself. After completing 3 40k armies (all bar a couple of Piranha anyhow) and buying a superheavy, I'm keen to try out something a little 'different' and this would appear to be an ideal for fulfilling my more 'Rogue Trader' type playstyle desires.

I've played Hordes now ... and although I like it, its not grabbed me like this has...

Maybe its the miniatures, just stunning:


Tuesday 2 March 2010

Apocalypse Post #2: Running a Game in 5 hours.

Good GM'ing - A Necron Monolith Formation deepstrikes into the middle of a combine Tau MIRAGE and Armoured Interdiction Formation ... FIGHT!

Reading around the web ... there seems to be a lot of consternation about running a manageable Apocalypse game. As we are all aware, running a normal game of 40k that runs below 3 hours for less than 2000pts can be a challenge. Unless you are a tournament player and have your armies approach to opponents down pat ... umming and erring can lead to a 4 hour game with ease.

Below is my advice, built upon some considerable APOC experience in the last year, for keeping games within a 5 hour bracket.

TIP #1: "Always have a GM!"

Do you want the game to run over? Do you want to be squabbling like children over the paradoxical and diametrically opposed rules of the GW codici? Or do you want to blow s*** up? Well then someone needs to be GM ... otherwise its all over. The GM should be a comparatively 'strong' personality (teachers, managers and storeholders come to mind), have a good grasp of the game and be as fair as possible.

Someone independent AND in charge who can order the 'roll a 4+ to decide' discussion ender. If nothing else, like in the classroom ... the 'but my rules say...' discussion dries up when the GM approaches.

GM's also have the option of being 'in' on the cunning plans and giving them his blessing. Meaning that cunning formations or dirty tricks are given the green light BEFORE they are de facto dropped in.

TIP #2: 2000-3000 pts per player

We usually run 14k to 16k battles with everyone bringing 2500-3000 (this changes from month to month) with 500pts of reserves. 2500-3000 is a hefty amount, allowing superheavies and titans on the board. It's also a manageable amount too. Each player can move their models (even if they are 5pts each), within a reasonable time frame, larger forces per player will result in longer turns ... and an over-run or 'caught short' 3.5 turn game ... and no-one wants that!

TIP #3: Player turn length ... 30 mins

This is an easy timescale to work to, as its short enough for us all to be acutely aware of. Players with superheavies will find this easy to achieve. The toughest time I ever had was fielding hordes of nids ... rolling the dice for a unit of 30 hormagaunts against Terminators proved more of a feat in counting and collecting than anything else ... I wouldn't recommend it!

The game automatically balances out, with the early turns going quick due to reserves and fewer weapons in range, and the latter speeding up as the casualties and assault dead-logs shorten the number of sequences units are involved in. The bell curve is observed.

Don't enforce 30 minutes like a Nazi ... but simply remind, remind, remind as the deadline approaches ... you'd be amazed to see the dice fly!

TIP #4: Turn sequence ... what turn sequence?

Keeping to a strict turn (move-shoot-assault) sequence is pretty pointless in APOC as you'll have between 2 and 4 players moving, shooting and assaulting in asynchronous mayhem. The simple answer is that players will be left standing while other 'complete' their movement phase, repeat for shooting and for assault.

Players (for both side) become acutely aware of the huge scale of decisions and actions they must take ... and the propensity to 'miss something completely' rather than just miss a sequence. The 30 mins rule also encourages the opposition to 'assist' the other player in moving models for them etc. Forgetting turn sequence also means allowing 'missed' shooting ... like "OH, my superheavy ... I completely forgot!" ... and letting the game roll forwards.

All good gamesmanship practice and essential in APOC, where strict adherence to the letter of the rules won't win friends and will irritate the GM.

TIP #5: Keep it simple, stupid... the gaming environment that is...

I've played split games, games with reserves from one board to another and games with underground sewers full of nurglings. After the first turn, no-one can remember all the special rules you sprinkled on the table. APOC is about a dirty great mashed up, so get the players to place objectives (or place them yourself GM) ... five is a good number and then get fighting down and dirty.

Your special Christmas tree bonus D6 roll with fun things will not get used ... there too much killing going on.

TIP #6: Strategic Assets ... my arse!

We've pretty much given up on allocating Strategic Assets for the same reason as the above... too much information. SA's can make or break a game, but usually by some nasty denial tactic (stopping reserves for example) and can ruin the game for the other team. Alike to the old 'magic cards' round in 2nd edition ... the Strategic assets become a guessing game of trying to out-fox your opponent and a huge delay on the fighting.

Why aren't we killing things?

As I highlighted in the previous blog on winning APOC, very cheap formations now come with a sprinkling of Strategic Assets all round ... so the old 'allocate 2 each' become redundant. There could be a good, fluffy, reason for it BUT it delays the game and makes things complex ... why bother?

In the same way ... hugely complicated reserve or a long board will benefit certain armies or reserves moves etc... I once played a Tyranid game where the tyranids had to run over 100" to reach the enemy. We were (unsurprisingly) losing quite quickly and very badly!

A straightforward rectangle board works fine. We tend to push 3-4 6x4 tables together and play a 6' by 12-16' board. Cover makes it interesting.

TIP #7: Share and Share alike...

As mentioned in the previous blog, sharing armies and controlling player 'zones' is the best way to play and play efficiently. In a similar way, if a general isn't 'controlling' his sub-commanders well (IE dividing the army up and allocating forces) and the team are playing 'tug of war' then the GM really needs to intervene.

That said, if they are playing like a bunch of numpties within 30mins ... don't bother.

The best rule ... everyone CAN roll for models on their team. One player is bound to bring Nids, Space Wolves, Black Templars or another particularly choppy army ... in this case they are bound to be deploying multiple assaults across the board. A good team commander would divide these assaults up for maximum team efficiency.

Remember, it's in the teams interest to divide and be efficient ... it gives them move mulling and thinking time (actually coordination time) ... if a team is being hugely inefficient and breaking the 30min rule ... then stop the turn. They won't like it ... but they won't take the piss again!

TIP #8: BRING the datasheet.

IF you field it, you better have the rules. This can be a photocopy, downloaded printout etc etc. If its a homemade gizmo, then it better be cleared with the club/GM or it's going home. Nothing's more frustrating than a player bringing models they don't know the rules for AND then DON'T HAVE the rules for... sort it out!

TIP #9: Qualify your scorers...

Is it FOC Troops only, all infantry, jetbikes, bikes, cavalry, non-immobile vehicles, Titans? What can hold and what can contest.

We adopt the 'any infantry can score' and anything else (including non-immobile vehicles) can contest. The balance is quite difficult, depending on your local metagame. If you see a lot of superheavies, then making FOC troops only scoring (IE following 5th edition rules) will make these squads target numero uno.

Think about this ... it may take several attempts to get it right.

A really good game we had involved the old 4th edition ... any unit at 50%...leading to some real throwdowns over objectives.

TIP #10: GM chooses teams and team commanders.

First up, choose the teams for balance and options. If they is gonna be a titan on the table ... make sure the opponents aren't mostly necrons with a few space wolves thrown in (my bad ... it wasn't pretty!) Make the player explain their forces and choose the sides for fairness.

As you can probably establish from above ... you need a GM no-one's gonna mess with (not a Gordon Brown bully, but not a pushover) ... in the same way DO NOT let teams choose or roll for their commanders. Team Commanders need to be the most tactically aware and 40k savvy player in each team with a positive personality and assertive streak.

Think of it in military terms. You need a solid NCO (Sergeant) in charge of the team, to organise and control their team to victory. Rolling dice or the leadership will inevitably end up with the person who doesn't want it ... they ignore it, they'll lose or be incoherent and the GM will have to effectively 'play the commander' in timekeeping and so on.

The better the NCO, the less work for the GM.

Conclusion

Despite my misgivings, I've found APOC to be a hugely enjoyable and fun thing to do. What it lacks in 'strategy' (that dies in the first turn), it more than delivers in great fun and hilarious exploits! The introduction of superheavies and titans is a daunting fearful fun than makes for great games... in the same way the explosion of said superheavy makes it all worth while.

The tips above aren't fullproof (and there's probably others to add) but they're good advice to keep the game rolling and you home before the kids bedtime/favourite TV show...

Comments welcome.

Monday 1 March 2010

How to win at APOCALYPSE ... with any army.

Apocalypse Now ... Remarkable Scenes, shame about Brando...

After quite a serious amount of thinking and some frequent Apocalypse battles fielding Tau, Guard and Tyranids ... here are my suggestions for the best ways to win at Apocalypse.

CAVEATS

***NB: Winning at Apocalypse is an Oxymoron, as anyone attempting to win at APOC will most definitely lose ... there are just too many variants, big destroyer cannon shots and other nastiness bouncing around.***

***NBB: These options involve standard apocalypse battles, using a big square board and a few (or no) strategic assets (which shouldn't be 'given away' anyway and should always be got through formations - but more on this later!***

BIBLICAL RULE #1: "Plan to kill Space Marines!"

The majority of large higgle-piggled together armies out there are space marines. GW love their pointy little heads, fluffy little rules and ridiculous number of codici for a single army variant ... that said, it makes it very easy to choose your weaponry... something that kills SMURFS will always have a target.

Obviously, if you are in a pre-prepared APOC arena versus Nids or Guard ... ignore the above. But nothing sucks quite as much as taking two hellhounds to kill Orks and having to use them on nurgle terminators...

So when the options is for AP3 or AP4 ... the smurf munching guns have it... Okay?

BIBLICAL RULE #2: "Formations first, Superheavies second!"

Ok, so superheavies are cool. A Warhound Titan will dominate a game very quickly. However, a warhound titan is also a very big boom waiting to happen. Within the annals of the IA and Apoc books are many formations. These formations range from the sublime to the ridiculous.

Think of the formation as a 'force multiplier'. The key is to purchase formations for units you were going to buy anyhow... To give you an example, in this APOC battle: Taking on a Warhound. Utilising two inexpensive formations gave our Tau army an impressive advantage.

The MIRAGE (pdf) upgrade cost a base 100pts and automatically allows you to upgrade all pathfinder devilfish in the formation gundrones to marker drones for free (?!?) ... well that just paid for itself. In addition, you can auto-deploy (ie like Marbo) at the start of the Tau first turn and move and fire etc! Also, if you get 3 markerlight hits on any number of targets and these are in LOS (line of sight) of any pathfinders in this unit, you get precision strike on that unit for every friendly unit on your side. Precision Strike is 2+ to hit for everyone. ALL for 100pts. Bargain. Oh did I also mention that every unit within 12" of the MIRAGE devilfish is covered by a stealth field operating exactly like a stealthsuit.

So that's a unit that is immune to long range fire, can deploy anywhere, is bristling with markerlights and grants a 2+ to hit to every friendly unit on any target they light up.

We combined this with an Armoured Interdiction Cadre from the Apocalypse main book. The Interdiction Cadre only costs 50pts, but allows you to place D3+1 markerlight hits every turn, anywhere in LOS. So for 50pts, you gets 2-4 markerlight hits which hit automatically ... hmm. We used them to great effect on pesky flyers (the bane of the Tau). The look on the Vendetta owner's face was distraught as 2 Seeker missile plowed into his vendetta squadron.... pure dirt!

In another example, the new APOC reload has some particularly tasty. The Hounds of Huron (for ChaosMarines) is particularly cheeky, giving you free 'flank march' on a horde of powerfisted Smurf bikes for 100pts. My personal favourite though is the 'Imperial Shield' Infantry Company.

150pts gets you 36" of aegis defence lines (3+ cover saves) to deploy at your discretion in your deployment zone ... so that's 'hulldown' for every vehicle then! It gets you a sheduled bombardment - which is music to a guardsman's ears ... dropping 3 turn worth of biblical firepower on the enemy. Oh, and it also gets you 'fire on my coordinates' where you drop an APOC (4) barrage at S8 AP3 on the vox-caster of a unit you 'sacrifice'. Imagine the attacker's surprise ... no to mention the fact that you just made 'charging the weedy guardsmen' a particularly irksome responsibility... Pure, pure dirt.

BIBLICAL RULE #3: "Infantry win games, tank and titans draw them"

Seems obvious, but if you load up with tanks and take few infantry, you better hope someone else brings the troops. If you play to true 5th Edition rules then only non-vehicle troop choices can claim an objective. Obviously anything can then contest ... however we found that this quickly turned into a sniping alley, with Superheavy Titans targeting tactical squads.

A better option that my local club has adopted is dropping back to the 'any infantry at 50%' rule ... which stops last minute contests. Alternatively, you can opt for the 'any infantry' can claim objectives approach ... this does add durability and competition to claiming objectives ... and makes for an interesting game.

In APOC, your tanks should always aim to support the aggressive aims of your army, while your infantry achieve objectives. Always remember that a superheavy transport or landraider can hold an objective well (if occupied).

BIBLICAL RULE 4: "Everything will die ... eventually."

The thing to remember with APOC is that everything except a superheavy or Titan WILL die if your opponent decides to fire every weapon at their disposal at it. A titan will probably die if the weapons firing at it are D weapons (ie from another Titan)... so don't put much store in one of your tanks, a unit or even a titan !

Carrying a big Destroyer weapon will also make you target numero uno for meltagun vets, deepstriking stormtrooper or just every lascannon in range. Just don't put your trust in one option, always have 2 or 3 options going for the same objective. Think of it as pawn-kills-pawn-kills-other-pawn moves from chess. If you don't you'll find your secure objective taken (or reduced to a large crater) without a 'leftover' unit to snaffle the prize.

Always try to hold something in reserve. For example, the platoon command squad is only 5 places in a stormlord (capacity 40), but can deploy and run up to 14" in a turn from the tank edge ... giving them near invulnerability (except if said tank go boom...) BUT objective grab potential.

BIBLICAL RULE #5: "Share and share alike..."

Sometimes running your own little men will prove confusing and silly. If you are running and fielding a deviously complicated list ... then don't do the following (and struggle because of it), but if you are running a themed list then I suggest the following.

Combine elements.

For example, running both 'your' portion of the indirect long range tanks AND 'your' part of the flanking unit will simply delay the game (as you run back and forth), confuse the hell out of you and your opponents and result in uncoordinated attacks. Therefore, what I suggest is that you divide the battlefield into relevant areas and divide the best forces to defend/attack those areas.

You get his tanks and he gets your flankers... for example.

BIBLICAL RULE #6: "Demon combos..."

As with the 'formations' above, always be on the lookout for a knock-out combination of firepower. For example, 20 Lootas in a Stormlord (backed up by 20 boys of course) ... AV 14-13-12 and 20-60 48" S7 AP4 shots a turn... with each 5 lootas shooting at a different target... Anyone for Rhino-hell? Genestealers in a Chimera... or a Falcon ... or even a Devilfish? All of these options are totally viable.

BIBLICAL RULE #7: "Everybody flanks..."

Remember that with certain strategies, whole portions of your army can (and will) use flanking to try and get the drop on the enemy. Obviously this is favoured in 'long thin' battles over 'wide fat' battlfields. Remember to use this to your advantage and hit them hard where it hurts (repeatedly, without pause, for a considerable time)...

BIBLICAL RULE #8: "Prepare to see the big guns..."

APOC is the battleground for Titans, yes ... but you are also a lot more likely to see a C'tan, a Swarmlord, biblical tonnes of Monstrous Creatures. Fielding Ratling, Space Marine Scouts with Sniper Rifles or other 4+ to wound options can hurt these guys badly.

In the same way, taking toxin sacs for 4+ to wound or taking rending weapons have a much higher opportunity to hit something valuable. In this way, buying powerfist and thunderhammers is exactly the way to go.

In the last game I played. 10 ratlings made back multiples of their cost back. They killing a c'tan deceiver, polished off multiple tomb spiders and even bagged a couple of terminators... not bad for a 100pt squad.

BIBLICAL RULE #9 .... #10 and #11

What would you suggest for Apocalypse. This is what I've learnt over about 10 games over the last year ... some of you will have much more experience than this ... and maybe more things to draw on.