You may have noticed that my Blog has undergone a dramatic change. In lieu of certain constructive comments, I've realised I have the cunning combination of supplying detailed batreps and blog entries on a small white font on a black background - which is totally unfriendly.
In trying to remedy this, I've reformatted the blog and need your feedback on the new width, colours and contrasts...
Have at it peeps!
PS: Oh and don't forget to fill your entries in one the 'what's 40k blogging about poll to the right.

Wednesday, 30 September 2009
Monday, 28 September 2009
"Sooo ronery and sadry arone.." - W40k blog poll.
 Do you too feel like Kim Il Jong? Well not barking mad with nukes ... but the ronely bit...?
Now I'm no expert, as can be attested to my last post. This battle report took some serious time to produce, including photo's, detailed accurate diagrams and pictures. It also included some pretty good Fluff hightlighting the apex of the exciting game ... And to top it all off, it was actually an audicious and surprising game that made most of the 'White Dwarf' ones look fairly pedestrian.
That said, when I posted on Friday - I did so with some concern. Despite all my work (and maybe because of it) it received not a comment over the weekend. Now I'm not the sort to place 'hit counters' on my pages - maybe I should, but I think the quality of my work is best reflected in the sort of comments it receives.
It is, after all, what we all do this all for.
So this got me a thinking. What do we blog about? What do we blog for? And what's effective or not so?
As such I've decided to put it all out as a bit of a poll. What do you enjoy reading... what sort of posts get your attention, do you ilike them short and quick or long and detailed:
- Opinion Posts: Extolling aspects of play or talking about people, places, faces and races... includes RANTS.
- Tactica's: Wanna know how to use hellhounds, chugs or mortars - I'm you man!
- Photo Batrep's: A lot of work went into your enjoyment.
- Video Batrep's: Fritz is the king here.
- No photo, no video batreps ... just a splurge, list and description. Can be good depending on writing style.
- 'Show off' posts: Check my beautiful photographs of my lush model - yeah!
- WIP posts: Wanna build Sarpedon outta Tyranid bits ... see here.
- Conversions: the completed article in an article.
- How to guides: usually building by numbers or painting tricks...
- Book reviews: these sometimes surface.
- Character creation: I've built a 'stands as' model - come see!
Remember to pass the poll on ... the more 40k bloggers who contribute the 'truer' the results will be.
As always - comment below... "I'm so ronery and sadry arone..."
Friday, 25 September 2009
"Down to the wire" Guard versus Guard 1500 pts

MEN v TANKS: who will win?
Prologue
Goran 'Lideye' Ludnick, First Sergeant of the Kochi Irregulars, glared up from the details of his command plate. In a brief and disjointed circle about him ranged the key squad leaders and tank bosses for this hotchpotch command he'd been handed. He cleared his throat.
"Looks like we've been given a job to do. Word is that some of these rotting bastard traitor guard are holed up in a position two klicks south. Kochi Command have agreed that these bastards are a good test for their new shiny toy. Us." Quick grins flashed around the circle as the First Sergeant continued.
"These whory sons have got a couple of Bassies up there and they been playing havoc along the supplies lines of Duckta valley. We got the nod from Munk himself that he wants us in there fast. Some of my Irregulars have been scouting the area and they've got themselves a Russ and plenty of heavy weapons parked up there. We're gonna set up the mortars and then go in hot with everything, neutralise the threat and claim that hill - understood?" A chorus of affirmative announcements met his announcement.
"Let's go people ... my eyeballs are itching, I wanna shoot something."
Introduction
Mark, a regular at Giftsforgeeks, agreed to a 1500 pts Guard v Guard battle. I've played against and alongside Mark multiple times in Apocalypse games and have always been impressed by his well painted and commanded force. I knew this was going to be a difficult battle and a fair amount of planning went into it. On first glance at the army lists below, this looks like this battle is about to be wrapped up in the army lists - and its a credit to Mark that he kept fighting til the end and produced a nail-biting three turn cliffhanger.
Army Lists
Kochi VIII "Mobile Infantry" (1500): This is a new concept I've been trialing lately for the doubles tournament. I was very heartened to see that the recent winner of the 'Ardboys tournament had a similar (although seriously buffed) concept. The idea with this force is to provide significant indirect harrassment from the mortars and Bassie, while the armoured fist charges into heavy flamer range and clears objectives. By choosing either indirect or tanks I felt confident that I would deny shooting to a significant proportion of Marks army either way.
HQ: Primaris Psyker
Troops: Infantry Platoon
Platoon HQ: 4GL's and a Chimera (ML/HF)
Squad #1: GL and a Chimera (ML/HF)
Squad #2: GL and a Chimera (ML/HF)
Mortar HWT #1
Mortar HWT #2
Hellhound #1: Multimelta/Extra Armour/Smoke
Hellhound #2: Heavy Bolter/Extra Armour/Smoke
Basilisk: Heavy Flamer
Leman Russ: Lascannon
Leman Russ: 3 HB
Leman Russ Demolisher: 2 HB, Lascannon
Marks of the Traitor: Mark admitted that he'd simply recycled his army from a close fight against Orks. On first glance, Marks infantry heavy list looks very overawed by the armour above, but some very clever play by Mark evened the score.
Cmd HQ: Meltagun, Regimental standard, Medic
10 Ratling Snipers
Troops: Infantry Platoon
Plt Cmd: lasguns and a prayer.
Squad 1-6: lasguns and a prayer.
Lascannon HWT
Autocannon HWT
Missile Launcher HWT
Veteran Squad: Powerfist, 2 Meltaguns, Plasmaguns and Carapace Armour (in the Vendetta)
Vendetta: extra armour
Leman Russ: battle cannon and flamer
Basilisk #1
Basilisk #2
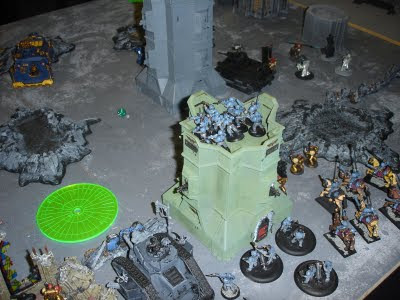
Deployment

The battlefield is dominated by four large bastions running across the centre, with defendable terrain at either end.
Luckily for me I won the first turn AND the right to choose the side. This meant that I could pick my 'run-up' to the opposition. The deployment roll went for 'spearhead' and 'capture and control' ... so I had the opportunity to get my Hellhounds reasonably close for a quick 18" move and smoke pop in turn one.
Not trusting that I had all the angles covered I decided to keep the Primaris in Reserve with a infantry squad and Chimera. I might need to mount a last minute charge or reclaim my own objective after all.
Mark decided to focus on banking his tanks behind his heavy weapons which in turn would cower behind his legion of disposible troops. I was a little bewieldered by this tactic, since the troops were clearly standing around in the open in front of a lot of fire power...
Call me bemused.
 The Kochi Deploy in an aggressive 'BlitzKrieg' combined arms formation, ready to weather a first turn barrage to come to terms with Marks hunkered guard.
In a less surprising move the Vendetta deployed and then shunted at for speed (36") into my deployment zone using its scout move. This would mean that a 3+ cover save flyer full of ... veterans with plasma, melta and a powerfist (Mark admitted under interrogation) ... were within a turn of charging my mortars with a instantkill power weapon. Doh! That gotta die!
 The Vendetta hurtles across the battlefield to flank the incoming tank column.
To top it all off, Mark positioned a group of 10 ratlings off to my right. While these guys wouldn't cause much of a threat, they would be able to challenge my tanks with some potential rending shots.
Turn 1: Kochi VIII "Charge of the Smokers"
 Leading tanks pop smoke as the rest surge forwards. Meanwhile the Demolisher breaks off to engage the Vendetta.
Mark failed to seize the initative and my tanks surged forwards. The Hellhounds decided that they could reach the opposition easily next turn and therefore the multimelta hellhound (sheltering behind the model popping smoke) decided to take a pop at the Vendetta. It missed.
 The Chimeras snake towards their target
Next up the demolisher focused on the same target. A Lascannon and Demolisher shell later and I'd achieved an earth shattering 'shaken' roll - Woophee! The Vendetta couldn't shoot (which is really good), but it could still drop those Vets... would they go for the objective or melta my rear armour - or both?!?
The Leman Russes on the other side were equally ineffective, managing to scatter off the board with one shot on the Basilisk. The other shot ended up killing one of the HQ command and 3 other men from two other squads. Such blatant overkill resulted in one pinning (despite the leadership reroll on the regimental banner). The Chimera foresook their shooting to move 12" and pop smoke. To top this all off the Bassie in the rear managed to scatter off the board... was this a sign?
 'Plastic bag' smokers defend the tanks behind.
The mortars were slightly more effective, wounding one lascannon crew (Mark was surprised to learn that they did not have a cover save from indirect (behind only behind barracades). The other mortar team targets the ratlings and achieves a single wound. Unluckily for me both team pass their Leadership rolls for pinning (even on a ratling meagre six!).
Turn 1: Marks of the Traitor "Bring it down! No quicker ... I said bring it down NOW damn you!"
 Mark throws everything he has at the incoming tanks...
With my luck in the hands of the Emporer I had to trust that my Smoke would be enough ... should have I bought camo too? First up Mark passed around some commands. Now mobile infantry isn't really the home for commands, as it requires the troops recieving to be outside a vehicle - and to quote interstate 76 "Never leave your car!"
Mark passed both his "Bring it Down!" rolls on the Lascannons and Autocannons. Suddenly my poor Hellhound was facing a barrage of incoming fire. Only two lascannons hit however, and then Mark rolled a 1 and 2! From the Autocannons the hits were higher, but the cmoke confounded the gunners aim and misdirected two penetrating hits!
Strangely (to me at least), the whole cadre of 6 vanilla infantry squads marched forward to form a line in front of my men. My thinking ran like this ... "That's a bit weird, I can just tank shock them and they've only got S3 weapons - they cannot hurt me!" Anyone notice the flaw in this thinking?!?
Meanwhile the two Basilisks decide to target their opposite number away down the board. Two shots later and my Basilisk is a hole in the ground - so much for that idea!
The Platoon Command Squad yells "Get back in the fight" to the pinned troop squad out front and they regather themselves. The Missile launchers target the lead Chimera and managed to knock out its heavy flamer. Bother! The Ratling are less lucky, failing to get a penetration on the second 'command' Chug.
Finally the Vendetta makes its move. Boosting another 24", it tries to deepstrike its Vets directly behind my Demolisher! How bloody rude! Unluckily for Mark (this turn was VERY unlucky for Mark) they scatter directly into an adjacent bastion and end up repositioned by me! Scanning the board, I decide that hiding behind the ratlings is the best position as it puts them safety out of harms way!
Turn 2: Kochi VIII "Disabled that Flyer!"
 The Vendetta goes down as the hellhounds hit.
My reserve tank didn't arrive - but that didn't worry me.
 Before Hellhounds
Moving the Chimeras forward to engage the guardsmen at point blank range (I was still assuming I was pretty indestructable), the Chimeras and Squads inside start picking at the incoming squads, the first Chimera kills 5 out of 10 guardsmen with multilaser and lasguns rounds. Meanwhile the command Chimera lines up 4 grenade launchers and a multilaser on the Missile Launcher heavy weapon team located on the bastion roof. It suddenly occurs to Mark that he's facing 7 instantkill shots. Luckily for him only 3 hit their target, but its still enough to kill one missile team after shooting. The Missile team fail their pinning test (despite the standard below them) and cowered behind the battlements.
 After Hellhounds (one round of shooting)
Meanwhile the two hellhound ramp up to 12" and then fire their inferno cannons into the horde of guard in front of them. Three things are a shock to Mark (Hellhounds are about the only thing he doesn't have in his army) that a hellhound can move 12" and fire, that the inferno cannon S6 and that the inferno cannon fires 12" and is placed at my discretion! One hellhound targets the Lascannons and instantkills all three lascannons. The other hellhound has a tricky choice ... does it target the command squad with the meltagun or the three autocannons.
Deciding that the meltagun is outside 12" (and therefore unlikely to get 2D6 after a move) he shoots the Autocannon AND the platoon command squad behind. Despite plenty of prayers, I roll not a single one this turn and all 8 bases are removed. Between the Hellhounds and the command Chug all the infantry threat to my tanks is gone - or so I thought.
Next up, the Demolisher does a 180 degree turn and targets the Vendettas rear armour, the lascannon misses (when do lascannons ever hit?), but the Demolisher is smack on target - giving me an autopentrating hit. Hoping and praying to the dice gods I roll... and score an immobilised result (boo), but he turbo boosted last turn so he crashes and burns (yeah) and he fails his turbo save (double yeah) - the Vendetta is history!
After this, my luck runs out as the mortars fail to wound either the vets or the infantry squads due to scatter and my two leman russes are stunningly rubbish at killing the Basilisk, despite a hit - I fail to penetrate its armour 12 on 2D6 - what's this thing got, forcefields?
Turn 2: Marks of the Traitor "What have we got to lose men? CHARRRGE!"
 Mark take me by surprised as 5 infantry squads charge my tanks!
By the start of turn two I was feeling pretty cocky. The hellhounds had performed brillantly. I was within a turn of cleaning up on the final heavy weapons team and I had three leamn Russes and a multimelta hellhound pointing at the enemies ordinance. All that stood between me and victory were a bunch of S3 guardsmen randomly knocking about.
Then those S3 guardsmen charged my tanks.... of course I know guard all have frag grenades now (which is nice), what I'd forgotten was that offensive grenades supply a S4 attack on vehicles.
Suddenly my Chugs, Hellhounds and Russes were crawling with fanatic guardsmen trying to shove pineapples through my portholes (If you'll excuse the crude analogy!). Despite this, the damage was actually quite light, with only two tanks succumbing to a 'hit'. The heavy bolter leman russ got a lucky double strike 6 on it and suffered a crew stunned result. The lead Chug also suffered the same (thank goodness they could only glance).
As some of you might have noticed, I stupidly placed my lascannon Leman Russ behind my heavy bolter russ - resulting in two turns of non-shooting on the Basalisk. To make matters worse, the Ratling pinged its rear armour with some remarkable shooting, clearly sniping a spare wiget on the tracks and immobilising the tank! DAMN YOU EXPOSED TRACK DESIGN!
To add insult to injury, the basilisks targetted my Mortar squad in an attempt to chase them off my home objective (fairly likely), killed a squad but the other two units remained strong!
Turn 3: Kochi VIII "Tank shock for EVERYONE!"
 The tanks plow through the traitorous defenders
In revenge, I felt it was about time to clean up house! Heavy Bolter Russ put his foot to the floor and flattened a brave soul on his way towards the enemy. After moving 6" hie targetted the squad that had been shunted aside by the lead Chimera and some quick Boom ... dakkadakkadakka later ... only the Sergeant survived (who subsequently legged it for the 'bastion' and hid out until the show down in turn 6!). My command Chimera (still with its heavy flamer attached) reversed course and hosed down a 10 men squad attacking the Russ, the sergeant staggered out of the fire pit ony to be hosed down by krak grenades from the command squad.
The other Chug pushed forwards, punching 12" towards the enemies objective (it was shaken anyhow) ... and the two hellhounds decided to crush their enemies. Chug one (heavy bolter) crushed his 'death or glory' candidate while Mark scored two sixes in a row to DoG my hellhound (If you'll excuse the pun). The result was a 'shaken' and yet another of my tanks couldn't fire ... grrrr.
The hellhound that could fire however made short work of polishing off the command squad. The Inferno Cannon was proving the bane of Imperial Guard armies as it double tapped W3 heroes, weapons teams and ignore stealth cover saves, carapace armour and even 'feel no pain'. Effectively two hellhounds had chewed through the enemies entire command structure.
For starters, my reserves arrived. Looking acorss the board, I assessed that my objective was relatively secure and that the Basalisks would die soon (oh ... the optimism) and so I concentrated my new arrived Chimera on the Ratlings and Veterans in the building. The Mortar team and Immobilised Leman Russ joined in, and for a while everything was good. Between them they downed three carapace armoured vets.
Editors Note: Some of the more attentive readers will have noticed that I bought 4 Heavy support vehicles. The two Leam Russes were in a squadron - hence the immobilised Russ should have been made a casualty sooner. Being new to squadrons, I missed this. It should be also noted that we only worked out that there was a leadership test with tank-shock after the tank-shocks had occurred. As the tank shocks were more damaging to my tanks than Mark troops I think that these two points balance eachother out ... but that's 40k for you!
Turn 3: Marks of the Traitor "Hit 'em with everything we got!"
 Mark quickly evens the odds with some startingly accurate attacks
The Leman Russ targetted the lead hellhound and managed to immobilise it, squad one recharged the hellhound, but failed to damage it further. Squad two were in a similar position with hellhound two (and after reading the 'tank shock' rules) decided to charge it in the side to minimise the 'run!' factor! Despite a valiant effort their attack failed.
 The Primaris Psyker and Sergeant cower dehind their destroyed Chimera as the Traitor Vets make a break for a stake in the battle.
In an amazing turn of events, my rearguard was turned into a catastophe. 9 Guardsmen had Harkers own luck and spiked the gun on the immobilised Leman Russ. Meanwhile my valiant reserves are met by devastatingly accurate Basilisk fire which destroys my brand new painted Chug and then kills all except one guardsmen, the Sergeant and the Primaris Psyker. Thanks to the Psykers improved Leadership, they hold their nerve despite having two members picked off by Sniper fire.
Into this maelstrom, the Veterans stride out to sow yet more havoc!
Turn 4: Kochi VII "We end this now!"
 The Kochi go overkill as Flamers, battlecannons and demolisher cannons target the troops.
Last turn had left me reeling. With only half his army left, Mark had managed to even the odds on my boys. Now its my turn.
The first order of the day is to finish off the veterans and nullify the 'trooper threat' around my tanks. The rearward Mortar squad, and the the Primaris Psyker focus all their firepower on the seven exposed vets. The combined firepower proves more than a match for the 4+ armour saves of the traitors and they go down. Next up the command chimera makes short work of the squad which spiked the Leman Russ last turn. Reducing their numbers to a single guard sergeant. He however holds his nerve (Mark is very good at rolling low when it counts!)
On the other side of the board, the Multimelta hellhound makes a rush at the Leman Russ, but in spectacular guard fashion, he manages to miss completely. The other Chimera manages its dangerous terrain roll and scrambled over the cover to come within 3" of the objective. The other, immobilised Hellhound tried to take out both the missile launcher teams behind them, but one survives.
Meanwhile, the Demolisher (now hopelessly out of range) decides to sit pretty and unload everything on the squad left behind by the multimelta hellhound. One Demolisher shot later and the two survivors are gunned down with heavy bolter and lascannon shots, accomplishing the biggest 'overkill' barrage of the game.
Turn 4: Marks of the Traitor "Desparate times lead to desparate actions..."
 "Charging tanks again Mark, that won't work..."
Famous last words...
The Ratlings go after my Command chimera and managed to blow it up with two penetrating hits! The best anti tank weapon on the board so far - sniper rifles?! The resulting explosion kills three grenade launcher toting guardsmen and the squad fails its morale test and legs it for the hills ... great!
My Primaris Psyker and Sergeant were shocked to find themselves charged by a sergeant from Marks 'Leman Demolition' crew and soon an assault was underway. Despite multiple hits on both side, the flak armour took the blows and the combat was a draw!
The remaining missile launcher targets my Chimeras rear armour and rolls a 2 ... the Leman Russ Battle Cannon fires at point blank range into the cab and fails to penetrate. Meanwhile the squad (S1) of guardsmen leave the immobilised Hellhound and run full pelt for the lead Chimera contesting the objective. Despite needing a double six, and two immobilised, the guardsmen manage to blow up the chimera.
All but the sergeant of my Squad 1 and two guardsmen are killed in the ensuing maelstrom. The S3 blast outside kills half their squad too. My remaining guardsmen can be placed anywhere within 2" of the Chimera - IE: right on top of the objective ... if only we can roll a 1 or 2 to finish. A five.
Turn 5: Kochi VIII "Block and tackle"
 Clinging onto the objectives...
I currently had both objectives in my hands and I intended to keep it that way. The immobilised Hellhound fired on the remaining (and slightly toasted) Missile launcher team and finally put them out of their misery, meanwhile the Demolisher and hellhound focused their attrition on the heavy flamer armed Leman Russ. Again the multimelta proved to most inaccurate weapon in the game (I'm yet to kill anything with it over two games). The mortars on the left and the remnant squad target the larger traitor squad challenging the target and manage to whittle their numbers down to just a sergeant (ruddy sergeants!)
 'Chop him up, chop him up!' said the Primaris Psyker in a moments personality change.
The mortars on the right fail to hit their ratling targets. With a tremedous effort the Primaris Psyker and sergeant stick it to their attacking sergeant.
Turn 5: Marks of the Traitor "Blood for the Blood god ... Urrk?!?"
 My valiant objective grabbers are rudely attacked in mid-victory dance ... how bloody rude!
Mark's Leman Russ backed up to give the Hellhound a taste of its own medicine ... and fails! The Basilisks were equally ineffective at scoring a wound on the mortar team on my objective. But hang on, but I suddenly realised just how precarious my 'victory' was. All Mark needed to do was hit my mortars with enought S9 fire and i'd be dead or running... ooo gamble gamble!
Meanwhile over at the enemy objective... two guardsmen and a sergeant prepare to hold.
All the 'replacements' had been killed when that damn frag grenade had come through the side of their Chimera. Johnson hadn't followed orders, not closed his gunnery plate and it had cost his life, the Chugs crew and six others.
Polson, Rassurgen and Moor had scrambled from the Chug. Polson lugging the heavy grenade launcher before him like a shield. Moor had scrambled into the cover, and then directed his men to target the Chug. Beyond the smoke and sparks he could hear the cheers and cursing of their assailants, maybe a full squad. Moor would make them pay. He quietly opened his commlink and contacted the Kochi regulars hidden at their rear.
'Pitcher team two, this is Echo One, status?" he whispered. Morr noted out of the corner of his eye Rassurgen peep his head up towards the now quieting Chimera. He ducked down quickly and flashed a full open hand followed by four fingers at Moor. Moor nodded.
'Echo One, this is pitcher two, primed and ready, what's your target." the call from the Mortar team crackled in his ear. He opened the bead again, he could now hear quiet scuffing of approaching men over the crackle of static and flames.
'Pitcher Two, fire for effect, target Chug One. 9 targets, minimum spread." He grated into the commlink. 'Understood, Emperor's Blessing!' a brief pause, then 'Fire, Fire!'
The whistle of the mortar was barely noticeable over the crackle of the burning Chimera. If Moor hadn't had his face neatly buried in the dirt he would have noticed how the enemy Sergeant cocked his ear and dove forward, how two traitor guardsmen, armour smeered with arcane and lurid symbols, glanced skyward before the mortar struck.
They'd been accurate shots.
Moor was on his feet even as the second blast richochets around the bastion they held, Polson followed Rassurgen quickly. Before them dust filled the scene between them and the dismembered Chimera.
Suddenly three men staggered form that gloom. Moors pistol stitched a line across a guardsmens armour plate as Rassurgens lasgun took the leader in the face. Then Polsons frag grenade hit the second soldier and the three bodies were thrown out at angles as the shrapnel grenade shattered their already bewieldered forms.
Moor ducked back behind the cover as Polson ans Rassurgen continued to scan for any more survivors. He quickly opened his dataslab and checked his location. They'd achieved their target - the enemy bunker. Hope swelled in him as he heard the chew of the Hellhounds gears beside the intermittent blast of the duel Basilisks. Now all they needed to do was silence those guns. Moor stuffed the dataslate back in his pack and picked up his laspistol. Rassurgen ducked down beside him.
'We nearly there sir?' he asked.
'We're there already, soldier.' He stood slowly, feeling his back creak as the adrenaline waned. He looked over at Gunny Polson.
'Quit waving that damn 'launcher around Gunny. They're dead already.' Polson grinned and looked up. His flash of a smile was accompanied by another flash within his mouth as Polson's eyes went blank and his mouth exploded scarlet vicsera at his two colleagues.
As the gunners knees buckled, Moor saw the reason. A grimy sergeant was lowering his aim withn a skeletal grin. Blackened wounds covered half his upper torso and face and he was bleeding from his ears, but the signs on his chest glowed iridescent as he tipped back his head and howled.
As Moor and Rassurgen stumbled to their feet, the insane traitor charged. In the cramped conditions, Moor couldn't get past Rassurgen. The guardsman was far too occupied fending off the insane strikes of the traitor NCO.
With a grunt, Rassurgen pushed the traitors rusted ceremonial sword aside and sank his bayonet into the gut of his adversary. The Sergeant howled and raised his laspistol, blowing a gaping hole in Rassurgens neck.
Staggering back slightly, Moor jumped past his mortally wounded squadman and hacked into the neck of the traitor guardsmen. The body crumpled.
Moor approached the body and made sure it was dead with a quick pistol shot. As he did so he was suddenly sturck from behind. Another attacker had leapt from the top of the Chimera at him. Caught from behind, he quikly dropped both his laspistol and chainsword and grasped at the autopistol pushed against his temple. He managed to shunt it forward just as the pistol exploded into life. The roar of the weapon at such close range was deafening. He felt hot cartridges scorch his face as the weapon discharged. He sank an elbow into his attackers stomach and was surprised to find no resistance as his strike winded his opponent. The spent pistol clattered to the floor. Spinning round he scrambled for his combat knife.
The lasgun shot was barely a whisper and the unarmoured officers chest exploded. Moor stared in disbelief as his assailant crumpled. Looking over he saw Rassurgens pallid features behind the stock of his MkII Lasgun. The trooper glanced briefly at his NCO before the weapon dropped. Moor rushed to his compatriots side. The wound in his neck was leaking slowly now, Rassurgens head lagged. Moor reached for his medpack. A deathly hand rested like ice over his shaking furtive fingers.
'Doesn't matter now, Serg' whispered Rassurgen. 'I'm just glad to have helped ... tell 'em how I died Serg' he gulped 'Tell 'em I died good, yeah.' He closed his eyes.
Moor stared dumbly at his last troopers corpse. 'Sorry lad,' he whispered. 'I can't hear a damn thing...' Moor looked up for the last time as the hulk of a traitorous Leman Russ shook to a halt. Behind the sigils and the heavy flamer sponson, Moor could make out the glinting eyes of the gunner.
Death was in those eyes. 'Didn't matter any ...'
 Before Hellhounds
Moving the Chimeras forward to engage the guardsmen at point blank range (I was still assuming I was pretty indestructable), the Chimeras and Squads inside start picking at the incoming squads, the first Chimera kills 5 out of 10 guardsmen with multilaser and lasguns rounds. Meanwhile the command Chimera lines up 4 grenade launchers and a multilaser on the Missile Launcher heavy weapon team located on the bastion roof. It suddenly occurs to Mark that he's facing 7 instantkill shots. Luckily for him only 3 hit their target, but its still enough to kill one missile team after shooting. The Missile team fail their pinning test (despite the standard below them) and cowered behind the battlements.
 After Hellhounds (one round of shooting)
Meanwhile the two hellhound ramp up to 12" and then fire their inferno cannons into the horde of guard in front of them. Three things are a shock to Mark (Hellhounds are about the only thing he doesn't have in his army) that a hellhound can move 12" and fire, that the inferno cannon S6 and that the inferno cannon fires 12" and is placed at my discretion! One hellhound targets the Lascannons and instantkills all three lascannons. The other hellhound has a tricky choice ... does it target the command squad with the meltagun or the three autocannons.
Deciding that the meltagun is outside 12" (and therefore unlikely to get 2D6 after a move) he shoots the Autocannon AND the platoon command squad behind. Despite plenty of prayers, I roll not a single one this turn and all 8 bases are removed. Between the Hellhounds and the command Chug all the infantry threat to my tanks is gone - or so I thought.
Next up, the Demolisher does a 180 degree turn and targets the Vendettas rear armour, the lascannon misses (when do lascannons ever hit?), but the Demolisher is smack on target - giving me an autopentrating hit. Hoping and praying to the dice gods I roll... and score an immobilised result (boo), but he turbo boosted last turn so he crashes and burns (yeah) and he fails his turbo save (double yeah) - the Vendetta is history!
After this, my luck runs out as the mortars fail to wound either the vets or the infantry squads due to scatter and my two leman russes are stunningly rubbish at killing the Basilisk, despite a hit - I fail to penetrate its armour 12 on 2D6 - what's this thing got, forcefields?
Turn 2: Marks of the Traitor "What have we got to lose men? CHARRRGE!"
 Mark take me by surprised as 5 infantry squads charge my tanks!
By the start of turn two I was feeling pretty cocky. The hellhounds had performed brillantly. I was within a turn of cleaning up on the final heavy weapons team and I had three leamn Russes and a multimelta hellhound pointing at the enemies ordinance. All that stood between me and victory were a bunch of S3 guardsmen randomly knocking about.
Then those S3 guardsmen charged my tanks.... of course I know guard all have frag grenades now (which is nice), what I'd forgotten was that offensive grenades supply a S4 attack on vehicles.
Suddenly my Chugs, Hellhounds and Russes were crawling with fanatic guardsmen trying to shove pineapples through my portholes (If you'll excuse the crude analogy!). Despite this, the damage was actually quite light, with only two tanks succumbing to a 'hit'. The heavy bolter leman russ got a lucky double strike 6 on it and suffered a crew stunned result. The lead Chug also suffered the same (thank goodness they could only glance).
As some of you might have noticed, I stupidly placed my lascannon Leman Russ behind my heavy bolter russ - resulting in two turns of non-shooting on the Basalisk. To make matters worse, the Ratling pinged its rear armour with some remarkable shooting, clearly sniping a spare wiget on the tracks and immobilising the tank! DAMN YOU EXPOSED TRACK DESIGN!
To add insult to injury, the basilisks targetted my Mortar squad in an attempt to chase them off my home objective (fairly likely), killed a squad but the other two units remained strong!
Turn 3: Kochi VIII "Tank shock for EVERYONE!"
 The tanks plow through the traitorous defenders
In revenge, I felt it was about time to clean up house! Heavy Bolter Russ put his foot to the floor and flattened a brave soul on his way towards the enemy. After moving 6" hie targetted the squad that had been shunted aside by the lead Chimera and some quick Boom ... dakkadakkadakka later ... only the Sergeant survived (who subsequently legged it for the 'bastion' and hid out until the show down in turn 6!). My command Chimera (still with its heavy flamer attached) reversed course and hosed down a 10 men squad attacking the Russ, the sergeant staggered out of the fire pit ony to be hosed down by krak grenades from the command squad.
The other Chug pushed forwards, punching 12" towards the enemies objective (it was shaken anyhow) ... and the two hellhounds decided to crush their enemies. Chug one (heavy bolter) crushed his 'death or glory' candidate while Mark scored two sixes in a row to DoG my hellhound (If you'll excuse the pun). The result was a 'shaken' and yet another of my tanks couldn't fire ... grrrr.
The hellhound that could fire however made short work of polishing off the command squad. The Inferno Cannon was proving the bane of Imperial Guard armies as it double tapped W3 heroes, weapons teams and ignore stealth cover saves, carapace armour and even 'feel no pain'. Effectively two hellhounds had chewed through the enemies entire command structure.
For starters, my reserves arrived. Looking acorss the board, I assessed that my objective was relatively secure and that the Basalisks would die soon (oh ... the optimism) and so I concentrated my new arrived Chimera on the Ratlings and Veterans in the building. The Mortar team and Immobilised Leman Russ joined in, and for a while everything was good. Between them they downed three carapace armoured vets.
Editors Note: Some of the more attentive readers will have noticed that I bought 4 Heavy support vehicles. The two Leam Russes were in a squadron - hence the immobilised Russ should have been made a casualty sooner. Being new to squadrons, I missed this. It should be also noted that we only worked out that there was a leadership test with tank-shock after the tank-shocks had occurred. As the tank shocks were more damaging to my tanks than Mark troops I think that these two points balance eachother out ... but that's 40k for you!
Turn 3: Marks of the Traitor "Hit 'em with everything we got!"
 Mark quickly evens the odds with some startingly accurate attacks
The Leman Russ targetted the lead hellhound and managed to immobilise it, squad one recharged the hellhound, but failed to damage it further. Squad two were in a similar position with hellhound two (and after reading the 'tank shock' rules) decided to charge it in the side to minimise the 'run!' factor! Despite a valiant effort their attack failed.
 The Primaris Psyker and Sergeant cower dehind their destroyed Chimera as the Traitor Vets make a break for a stake in the battle.
In an amazing turn of events, my rearguard was turned into a catastophe. 9 Guardsmen had Harkers own luck and spiked the gun on the immobilised Leman Russ. Meanwhile my valiant reserves are met by devastatingly accurate Basilisk fire which destroys my brand new painted Chug and then kills all except one guardsmen, the Sergeant and the Primaris Psyker. Thanks to the Psykers improved Leadership, they hold their nerve despite having two members picked off by Sniper fire.
Into this maelstrom, the Veterans stride out to sow yet more havoc!
Turn 4: Kochi VII "We end this now!"
 The Kochi go overkill as Flamers, battlecannons and demolisher cannons target the troops.
Last turn had left me reeling. With only half his army left, Mark had managed to even the odds on my boys. Now its my turn.
The first order of the day is to finish off the veterans and nullify the 'trooper threat' around my tanks. The rearward Mortar squad, and the the Primaris Psyker focus all their firepower on the seven exposed vets. The combined firepower proves more than a match for the 4+ armour saves of the traitors and they go down. Next up the command chimera makes short work of the squad which spiked the Leman Russ last turn. Reducing their numbers to a single guard sergeant. He however holds his nerve (Mark is very good at rolling low when it counts!)
On the other side of the board, the Multimelta hellhound makes a rush at the Leman Russ, but in spectacular guard fashion, he manages to miss completely. The other Chimera manages its dangerous terrain roll and scrambled over the cover to come within 3" of the objective. The other, immobilised Hellhound tried to take out both the missile launcher teams behind them, but one survives.
Meanwhile, the Demolisher (now hopelessly out of range) decides to sit pretty and unload everything on the squad left behind by the multimelta hellhound. One Demolisher shot later and the two survivors are gunned down with heavy bolter and lascannon shots, accomplishing the biggest 'overkill' barrage of the game.
Turn 4: Marks of the Traitor "Desparate times lead to desparate actions..."
 "Charging tanks again Mark, that won't work..."
 Famous last words...
The Ratlings go after my Command chimera and managed to blow it up with two penetrating hits! The best anti tank weapon on the board so far - sniper rifles?! The resulting explosion kills three grenade launcher toting guardsmen and the squad fails its morale test and legs it for the hills ... great!
My Primaris Psyker and Sergeant were shocked to find themselves charged by a sergeant from Marks 'Leman Demolition' crew and soon an assault was underway. Despite multiple hits on both side, the flak armour took the blows and the combat was a draw!
The remaining missile launcher targets my Chimeras rear armour and rolls a 2 ... the Leman Russ Battle Cannon fires at point blank range into the cab and fails to penetrate. Meanwhile the squad (S1) of guardsmen leave the immobilised Hellhound and run full pelt for the lead Chimera contesting the objective. Despite needing a double six, and two immobilised, the guardsmen manage to blow up the chimera.
All but the sergeant of my Squad 1 and two guardsmen are killed in the ensuing maelstrom. The S3 blast outside kills half their squad too. My remaining guardsmen can be placed anywhere within 2" of the Chimera - IE: right on top of the objective ... if only we can roll a 1 or 2 to finish. A five.
Turn 5: Kochi VIII "Block and tackle"
 Clinging onto the objectives...
 'Chop him up, chop him up!' said the Primaris Psyker in a moments personality change.
The mortars on the right fail to hit their ratling targets. With a tremedous effort the Primaris Psyker and sergeant stick it to their attacking sergeant.
Turn 5: Marks of the Traitor "Blood for the Blood god ... Urrk?!?"
 My valiant objective grabbers are rudely attacked in mid-victory dance ... how bloody rude!
Mark's Leman Russ backed up to give the Hellhound a taste of its own medicine ... and fails! The Basilisks were equally ineffective at scoring a wound on the mortar team on my objective. But hang on, but I suddenly realised just how precarious my 'victory' was. All Mark needed to do was hit my mortars with enought S9 fire and i'd be dead or running... ooo gamble gamble!
Meanwhile over at the enemy objective... two guardsmen and a sergeant prepare to hold.
*****
Down to the wire
 Bloody Sergeants everywhere ... and not the time to think!
Sergeant Moor wiped the sweat from his eyes and checked the power reading on his laspistol. He'd barely got a shot off all battle... he glanced guiltily at the sordid remains of his own squad. Men he'd trained. Bloody Sergeants everywhere ... and not the time to think!
All the 'replacements' had been killed when that damn frag grenade had come through the side of their Chimera. Johnson hadn't followed orders, not closed his gunnery plate and it had cost his life, the Chugs crew and six others.
Polson, Rassurgen and Moor had scrambled from the Chug. Polson lugging the heavy grenade launcher before him like a shield. Moor had scrambled into the cover, and then directed his men to target the Chug. Beyond the smoke and sparks he could hear the cheers and cursing of their assailants, maybe a full squad. Moor would make them pay. He quietly opened his commlink and contacted the Kochi regulars hidden at their rear.
'Pitcher team two, this is Echo One, status?" he whispered. Morr noted out of the corner of his eye Rassurgen peep his head up towards the now quieting Chimera. He ducked down quickly and flashed a full open hand followed by four fingers at Moor. Moor nodded.
'Echo One, this is pitcher two, primed and ready, what's your target." the call from the Mortar team crackled in his ear. He opened the bead again, he could now hear quiet scuffing of approaching men over the crackle of static and flames.
'Pitcher Two, fire for effect, target Chug One. 9 targets, minimum spread." He grated into the commlink. 'Understood, Emperor's Blessing!' a brief pause, then 'Fire, Fire!'
The whistle of the mortar was barely noticeable over the crackle of the burning Chimera. If Moor hadn't had his face neatly buried in the dirt he would have noticed how the enemy Sergeant cocked his ear and dove forward, how two traitor guardsmen, armour smeered with arcane and lurid symbols, glanced skyward before the mortar struck.
They'd been accurate shots.
Moor was on his feet even as the second blast richochets around the bastion they held, Polson followed Rassurgen quickly. Before them dust filled the scene between them and the dismembered Chimera.
Suddenly three men staggered form that gloom. Moors pistol stitched a line across a guardsmens armour plate as Rassurgens lasgun took the leader in the face. Then Polsons frag grenade hit the second soldier and the three bodies were thrown out at angles as the shrapnel grenade shattered their already bewieldered forms.
Moor ducked back behind the cover as Polson ans Rassurgen continued to scan for any more survivors. He quickly opened his dataslab and checked his location. They'd achieved their target - the enemy bunker. Hope swelled in him as he heard the chew of the Hellhounds gears beside the intermittent blast of the duel Basilisks. Now all they needed to do was silence those guns. Moor stuffed the dataslate back in his pack and picked up his laspistol. Rassurgen ducked down beside him.
'We nearly there sir?' he asked.
'We're there already, soldier.' He stood slowly, feeling his back creak as the adrenaline waned. He looked over at Gunny Polson.
'Quit waving that damn 'launcher around Gunny. They're dead already.' Polson grinned and looked up. His flash of a smile was accompanied by another flash within his mouth as Polson's eyes went blank and his mouth exploded scarlet vicsera at his two colleagues.
As the gunners knees buckled, Moor saw the reason. A grimy sergeant was lowering his aim withn a skeletal grin. Blackened wounds covered half his upper torso and face and he was bleeding from his ears, but the signs on his chest glowed iridescent as he tipped back his head and howled.
As Moor and Rassurgen stumbled to their feet, the insane traitor charged. In the cramped conditions, Moor couldn't get past Rassurgen. The guardsman was far too occupied fending off the insane strikes of the traitor NCO.
With a grunt, Rassurgen pushed the traitors rusted ceremonial sword aside and sank his bayonet into the gut of his adversary. The Sergeant howled and raised his laspistol, blowing a gaping hole in Rassurgens neck.
Staggering back slightly, Moor jumped past his mortally wounded squadman and hacked into the neck of the traitor guardsmen. The body crumpled.
Moor approached the body and made sure it was dead with a quick pistol shot. As he did so he was suddenly sturck from behind. Another attacker had leapt from the top of the Chimera at him. Caught from behind, he quikly dropped both his laspistol and chainsword and grasped at the autopistol pushed against his temple. He managed to shunt it forward just as the pistol exploded into life. The roar of the weapon at such close range was deafening. He felt hot cartridges scorch his face as the weapon discharged. He sank an elbow into his attackers stomach and was surprised to find no resistance as his strike winded his opponent. The spent pistol clattered to the floor. Spinning round he scrambled for his combat knife.
The lasgun shot was barely a whisper and the unarmoured officers chest exploded. Moor stared in disbelief as his assailant crumpled. Looking over he saw Rassurgens pallid features behind the stock of his MkII Lasgun. The trooper glanced briefly at his NCO before the weapon dropped. Moor rushed to his compatriots side. The wound in his neck was leaking slowly now, Rassurgens head lagged. Moor reached for his medpack. A deathly hand rested like ice over his shaking furtive fingers.
'Doesn't matter now, Serg' whispered Rassurgen. 'I'm just glad to have helped ... tell 'em how I died Serg' he gulped 'Tell 'em I died good, yeah.' He closed his eyes.
Moor stared dumbly at his last troopers corpse. 'Sorry lad,' he whispered. 'I can't hear a damn thing...' Moor looked up for the last time as the hulk of a traitorous Leman Russ shook to a halt. Behind the sigils and the heavy flamer sponson, Moor could make out the glinting eyes of the gunner.
Death was in those eyes. 'Didn't matter any ...'
*****
With Moor still alive, victory is in the hand of the loyal Kochi. But we roll for turn six.
Turn Six: Kochi VIII "Bringing it home"
 Still Clinging On ... to both objectives ... just
The two Hellhounds and the Demolisher (with its lascannon) throw everything at the Bassies and Leman Russ and failed again. Meanwhile the Primaris Psyker throws on a 'leadership cloaking device' and attmepts to move out towards the home objective.
The two mortars finally respond to the barrage of basilisk rounds and regroup. Unfortunately, the unharmed mortar team need a 5 or 6 to get within 3" and only manage a 4.
This means that only Sergeant Moor and Pitcher Two stand between victory and a hard fought draw.
Turn Six: Marks of the Traitor 'Fire in the hole!'
 All I can say is ... the bastard.
Mark moves his traitor russ forward and incinerates Moor. The ratling pass their 'can't shoot me' leadership test and kill the arrogant Primaris Psyker. Now it's all down to the Bassies shooting at two mortars. Stupidly, when I repositioned the mortars, they were repositioned to get two hits from a Bassie.
Mark rolls. The first bassie misses spectacularly! The second shot is however a direct hit. Two hits, but MArk rolls a 1! Only one 4+ saving throw stands between victory and a draw...
I roll a three.
Down to one mortar team, my boys take an against the odds roll of less than 6 on 2D6. I roll a 5.
Conclusion
Marks game: Hats off to Mark for fighting hard on a poor hand and nearly pulling off a draw. His charge took me completely by surprise, and is one to remember as a couple of 6's across 10 models is quite easy. He was very unlucky with the Vets as they scattered. They could have destroyed the Demolisher and taken my objective. This didn't worry me overly as I had a Chimera (with heavy flamer) in reserve for just such an eventuality. Thanks to his bad luck (and risky strategy) he lost both his Vendetta, and effectively his Vets. If the Vendetta had survived, I would have been hard pressed with 3 twin-linked lascannon shots in the rear of my tanks per turn.
With his vets team, I've actually modified one of my Veteran Sergeant to field a power fist and plasma pistol. While pricey - being on the (potential) receiving end of this unit worried me more than expected. The vets were a lethal crew (and I'm glad they didn't really get a chance!)
The Ratlings played well, and although I didn't want to spend any more resources attacking them than I had committed, they weren't strategically imporant to the game. In deploying out the way they were a consistent threat (destroying two tanks) but their fear of the hellhounds/chimera meant they weren't going anywhere.
Kochi Performance: This is the first time I've used Hellhounds on mass and I was very impressed. The hellhound inferno cannon seems custom made for killing its own guardsmen - ironically... and the ability to place the template means that targetting individual squads is no defence. Where the hellhound falls down is in killing single models - as it seems such a waste.
I'm definitely considering swapping to both heavy flamers on my hellhounds. The multimelta was a waste of points, and it would probably have been more salient to have a couple of meltaguns in my armoured fist squads. Additionally, having all heavy flamers doesn't increase the 'heat' of the unit, but seriously increased the point blank carnage it can commit. It would have been considerably useful against the massed 'charging' troops. The ability to move 12" and fire is genius as it means the Hellhound only gets hit on a 6, this (combined with smoke) makes the hellhound a really durable close support tank.
Over all I felt the 'mobile infantry' list was very effective. Perhaps if I'd paid more attention to the ratlings, I could have flamered them to death sooner. I was unlucky to take them with the reserved Chimera thanks to some spectacularly effective Basilisks.
As for my Basilisk? I'm unimpressed. Although I didn't have the antitank option with the Mortars - I'm seriously considering replacing the Bassie with two more mortar teams. They proved very useful obejctive 'holding' units ... and with the mortar having no 'minimum range' they are effective three frag missiles against anyone brave enough to flank or deepstrike them. Four mortar teams, spread out would have been difficult to winkle out (as proven by the result).
The ability to hold and defend objectives and contribute enormously to the battle makes them a must for me! 4 mortars would drop 12 S4 hits a turn. Against Guard, Orks, Nids or Tau this is a lethal barrage.
I hope you enjoyed this battle report ... and my artistic additions. Let me know.
Lastly - does this work?
 I'm undecided if this is a useful tool for encapsulating the battle in one go... let me know...
Turn Six: Kochi VIII "Bringing it home"
 Still Clinging On ... to both objectives ... just
The two Hellhounds and the Demolisher (with its lascannon) throw everything at the Bassies and Leman Russ and failed again. Meanwhile the Primaris Psyker throws on a 'leadership cloaking device' and attmepts to move out towards the home objective.
The two mortars finally respond to the barrage of basilisk rounds and regroup. Unfortunately, the unharmed mortar team need a 5 or 6 to get within 3" and only manage a 4.
This means that only Sergeant Moor and Pitcher Two stand between victory and a hard fought draw.
Turn Six: Marks of the Traitor 'Fire in the hole!'
 All I can say is ... the bastard.
Mark moves his traitor russ forward and incinerates Moor. The ratling pass their 'can't shoot me' leadership test and kill the arrogant Primaris Psyker. Now it's all down to the Bassies shooting at two mortars. Stupidly, when I repositioned the mortars, they were repositioned to get two hits from a Bassie.
Mark rolls. The first bassie misses spectacularly! The second shot is however a direct hit. Two hits, but MArk rolls a 1! Only one 4+ saving throw stands between victory and a draw...
I roll a three.
Down to one mortar team, my boys take an against the odds roll of less than 6 on 2D6. I roll a 5.
Conclusion
Marks game: Hats off to Mark for fighting hard on a poor hand and nearly pulling off a draw. His charge took me completely by surprise, and is one to remember as a couple of 6's across 10 models is quite easy. He was very unlucky with the Vets as they scattered. They could have destroyed the Demolisher and taken my objective. This didn't worry me overly as I had a Chimera (with heavy flamer) in reserve for just such an eventuality. Thanks to his bad luck (and risky strategy) he lost both his Vendetta, and effectively his Vets. If the Vendetta had survived, I would have been hard pressed with 3 twin-linked lascannon shots in the rear of my tanks per turn.
With his vets team, I've actually modified one of my Veteran Sergeant to field a power fist and plasma pistol. While pricey - being on the (potential) receiving end of this unit worried me more than expected. The vets were a lethal crew (and I'm glad they didn't really get a chance!)
The Ratlings played well, and although I didn't want to spend any more resources attacking them than I had committed, they weren't strategically imporant to the game. In deploying out the way they were a consistent threat (destroying two tanks) but their fear of the hellhounds/chimera meant they weren't going anywhere.
Kochi Performance: This is the first time I've used Hellhounds on mass and I was very impressed. The hellhound inferno cannon seems custom made for killing its own guardsmen - ironically... and the ability to place the template means that targetting individual squads is no defence. Where the hellhound falls down is in killing single models - as it seems such a waste.
I'm definitely considering swapping to both heavy flamers on my hellhounds. The multimelta was a waste of points, and it would probably have been more salient to have a couple of meltaguns in my armoured fist squads. Additionally, having all heavy flamers doesn't increase the 'heat' of the unit, but seriously increased the point blank carnage it can commit. It would have been considerably useful against the massed 'charging' troops. The ability to move 12" and fire is genius as it means the Hellhound only gets hit on a 6, this (combined with smoke) makes the hellhound a really durable close support tank.
Over all I felt the 'mobile infantry' list was very effective. Perhaps if I'd paid more attention to the ratlings, I could have flamered them to death sooner. I was unlucky to take them with the reserved Chimera thanks to some spectacularly effective Basilisks.
As for my Basilisk? I'm unimpressed. Although I didn't have the antitank option with the Mortars - I'm seriously considering replacing the Bassie with two more mortar teams. They proved very useful obejctive 'holding' units ... and with the mortar having no 'minimum range' they are effective three frag missiles against anyone brave enough to flank or deepstrike them. Four mortar teams, spread out would have been difficult to winkle out (as proven by the result).
The ability to hold and defend objectives and contribute enormously to the battle makes them a must for me! 4 mortars would drop 12 S4 hits a turn. Against Guard, Orks, Nids or Tau this is a lethal barrage.
I hope you enjoyed this battle report ... and my artistic additions. Let me know.
Lastly - does this work?
I'm undecided if this is a useful tool for encapsulating the battle in one go... let me know...Monday, 21 September 2009
Guard Heavy Weapon Tactica - Mortars

Courtesy of Wikimedia
Heavy Weapons teams took a serious nerf under the new codex. To my mind this is all to the good, since the ubiquitous 5 heavy weapon teams had turned into a fairly invulnerable unit. The combination of multiple 6 wound (three redundant) units, and a nearby Commander with Ld9+1, plus Commissar, plus regimental banner meant HWT's never broke, were disproportionally hard to kill and could keep giving out the pain regardless.
Under the old codex, the combination of range and (ironically) toughness meant that HWT could even preference on big tanks in providing battle covering firepower.
With the new codex came a new reality. The heavy weapon team was no longer a two model set, but a two wound model. This meant that their vulnerability to incoming firepower shot up. A heavy weapon team was now very likely to die from incoming scatter laser, plasma rifle or missile pod fire. In fact anything with a S6 or 7 would be gunning for your heavy weapon teams.
In a game against the Tau, I had an epiphany... Mortars are the ultimate heavy weapon. Here's why:
- Mortars are difficult to kill. Mortars should only ever be deployed in hard to reach positions behind buildings. The ability of mortars to fire indirectly gives them the untimate armour. Your opponent cannot see and therefore cannot fire on your mortars.
- Mortars are low heat. S4 indirect AP6 is pretty pants... but it means that mortars aren't prioritised for attack. This, combined with a difficult position, forces your opponent to consider 'chasing' after mortars with some serious firepower/elites which is unlikely.
- Mortars force your opponent out of his comfort zone. To kill the mortar, your opponent wills have to sacrifice deepstrike or flanking options to go after a 60pt unit... even if they succeed they will have exposed an expensive unit, out of position, with only a 60pt kill to show for it... counter attack!
- Mortars abilities are as barrage weapons. S4 is poor. But opponents are often surprised when I frequently tot up 7-10 hits per turn on a group of heavy weapons space marines. Against those kinda numbers the 3+ starts to look pretty feeble. Suddenly his 'emplaced' troops are facing sustained barrages they can do nothing about. Effectively if the first 'shot' hits, you have a significant chance of getting lots of hits... add to this the fact that barrage weapons (even S4 ones) cause pinning and you can see how mortars can quickly pin and hold an enemy.
- Indirect ignores cover saves. Unless you model is sitting in cover, I'm gonna ignore it. Against Gaunts, Kroot and Orks this is unbeliveably lethal. Forcing the large mobs to hug area terrain in fear of their lives. In one game (click here) my opponent tried to avoid fire on his Kroot entirely by hiding behind a building, three mortars reduced his 15 warriors to a single shaper in one round of shots from just three mortars.
- Indirect got better. Are you aware that the 'guess that range' rules are gone. I'm a little sad as I was actually pretty good at it. Nevertheless, the rules now are awesome, simply choose a target within 48" and then roll 2D6 and the scatter dice. Indirect means full scatter - but a 33% to hit rate is still pretty good.
- Mortars LOVE stealth teams. Harlequins and XV25 Tau should fear the mortar as its inaccuracy can lead to some awfully impressive shooting. Don't believe me, just let me target that unit next to your 'hidden' unit - oh what a shame... rinse repeat 15 times.
- Mortars are cheap. 60pts for a durable unit that can dish out ridiculous amounts of wounds. In addition, the new army lists allow for up to 5 mortar teams per infantry platoon. This means you could field up to 45 mortars easily within a 1500pt army. Bring on the horde...
- Mortars are 'extension' free. Unlike Lascannons, Mortars are effective without orders (like 'bring it down'), and without LoS to worry about you won't take the hits (and have the leadership tests to worry about). 'Fire on my target' is only useful against low armour hordes (in which case your command platoon will probably be sitting behind cover next to your mortars) - so mortars are a really useful unit to get 'left behind' as your main army advances - there's no downside.
- Mortars are troops too. This means mortars can comfortably hold your own objectives while pinging the enemy for all they're worth. If you are going to group mortars, a roughrider or 3 flamer special weapon team becomes a neccessary requirement for pinging the inevitable counterattack that 'sitting on a big fat objective' will hold.
For all the above reasons I love mortars. There something particularly 'light infantry' about the mortar and its extensive use in WW2 and continued relevance in modern warfare makes it a winner for both fluff and its highly effective anti-infantry options.
After Mortars, I believe the HWT options come in the following order of priority:
- Lascannon: Still worth it. 48" will ignore most incoming, best used in infantry squads for durability or laid out at the back to provide antitank fire. A must against Tau.
- Autocannon: best anti-APC weapon on the table, useful against MEQ armies.
- Missile Launcher: price increase against mortar negates its usefulness as an anti-infantry option, plus LoS makes them very vulnerable to return S6-7 fire. Strength 8 is too low against most tanks, but AP3 might give crisis suits and some MC's pause. Autocannons better. Only useful as can be easily converted from heavy weapons sprue.
- Heavy Bolter: 36" just doesn't cut it, heavy bolters are too short ranged as most S6-7 weapons are within this. AP4 is as useful as AP6 with all the cover around. Convert to Lascannons.
So what do you think of the humble mortar? Does this change your opinion...? Let me know.
Friday, 18 September 2009
When is an Ogyrn an Ogre-in? GW Pronounciation Problems Solved
 Name that Ogyrn: go here to take part!
 First question: how do you pronounced Ogyrn?
Is it 'Or-groin' or 'Ogre-in' or 'Og-girn'? Or another version..?
In Japanese it would get particularly confusing. A quick search on the interweb later and I have the official response. By selecting 'Japanese' as my identity on the GW website, I've traversed through and therefore found the following link: http://jp.games-workshop.com/resources/wh40k/imperialguard09.htm which might make you smile.
It appears that the Japanese have downloadable version of all the codici in PDF format ... how obliging of GW. More importantly if you happen to download this PDF, you have the complete army list.
Luckily for me, I speak fluent Japanese, and have a passable reading skills. The reason why this is important is that Japanese is majoritively a 'phonetic' language. This means that the way GW translates Ogyrn etc in Japanese tells us exactly how it 'should' be pronounced - according to GW...
Therefore I pronounce the following:
- Ogyrn: O-Gu-RIN - ie: O'grin.
- Lasgun: RA-Su-GAN - 'lahsgun' (not lays-gun)
- Leman Russ: RE-MAN RASU - Layman Russ (Not Leeman Russ)
- Chimera: KI-ME-RA - ki'mera (not Kai'mera - which is weird!)
This is just from the Imperial Guard list ... if you have any other 'pronounciation' questions for Eldar, Tau or Orks - just give me a shout.
Monday, 14 September 2009
Gaming, painting and a naming challenge!
By Suneokun
GAMING UPDATE
First a quick battle report update for the new 'merpeople planet of agarian hi-tech' campaign. To celebrate the release of the planetary empires set, my local GiftsforGeeks store has built a campaign based around the devious decisions of Jack 'The Stormbringer' (Surname unknown).
As such there are a total of 6 'teams', made up of either two 1000 pt armies or 1 uber army. They are as follows (Please note, all names apart from the first are invented, because it amused me...
300 (Thousand) Army list
I fielded a melta and plasma rich infantry platoon led by a 4 grenade launcher platoon command in a Chug, accompanied by a Primaris Psyker (yes that is 10 S6 shots at 24" a turn, and yes it was a surprise). The platoon included 6 mortars. Centrally, I took a lascannon and heavy bolter armed Demolisher (the 24" range was awesome as they HAD to come at me), a banewolf with extra armour and 6 rough riders playing counter assault.
My partner in crime, Paul, went for some serious assaulty elements including a terminator squad with chainfists and assault cannon, an assault squad and a buffed up command squad plus a Dreadnought and a single tactical squad.
Battle One Roundup
 The Tau try (and fail) to storm the battle-line of two 'newer' codici.
Apocalypse Tau versus The Dirty Dozen (x166.66): Despite a valiant approach by the attacking Tau, the combination of the Guard numberless infantry in defense and some seriously good shooting by the Leman Russ kept the Tau at bay. Funniest moment: Two space marines manage to down a Hammerhead in close combat, but immolate themselves in the S3 flashback - doh!
 Adam's Orks are just everywhere...
Full Metal WAAARRGGHHH! versus Where Necrons Dare: The Necrons defended valiantly, but Adams mounted Waaargh simply rolled over the Necrons, who phased out spectacularly. Moment to remember: Hutch's escaping 'I'll be back' necrons deepstrike mishap and scatter into the middle of Adam's Horde ... Gulp!
 Despite some dramatic action, the Chaosmarine found themselves fighting a long way from the Guardsmen.
The Chaosmarine has Landed versus 300 (Thousand): Arriving late-ish didn't help... arriving late-ish without an army list proved crucial as the Chaos Marines found themselves on the receiving end of a counter attack from Paul's 300, backed up by a Chem-tank and Chimera. The Guardsmen held the battleline, but were largely uninvolved (only losing 2 guardsmen in total) ... to add insult to injury, the warp seemed to hate the Chaosmarine reserves and when they finally arrived a whole squad of Khornate Terminators AND a Chaos Sorceror managed to scatter separately to their deaths. Durability test: Chaos Marine Havocs survive over 40 hits from mortars ... losing only 2 men over multiple turns of fire...
Results: at the end of this, both Guard armies and the Orks were able to claim additional resources. All armies received a quick buff thanks to the vet rules... Paul gained scout for his tactical marines and I gained fearless for one mortar squad ... great? In addition, any commanders alive at the end of the game gained a bonus... My Primaris Psyker gained Feel No Pain - awesome!
PAINTING UPDATE
I've completed both my Ogyrns AND a Tau Devilfish that have been 'nearing completion' for a couple of weeks. Like most painters, I tend to vary between models, but recently I've been starting lots of paintjobs based around whats required on the battlefield - hence the glut of half finished mini's.

The Devilfish has adopted a new paint scheme which is bolder than before. My 'pathfinder' devilfish has typical 'fuzzy' camoflague - whereas the new tank has a brighter, bolder design. I prefer it greatly and will carry it through to my Hammerheads/SkyRays.
The Ogyrns are a unit I have hardly ever fielded. The price of ogyrns terrifies me. Despite the T5 and 3 wounds, they're ten conscripts a model! I'm going to field them soon as they look great, the conversion is from the Warhammer Ogres (as if you couldn't guess) and I think works really well. It was my first outing with greenstuff, so the moldings a little shaky...

AND FINALLY... NAMING
As part of my unit of Ogyrns, I couldn't resist designing a 'special character'. Since I had 6 Ogres anyhow and you usually just field five (leaving space in the Chimera for a Psyker/Commissar etc), I had fun with this fella. While I've got some ideas about his abilities and his weaponry, I'm really interested in seeing what you guys think he should have and how much he should cost, and most importantly - his name!
Basics: Ogyrn Bonehead with Carapace Armour, a heavy flamer and some sort of power weapon...
So I throw this wide open to you, what do you think he should be called, give me his stats and points and finally a cool name. Once we've got some options in, I'll open a poll for voting...
Plus, do you like him?
GAMING UPDATE
First a quick battle report update for the new 'merpeople planet of agarian hi-tech' campaign. To celebrate the release of the planetary empires set, my local GiftsforGeeks store has built a campaign based around the devious decisions of Jack 'The Stormbringer' (Surname unknown).
As such there are a total of 6 'teams', made up of either two 1000 pt armies or 1 uber army. They are as follows (Please note, all names apart from the first are invented, because it amused me...
- "Apocalypse Tau": Double trouble, times two Tau force.
- "300 (Thousand)": My Guard accompanying some spanking gold plated 'Spartan' marines by Paul.
- "The Chaosmarine has Landed": Ant and Ross' Double trouble Chaosmarine force.
- "The Dirty Dozen (x166.66)": Mark's Guard and Jack's Stormbringer Marines.
- "Where Necrons Dare": Where are Necrons not infesting a planet ... Hutch brings the skellybobs.
- "Full Metal WAAARRGGHHH!": Adam's Orks mass on the board.
300 (Thousand) Army list
I fielded a melta and plasma rich infantry platoon led by a 4 grenade launcher platoon command in a Chug, accompanied by a Primaris Psyker (yes that is 10 S6 shots at 24" a turn, and yes it was a surprise). The platoon included 6 mortars. Centrally, I took a lascannon and heavy bolter armed Demolisher (the 24" range was awesome as they HAD to come at me), a banewolf with extra armour and 6 rough riders playing counter assault.
My partner in crime, Paul, went for some serious assaulty elements including a terminator squad with chainfists and assault cannon, an assault squad and a buffed up command squad plus a Dreadnought and a single tactical squad.
Battle One Roundup
 The Tau try (and fail) to storm the battle-line of two 'newer' codici.
Apocalypse Tau versus The Dirty Dozen (x166.66): Despite a valiant approach by the attacking Tau, the combination of the Guard numberless infantry in defense and some seriously good shooting by the Leman Russ kept the Tau at bay. Funniest moment: Two space marines manage to down a Hammerhead in close combat, but immolate themselves in the S3 flashback - doh!
 Adam's Orks are just everywhere...
Full Metal WAAARRGGHHH! versus Where Necrons Dare: The Necrons defended valiantly, but Adams mounted Waaargh simply rolled over the Necrons, who phased out spectacularly. Moment to remember: Hutch's escaping 'I'll be back' necrons deepstrike mishap and scatter into the middle of Adam's Horde ... Gulp!
 Despite some dramatic action, the Chaosmarine found themselves fighting a long way from the Guardsmen.
The Chaosmarine has Landed versus 300 (Thousand): Arriving late-ish didn't help... arriving late-ish without an army list proved crucial as the Chaos Marines found themselves on the receiving end of a counter attack from Paul's 300, backed up by a Chem-tank and Chimera. The Guardsmen held the battleline, but were largely uninvolved (only losing 2 guardsmen in total) ... to add insult to injury, the warp seemed to hate the Chaosmarine reserves and when they finally arrived a whole squad of Khornate Terminators AND a Chaos Sorceror managed to scatter separately to their deaths. Durability test: Chaos Marine Havocs survive over 40 hits from mortars ... losing only 2 men over multiple turns of fire...
Results: at the end of this, both Guard armies and the Orks were able to claim additional resources. All armies received a quick buff thanks to the vet rules... Paul gained scout for his tactical marines and I gained fearless for one mortar squad ... great? In addition, any commanders alive at the end of the game gained a bonus... My Primaris Psyker gained Feel No Pain - awesome!
PAINTING UPDATE
I've completed both my Ogyrns AND a Tau Devilfish that have been 'nearing completion' for a couple of weeks. Like most painters, I tend to vary between models, but recently I've been starting lots of paintjobs based around whats required on the battlefield - hence the glut of half finished mini's.

The Devilfish has adopted a new paint scheme which is bolder than before. My 'pathfinder' devilfish has typical 'fuzzy' camoflague - whereas the new tank has a brighter, bolder design. I prefer it greatly and will carry it through to my Hammerheads/SkyRays.
The Ogyrns are a unit I have hardly ever fielded. The price of ogyrns terrifies me. Despite the T5 and 3 wounds, they're ten conscripts a model! I'm going to field them soon as they look great, the conversion is from the Warhammer Ogres (as if you couldn't guess) and I think works really well. It was my first outing with greenstuff, so the moldings a little shaky...

AND FINALLY... NAMING
As part of my unit of Ogyrns, I couldn't resist designing a 'special character'. Since I had 6 Ogres anyhow and you usually just field five (leaving space in the Chimera for a Psyker/Commissar etc), I had fun with this fella. While I've got some ideas about his abilities and his weaponry, I'm really interested in seeing what you guys think he should have and how much he should cost, and most importantly - his name!
Basics: Ogyrn Bonehead with Carapace Armour, a heavy flamer and some sort of power weapon...
So I throw this wide open to you, what do you think he should be called, give me his stats and points and finally a cool name. Once we've got some options in, I'll open a poll for voting...
Plus, do you like him?
Monday, 7 September 2009
Loving the Chug

A 'Chug' (he say with all authority) is a Chimera. It's a name (I invented) which I think best reflects the vehicles abilities. It's not the fastest transport in the fleet, but it'll poddle along like Ivor the Engine and eventually get your boys into combat.
In my fluff, the Chimera plays an intrinsic role for the Kochi 20th Light Infantry - and as such, they're my first tank of choice when it comes to filling out the armour. For the uninitiated, here's a quick taster:
***
Either way, it was a mess.
"No one's helming this tub, and they're playing in the rigging while the rocks kiss our keel." Hagard mused to himself, scratching his three days growth of grey black mottled stubble. It was clear that this battle was in its last moments, and despite the desperate acts of a valiant few, it was the last desperate punch delivered before the true weight of the Tau fell.
"Lucky for them the 20th is in the last minute business.” He mused to no-one in particular. He triggered his intercom, all channels.
"Huntpack Alpha: flank left and vent those Tau. Huntpack Beta: flank right, I want concentrated fire, rout those Tau and isolate the hill. Chugs are up front and centre, target those blasted skimmers. Branch out and form a firebase at the Colonel’s position. Watch your spacing and go spare with the ammunition, we got friendlies up there."
***
As such, I'm a very happy bunny about the new imperial guard codex. On my recent uber-tank-purchasing-splurge I purchased a bucket full of goodies for the Guard. The new demolisher and hellhound were top of my list, along with a Basilisk for more indirect meanness. But alongside all this hardcore firepower, a also purchased two additional Chugs to bring my tally up to four.
Here's why...
Comparible benefits of a Chimera ...
The Chimera (pronounced Kai-mera - go figure, ruddy greeks?!?) is the 'workhorse' of the Imperial Guard, and until recently it was a fairly pricey one at that. The old Chug had to buy its tank AND then buy all the upgrades, resulting in a slow transport at about 100pts a pop. Other than the price, it is one of the best balanced transports in the game... but that was until the new rules, which make it indispensible.
Armour
The Chug has solid frontal armour, and thanks to its relatively 'wide' nose any first round chug with a hit on the side armour is an unlucky one. Added to this, the Chug now comes with 'free' smoke launchers. This means that the first turn can be spent chewing up 12" and popping the smoke. Try alternating 'smokers' to benefit from 2 turns of popping. The Chug can also mount extra armour, which is worthwhile if you're expecting to use them as 'armoured walls' and want to move 6+ inches a turn to minimise the hits against you.
Weaponry
In the world of 5th Edition, rate of fire is now more important than low AP in general. That's not to say, when facing space marines or terminators, that the application of plasma isn't required. But at range (24" +) its all about rate of fire due to the abundance of cover saves. I was always fairly dismissive of the lowly multilaser as it lacks either the high (er) strength of the autocannon or the AP4 of the heavy bolter.
In the new codex however, the multilaser is now the anti-transport weapon of choice. The advent of heavy weapon teams becoming T3 2W models has lead to some serious navel gazing among the 40k Guard throng. The weapons team is only Ld7, so orders like 'bring it down' aren't as effective - in addition, an agressive Guard force (now a distinct possibility) cannot rely on any heavy weapons teams to give the 'durability' of the previous codex.
Assault cannons, Reaper Autocannon, Ion Cannons, Tau Rail Rifles and other S6-7 weapons all love targetting weapons teams, and I'm incresingly finding that beyond fielding mortars (hidden away), I'm prefering armoured direct fire heavy weapons over unarmoured.
This is where the Chug excels, at only 55pts with multilaser and heavy bolter. The Chug can lay down withering antipersonelle and anti-transport fire while ignoring every S6-S7 shot on the board. In the absense of some heavier armour, this may present a problem, but usually Chimeras are ignored in favour of targetting higher priority targets, like Russes and Hellhounds.
Transport
12 passengers isn't bad either. Delivering either that much needed veteran squad or 6 Orgyrns into the mix, the only problem the Chug suffers from over the Rhino is that its weaponry means that often you'll choose to move 6" and fire rather then 12". This said, as guard, if it ain't peppered with holes by the time you arrive, you ain't going to kill it. Chimeras give you the option of considerable speed en masse, while at the same time allowing you to approach steadily mowing things down - the moving pillbox.
Command Vehicle: The new orders also make the Chimera the first vehicle of choice for command squads as it both makes them more durable AND give them a longer range for administering orders - plus the discounts on the command squads over the old codex mean a chugs practically mandatory.
Drive-by Monster: The rules for shooting from a Chimera have been simplified. Rather than firing once from the top and firing the 'lasguns' along the side separately the new rules mean the player can simply shoot up to 5 squad weapons from the top of the Chug. In addition, the Chimera no longer counts as open topped when doing so. Suddenly a range of opportunities opens up - for drive by Chugs...
 Where's the command squad? Three guesses...
Favourite Combinations:
- Close Support Command Shooter: Command HQ with a plasma pistol and 4 grenade launchers in a Chimera with Multilaser, heavy flamer, heavy stubber and extra armour. This baby pumps out 7 S6 shots and 3 S4 shots at 24" a turn when moving. This tank is designed as the ultimate close support vehicle for your infantry. Remember that HQ Command Squads are true Vets now with BS4! When moving forward, the heavy flamer is my secondary weapon of choice. Moving will limit your ability to fire more than the multilaser and heavy stubber anyhow, and the heavy flamer is brilliant for parking up and clearing a building.
- Oggers Away: The Chug is the only way to deliver Ogyrns in 40k. Gone are the 'dark in dere' rule, so Oggers can leap in and out of Chugs all battle (albeit gingerly). Ogyrns are a bit of a points sink - but it should be remembered that 6 Oggers pump out a total of 18 S5 shots at 12" - nice! I'd recommend extra-armour, heavy flamer and a bulldozer blade to get you there asap. In for 400 points in for a pound.
- Drive-by Plasma Death: Any enemy Marine Equivilent (MEQ) commander is going to target those squads carrying the plasma weaponry. This either leads to you spreading out your plasma death, or alternatively, putting them in a metal box. The combination of 3 plasma and a medic for 'feels no pain' is as old as the hills. Combine this with a Chimera and you've a durable unit for surviving long enough to deliver those S7 hits on the nose.
- Psyker Touring Bus: The psyker battle choir turns a Chimera into a close support Basilisk - adding a 36" S9 template to the mix. That said, for the price I'd rather have a leman russ... but the 36" 'I'm gonna screw with your leadership and give you the willies...' skill is pretty damn cool - especially for routing jetbiking seer councils 3D6.
- Primaris Psyker Toy: 2D6 24" S6 shots ain't to be sneered at, combine this with a command squad with 4 grenade launchers, or a meltagun in the mix and you've got a brilliant (and cheap) objective grabber. They may be a command squad, but they're troops none-the-less and with 14 S6 shots and 3 S4 (heavy stubber) plus a heavy flamer when needed - they WILL TAKE THAT HILL DAMMIT!
- Veterans Armoured Fist: The only armoured fist you can now recreate (and a much improved one too) is the veteran squad. Melta should maybe be deployed in Vendettas and Valks, but the Chug will suffice for grenade and heavy flamer objective takers. For a real treat, have Harkers squad picked up from a flank in a Chug for an Assault 3 Heavy Bolter and three special weapons on top of the multilaser shots... nice.
The chimera offers a plethora of lethal combinations that make it still one of the most viable and durable tanks in the game. The bargain price has made it a serious contender... plus in my experience ... Chugs are lucky - I've had one survive a close encounter with a Carnifex AND face down a wraithlord twice ... they are especially useful against Eldar as brightlances bring everything down to AV12 - so bring AV12. At 55 pts you can buy 4 Chugs for 1 well built demolisher, which makes choices tricky.
So lets here it for the Chug - How do you feel about the ubiquitous transport?
Thursday, 3 September 2009
Learning to be Sporty 1 ... 2 ... 3
 Ever feel like this??
I thoroughly enjoyed Jawaballs exposition on sportsmanship ... but it got me thinking. Was I always sporting? In my most recent game, my Tau were mightily tabled by ... another Tau army.
Despite using the blog for a bit of a whinge (making a mockery of my skyray indeed!), I feel that I did play the game with a certain 'C'est la Vie!' attitude, and fully recognised that I didn't turn up with a coherent battle plan, 'boxed' myself in, and reserved my best unit - doh! I am also the first to point out that my opponent is an experienced and very good Tau player and has 'seen it before', he knows his tactics well - so it was an important learning experience.
But I haven't always been able to play like that...
To explain, I'm one of a pair of twins. Twins are generally of two sorts. Either the wear the same clothes, finish eachother sentences, marry to same woman kind - or the other kind. The competitive sort.
Take sibling rivalry, start at birth, times ten to the power of age - you get the idea.
As a child, my 'successes' were always based around winning ... something (just playing and creating stuff played huge parts as well, but we're focusing on Sportsmanship here peeps!). As such, individual sports became preferable to team ones, and board games (and Warhammer at the age of 12) became to Loci of some serious rules bashing.
Needless to say, all the 'bad behaviour' exampled above, of 'accidentally' mismeasuring, over moving, making the 'impossible' charge and being 'unsportsmanshiplike' for your opponent all happened. It led to a lot of fights and arguments between me and the bro. And I'm embaressed to say, not just when we were 12 ... but when we were 30 too!
You've all been there. You come to the table with the best of intentions. This battle will be different. Then he starts 'misjudging' distance, you get frustrated because your 'battle plan' and his 'cheating' are screwing you over. You start 'tightening up' on movement, measurement and rules. He gets irritated by your lack of trust and then you're having an argument over you 'watching him' ...
Been there? Many times...
So what changed. Well, firstly I learnt a lot through teaching my other half, Kim, how to play. She learnt W40k, and it was such a joy to play with her, I actually forgot to win - repeatedly. However, I loved every game. I then went on to teach her whole family (Mother, Father, Brother, Danish Sister-in-Law) and the responsibility taught me a little of how playing the game was more important than winning.
In a small way, I adopted a playing style from Dustin at GiftsforGeeks which is that every 'bad' roll you make, or bad bit of luck that's going against you is simply adding to the Karma pot for later in the game. This Jedi-mind-trick is very helpful in distancing you from the losses, and helped me focus on the objectives. And you know what, the number of times I've rolled say 6 hits from 24 dice on a 4+ to hit, only to have every single dice wound on a 5+ ... needless to say - watch for the Karma.
On a personal side, my game was actually improving dramatically as I focused more on playing well and less on 'HAVING TO WIN'. Meanwhile, I was frustrated that my now 'occassional' games with the bro were still degenerating into anarchy and snappingly snide recriminations. It seemed like we were locked in, despite my changes. I felt a bit like he still wanted to engage me in a 'head-to-head' and despite my desire not to, there were too many buttons to push, too many mismeasurements. And despite (or maybe because of) all this, I was winning, which didn't help matters. So instead of having enjoyable games, I was getting shouted at for tabling him.
Needless to say, my helpful advice on relaxing, sportsmanship and gameplay wasn't appreciated ... at all.
The next stage of the development was Apocalypse. 8 players fielding 2000 pts was total confusion, total carnage. In my first game, I lost many men through dice rolls I never witnessed and movement was really an irrelevance (as the board was over a mile long ... no really!) - something snapped inside me, my desire to control the game... Needless to say I love the game, and thoroughly enjoyed being a small part in the calamity that followed.
It took 3 such APOC games to actually get a decent game and win something... but I was having so much fun.
So I'm playing 'friends' mostly now, not family (although Kim and I still kick out a game sometimes) and I am 'converting' other mates to the 'small plastic men' sport.
I'm a bigger fan of W40k than ever now - I thoroughly enjoy it, it is my major hobby - and importantly, its taught me a lot.
A lot about being a sportsman.
What's next? I'd like to try a tournament. Since I've now improved my ability to take a spanking well, I'd like to get spanked 6 times in a day! Ohh ... kinky!
Subscribe to:
Posts (Atom)