
"They're coming out the walls!" Special 40k Scenario
The Inspiration for this scenario is two fold. Firstly, like many of my generation, the scene in Aliens were the motion detector goes awol still sends a tingle down my spine as I anticipate through felinic uncurling of alien bodies and the ensuing maelstrom.
Also, when Dev and I were 12, we bought Advanced Space Crusade. And despite some interesting rules and 12 sided dice - the pressure and anticipation of seeing that horde of 'blips' surround your bedded in location triggered the same response.
You could almost feel the sweat dripping off the space marine scouts brow as he concentrated his firearm on the mucous laden organic retractable corridor. Awaiting an unknown foe.
It was that frisson, that air of anticipation that I want to evoke with the following Scenario.
"They're Everywhere!" Scenario Rules
"We have secured the outer marker and the base is in good order. Due to the topography of the valley, radio communications are impossible despite the best efforts of our cogboys. I have dispatched 3 squads from 5th platoon to take high band radio relays to the valley ridge in order to resume communication with command. We have lost contact with the outlying teams, which is concerning. I am hearing reports that the motion detector system is picking up erroneous fauna in the area, but I am suspicious. We are too isolated here and too exposed. I am giving Lieutenant Godfrey his command of the remainder of 5th platoon and told his to make best time towards the hive. Hopefully, its nothing."
Last Report from Brigadier General Mournay, 18th Genswick Rifles.
Both player choose an army from their codex of choice. We recommend a force no larger than 1000 pts a side (for reasons which will become clear later). Before you choose your army decide who will be the attacker and who will be the defender.
Game Note: Normal rules for Deep Strike and Infiltration are not available in this scenario.
Attacker Restrictions: Beyond the required HQ purchase and 2 troops selection, 2/3rd of the army choices must come from the troops section of your list. Only 1/3rd of points can be allocated to elite, heavy or fast attack options. It should be noted that no squad purchased can number greater than 15 models. Remember that both Deep strike and Infiltration are not available in this scenario (although jump troops are, for the attacker).
Defender Restrictions: The Defender may choose any forces from his army list beyond his required listing. All unt types are available in line with the codex. However the following exemption overrules: the only scoring unit is a normal troops choice infantry unit. Jetbikes, fast vehicles, jumppack troops, beasts and leaping troops are available, but cannot score a victory by leaving the 'Safe Edge'.
Example: A Tyranid defender takes a horde of 15 Gaunts and 15 Hormagaunts. The Gaunts are therefore scoring units, the Hormagaunts are leaping (12" move) and are therefore not scoting units.
Divide your forces: The defender must send at least 50% of the points in his army towards the safe zone.
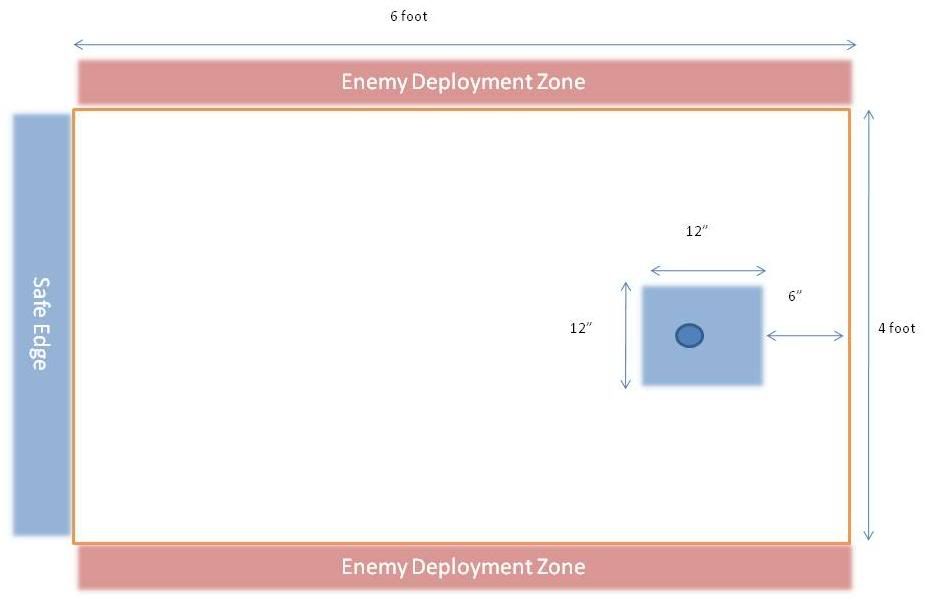
Gaming Board: The board measures 6' x 4' with the defender deploying in a 12" box centred at one end, 18" from either long edge and 6" from the shortest edge. An objective is also placed in this 12" square (and also a defendable structure or series of structures). The deployment of other scenery is taken from Cities of Death rulebook. Scenery should be deployed fairly across the area. There will be no roads.
Deployment: The Defender deploys his models within the deployment zone. The attacker does not deploy his models. The attacking players models will be introduced using the reserves rule with the exception of the HQ and two core troops choices.
'Blips' and their use: When the attacking player deploys, for each squad (or combat squad for Space Marines) he deploys a blip. I would recommend using a troops based model, genestealer or the like with a number written underneath.
For every 'actual' blip added roll a dice:#
1-3 Machine blessing, the auspex is working strongly, 1 erroneous blip added
4-5 Scrmabled signal, 2 erroneous blips added
6 Corrupt Data, 3 erroneous blips added
Revealing Blips: Any blip model will stay a blip until it can be sighted by line of sight of any defending model in the Defenders shooting phase. Once the blip model is sighted, it is turned over and revealed for what it actually is. Only the attacking player knows which blips are real, if he forgets its his fault! The attacking player can choose to reveal a blip at any time. He may choose to do so in order to gain extra movement or charge bonus, fire on the enemy etc. Jump troops or equivilent have to be revealed in order to gain their additional movement.
Example: The Space Marine player has deployed his assault marines 'blip' onto the board. The Imperial Guard player has a squad within 18" of the 'safe zone'. The Space Marine player opts to sacrifice his annomimity is excahnge for 13"+ movement and the chance to catch those Guardsmen.
"Damn you machine!": Whenever a real blip is revealed (whether through the actions of the defender or the attacker) turn over the two closest erroneous blips to the defender - the auspex just confirmed the source. If either of these blips turns out to be a squad deploy them as usual. Do not turn over any further blips for this revealed squad - auspexes have limits.
Auspexes and Psykers: Auspexes and Psykers will automatically reveal any blip within 12".
Notes on blip movement: until a blip is revealed a blip can move 6" in any direction regardless of terrain. It can move through difficult terrain with no consideration to entryways and even walk straight through impassable terrain. As such, blips can take up 'ambush' positions.
Reserves Rolls: when making the attacking players reserve rolls, take a piece of paper for each squad. Write a number on the paper (that connects it to a 'blip') either write the unit name inside the folded paper token, or have a numbered list. Each turn roll a dice for every squad, under the normal reserves roll rules. For every successful roll randomly draw a piece of paper from the bucket/hat etc. That number is then active and the 'blip' along with two other empty blips are deployed. If you roll a 6 for a reserve roll on a blip then roll a further dice. On the roll of 4+ that squad can be deployed via infiltration (although all normal rules apply), the downside is that it will be deployed on it's own with no erroneous blips.
Game Objectives: Each player is considered to have an objective marker. The defending player can 'win' the attackers objective by evacuating a scoring infantry troops model across the 'Safe Zone'. The attacker can 'win' or 'contest' the defenders objective marker located within the bunker complex in his deployment zone.
Turn One: The attacker goes first, the ambush is sprung. This best balances reinforcement rolls.